Featured Post

Beolover SyncDrive: DC Platter Motor Replacement for Beogram 4002 and 4004 (Type 551x and 552x)

Late Beogram 4002 and the 4004 (Types 551x and 552x), which have DC platter motors instead of the earlier synchronous AC motors usually suff...

Showing posts with label encoder. Show all posts

Wednesday, September 21, 2016

Beogram 4002 (5501): Replacement of End Groove Detection Light Bulb with an LED

After restoring the RPM trimmer panel of the Beogram 4002 (5501) that I am rebuilding right now, it was time to look into the not working end groove detection mechanism. This mechanism is an exciting part of this design. It uses a light bulb and a photoresistor in conjunction with an encoder wheel doubling as pulley to detect the moment when the carriage starts moving faster after the last track of a record is over. This allows cutting short the time it takes until the arm returns to the home position on records that have a wide end groove section (such as many 12" singles or some short playtime LPs).

This shows the setup:
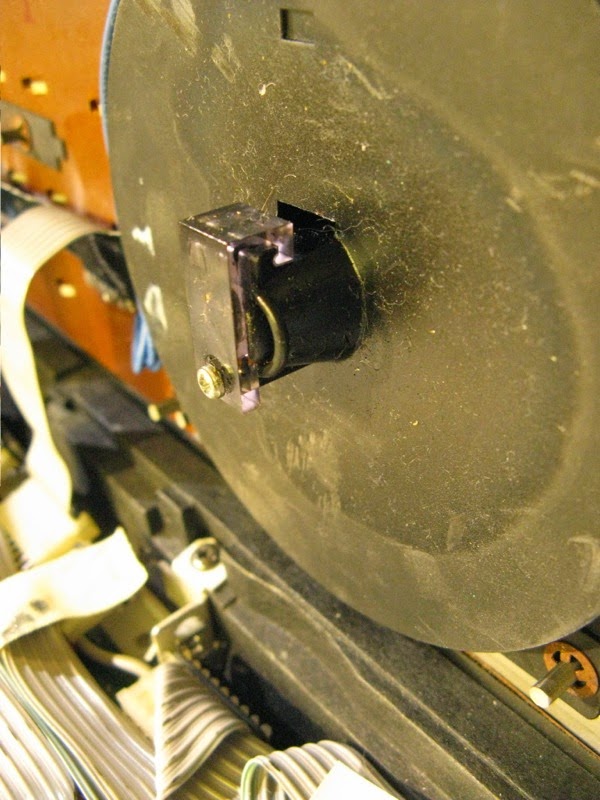
The bulb illuminates small holes that are in the pulley that is driven by the carriage motor. The light sensor is located on the other side of the spindle bearing. Unfortunately, the light bulb fixture of this Beogram had a broken off tab requiring some tape to hold it in place. Here is a picture of the bulb assembly pulled from the bearing unit:
The tab goes into the groove on top of the pulley bearing assembly. The back part of the tab is missing. You can also see very nicely the crack in the pulley. Nick is already working on a redesign of his standard aluminum pulley for the 4002 to add the small holes necessary for the end groove detection mechanism to work. Thanks Nick!

Naturally, this was not a Beolover acceptable state of affairs and so I designed a replacement part upgrading the system with an LED.

Here are a few impressions. This is the finalized component holding an amber high intensity LED (Newark 78R6602) and a 2k resistor (Newark 26R3983) reducing the current to below spec level of the LED. The resistor sits in a small holder on the left side to keep things neat and tidy:
This shows it illuminated at 23V:
And installed:
It press-fits right on top of the pulley bearing assembly
This shows it in action after the end groove circuit is activated via a carriage position switch:
I tested it and it seems to work great.

Here is an explanation how the end groove detection system works:
This shows the relevant section of the circuit diagram:
0IL1 is the LED. The switch 8009021 is the second carriage position switch on the B-rail:

Once 0IL1 comes on, the holes on the pulley begin to illuminate OR2. This causes voltage fluctuations across 1C35 which briefly turn off TR21. This applies a brief voltage pulse to C33 via D31 and R90. Hence, every time a hole of the pulley comes in between 0IL1 and OR2 a small amount of charge is put into C33. Therefore, over time the voltage on C33 increases proportionally to that charge. Once the voltage is high enough, TR20 turns on. TR20 is connected in parallel to the end switch ("ES", A), i.e. to the control system a TR20 in "ON" condition looks like ES was triggered and the arm lifts and the carriage returns home.

You may wonder, "what happens when the lamp turns on, but the needle is still on the last track of the record, and a pulley hole comes by and C33 charges up?" This is why D30 and R91 were added to the circuit as a (competing) path to discharge C33. R91 essentially determines the time it takes to discharge C33, and it was adjusted to discharge it fast enough to compensate for the charge build-up when the pulley only moves slowly when a track is played. In the end groove, however, the carriage moves much faster, and so the pulley holes come by more often, which overwhelms R91, and so the voltage can build up on C33, finally triggering the ES process.

If TR20 is not triggered due to a malfunction of the end groove detection system (dead bulb, for example), the arm will go all the way to the end of the end grove and then ES will be triggered by the carriage and save the day. All the end groove detection system does is to spare the user the wait until the arm goes all the way to the end (and to listen to the static from the groove). A typical B&O approach. Why not make it more perfect if you can?? This is Beolove!


Friday, February 26, 2016

Beogram 8002: Strange Behavior - After PLAY Arm Just Moves 2 cm, Then Stops

A Beogram 8002 from Australia arrived for some TLC. The problem at hand was that after pressing PLAY the arm just traveled in for about 2 cm and then it stopped. While this was very reproducible on my bench the previous experience was more intermittent in that sometimes the deck would start playing normally, but then after a few minutes it would suddenly stop. 

I opened the deck up and my first guess was rotary encoder trouble. If the encoder on the carriage spindle does not work properly, the normal response of the control system is to stop playing after about 2 sec. And 2 sec is about the time it takes to travel 2 cm. This shows the relevant sections of the circuit diagram:


The rotary encoder section is in the top left quadrant. The IR diode (OPE1) is powered via the 5V rail and a 150R resistor. This results in about 1.3V at the diode. When I measured I got 5V, indicating that no current is flowing through R1, meaning that the diode had gone open circuit. This is the typical failure mode of these devices.
This shows the rotary encoder assembly removed from the aperture wheel section:
The bottom unit is the IR diode, the upper two units are the two photo diodes. Their voltages are fed into IC1/IC2 and after amplification are fed into processor pins 28/29 ("Slide Tacho"). When this signal is flat while moving the carriage (slide) the processor stops the movement after 2 sec. I replaced the IR emitter with a Optek OP240, which can be had in the same package as the original unit:
This restored the 1.3V at the diode and I was now able to measure the proper encoder signal at plug 6 Pin 13/14, but the problem did not go away. Frustrating!

My initial guess was that the encoder signal did not arrive at the processor pins. So I removed the PCB, opened up the processor EMI can and ran the unit, while measuring directly at the processor pins. Micro grabber jumper cables are really nice for such measurements! Here is an impression:
Well...the signal arrived at the processor. And I also noticed during these experiments that the deck would sometimes work, especially when freshly plugged in! The plot thickened! Working on B&O vintage units for some time now, I immediately put my money (I lost...;-) on a cracked solder joint or a hair line fracture in the PCB. So I set out to re-solder all relevant connections. Here is an impression of the processor board, solder side:
Well, al this effort did not fix the problem!
So I hooked up my oscilloscope and watched the relevant signals on the processor inputs as the issue unfolded. Finally, when monitoring pin 31 ("lift manual") I got these traces:
the green and yellow ones are the encoder signals on 28/29. The red one is the signal at pin 27 (<<), which essentially controls the carriage servo. The blue line is the signal on pin 31. And what we see is that the signal on this pin increases, and at about 3.5V (which is about where a logic HIGH starts on 5V systems) pin 27 caves turning the servo off, causing the carriage to stop as we see from the petering out signals on the encoder diodes.
This immediately suggested that something gave the processor the impression that the arm needs to be lifted and the carriage stopped.

Considering the relevant sections of the circuit diagram, it was clear to me that somehow the signal on the input opamp IC2 (same opamp package as the IC2 that amplifies one of the encoder diodes) that is hooked up to pin 31 must go high. The only way that this can happen is when the resistance of the photoresistors R9 or R10 in the << >> control housing gets too large without pressing one of the <</>> buttons. The way this control system works is that when these buttons are pressed an aperture is driven in between the light bulb IL1 and the either R9 or R10. This gradually increases their resistance, thereby raising the voltage at the corresponding IC2 turning on the carriage servo OM1 in either forward or reverse direction. While this happens the motor control signal is also fed into the opamp that connects to pin 31 via diodes D5/D6. 
All this suggested that one of the photoresistors increased its resistance by itself without pressing one of the << >> buttons. The service manual prescribes that the voltage at the resistors as measured at plug 5 pins 4 or 6 needs to be 0.61V when the buttons are not pressed. I measured 1.2V at pin 6 and 0.6 at pin 4. My first response to that was trying to adjust the screws that are in the housing allowing the reduction of the light that falls on the resistors. But I was not able to get the voltage below 1.2V. And that suggested that the photo resistor was either the wrong type or broken. This also explained the 2 sec delay before the deck would shut off, since these resistors are temperature sensitive, i.e. the lamp would heat up the resistors and the bad/wrong one then crossed the threshold at which the opamp started triggering pin 31.

I took the control panel out:
The two screws on the bulb housing are used to adjust the light intensity that arrives on the photoresistors. Then I removed the PCB from the front panel. Here is a look at the panel backside:
This shows one of the photoresistors. 

They are mounted in compartments on either side of the light bulb. Here is a picture with the bulb illuminated.
I measured the resistance on the photoresists on the 'good side' of the assembly. I found about 20k when the button was not pressed. The other side had about 75k, and there was no way to get that down.
Since the manual does not specify what type of photoresistor they used for this assembly, I needed to experiment a bit. So I bought a bunch of photoresistors with different resistances for a 'shootout'. 

A few days later, I received six different types, and I measured their resistance in the cavity with the light bulb on. I finally settled on GL5549, which is widely available on ebay. It is specified to have a dark resistance of 10M and 100-200 under illumination. But that seems to be a fairly weak light intensity. In the Beogram assembly it showed 20k with the aperture fully opened. 
While in there I decided to also replace the light bulb with a white LED (Newark 14N9428) to ensure better long term stability. I used a 1k resistor to limit the current. Here is an impression:
This shows the backside:
After verifying that the light intensity was high enough to yield the 0.61V I put everything back together, adjusted the brightness screws on the bulb housing to get the 0.61V on both sides and then fired up the deck. And it was back in business. So this appears to be fixed!


Wednesday, December 2, 2015

Beogram 8000: Replacing the Carriage Belt

Another loose end in the Beogram 8000 that I am readying for shipping I needed to attend to: I earlier noticed that the carriage belt was quite loose, i.e. at the end of its lifetime. On the occasion of my recent effort to replace a cracked BUNA-N volume belt in a Beomaster 6000 I ordered samples of the entire lineup of EPDM 1/16 O-rings at the O-Ring Store with the goal to be ready for future belt replacements of yet unknown diameters. So I thought I probably had the proper EPDM ring for the Beogram 8000 already in stock! And indeed: It turned out that the E70025 (1-3/16" diameter) ring made a good replacement of the original belt. Here are a couple of impressions:

This shows the original belt with rotary encoder sensor cluster removed (just pull the plastic clamp out and carefully pull the board up while making sure that the IR emitter passes through a gap in the encoder wheel), which is necessary to get the belts over the encoder wheel:

And here after installing the new belt:

It is interesting to note that my first attempt with a 1-1/16" belt did not work out. When I checked initially the carriage would move very well with it. However after attempting to play a record, it turned out that the Beogram would have trouble to move the arm to the run-in groove.

What happened was that the firmware in the microcontroller reduces the power on the carriage motor before the touch-down point to get a more precise positioning (and probably also because it just looks more elegant...;-). However this is apparently not done via encoder feedback but rather via a blind  flight power reduction without monitoring the encoder action. This resulted in a very slow movement of the arm do to the unexpected friction caused by the too-tight belt. It would take several seconds from moving swiftly near the position and then via a very slow final movement to the touch-down position. Replacing the ring with the 1-3/16 version cured this issue and now it behaves like with the original ring. All good now under the hood! Playing right now my just arrived 180g reissue of Queen's 'A Day at the Races' - those were the days!...;-)


Saturday, October 31, 2015

Beomaster 8000: Volume Encoder Damping Restoration - The Final Answer

The Beomaster 8000 that is currently on my bench had lost all damping of the volume rotary encoder wheel. This issue is more than a cosmetic one, since damage can occur to the speakers if they are not dimensioned properly if someone accidentally spins the volume encoder up to 6.0. Without damping this can easily happen if attention is not being paid. Up to now I used a method to restore the damping that was based on a 3D printed paddlewheel that I clamped on the back of the encoder shaft and then filled the cavity with a high viscosity damping grease. While this worked fairly well, I always had the feeling I was on the wrong track with this. So yesterday, I finally took the plunge and opened up the volume encoder to have a look under the hood with the goal to understand how the original damping had been done. After taking out the encoder sensor assembly I cut the retaining clips off with a wire cutter (unfortunately this seems to be the only way to get them off) and removed the encoder:

It is held by four adhesive strips and I needed to use a screwdriver to lift it up one corner at a time. Once I had it out I thought what a beautiful big design compared to today's encoders...Anyway, once the encoder is off, one can simply pull out the wheel from its precision sleeve bearing:

And after I saw this everything was clear: The original damping was simply done by putting some damping grease on the shaft and then inserting it back into the bearing. Due to the fairly tight fit this creates a nice damping effect. Unfortunately, over time this grease is entropically driven out of the bearing, and the damping effect wanes gradually. I put some Nyogel 767A on the shaft

And inserted the wheel into its bearing and the wheel was damped again. I put the encoder assembly back onto its posts and clamped it down with new 3mm retaining clips and nylon washers to protect the encoder housing in case it needs to be opened up again in another 20 years for a re-greasing:

Then I adjusted the plexiglass clamp in the back to ensure scraping free operation while being flush with the surface of the Beomaster keypad. I guess the evolution of my fix to this issue is another example of live-and-learn. I should have taken one apart much earlier...;-).


Thursday, October 8, 2015

Beogram 8000: Not Responding to Keyboard Input - Not Working Rotary Encoder Feedback

A Beogram 8000 hailed from Tokyo in search for some TLC. It was initially purchased from ebay and supposed to be in excellent condition. Once unboxed, however, it turned out that the unit did not work properly. There is already an extensive thread on Beoworld.org about the issues this unit displayed. In a nutshell, when pressing start the arm would run to the end of its range and then be stuck.
Yesterday, I opened the unit up and had a look. I immediately suspected a fault with the rotary encoder that is fitted to the spindle that drives the carriage with the arms. In difference to the earlier 400x models, the 800x employ a more modern positioning concept that is based on detecting the angular motion of the spindle and calculating the carriage position from that. This is a concept that is used in most modern control systems involving motors. The encoder unit is very similar to the ones used in the Beomaster 8000 for the volume and FM frequency wheels.
In the Beogram 8000 the evaluation of the encoder signals is done by the microcontroller, which has two inputs that detect the intensity fluctuations on two sensors. The fluctuations are generated via an aperture wheel that sits between the detectors and the IR emitter. Depending on the phase of the fluctuations on the two detectors relative to each other the system can detect the direction of the motion. The number of intensity oscillations tell the traveled distance. This way, the microcontroller always knows where the needle is. This 'feedback' is used to determine where to set down the arm, when it is time to lift and return home etc...
Therefore, when there is no feedback, the controller does not know anymore where the arm is. The firmware seems to be programmed with simple if...then conditionals that cause action depending on the position. If the position does not change in the mind of the controller (in the case of a non-working encoder system) the arm simply continues to travel until it hits the mechanical stop at the end.

All this suggested to me that I needed to investigate the encoder system to get to the bottom of the issue at hand. Below is the relevant section of the circuit diagram. Since I had similar problems already a couple times with Beomaster 8000s that I restored, I first checked on the functionality of the light detectors and the IR diode (OPE1). In the Beomasters the diodes had failed.

With the multimeter I determined 1.2V at the anode of the diode and this told me that it most likely was o.k. (they usually die by going OC). Then I measured the resistance on the photoresistors. They both showed about 1k when shining a strong LED light into the assembly and about 20-40k when just room light trickled into the setup. This seemed o.k., too. 

So I hooked up my oscilloscope and measured at the P2/6 and P2/4 whether I got pulses when manually turning the spindle. Of course the deck needs to be in PLAY mode or another on state to have things powered up. I had it in PLAY with the carriage belt removed, so the motor simply ran but the spindle did not move. This measurement yielded pulses for both encoder channels. The next step was checking the outputs of the opamps. And there I found a first clue to the problem: IC2 had no pulses at the output, while IC1 gave me nice 5V square pulses.
So I had a look at the PCB, and there it was:

The input of IC2 was short circuited to GND. In the above photo that is the IC pin that is associated with R5. It connects to the adjacent GND pad on the left via a gigantic solder ball. In fact if you look at the entire area it is apparent that someone with very little practice in electronics messed around and did some 'expert work'. Another great example of a 'perfect condition' or 'fully restored' ebay unit....(I hope this guy will smolder for a long time in Vintage Hifi Purgatory when his time comes).

Grounding the IC2 input of course results in a zero output signal since then there is nothing to amplify, and that explained my measurement. I fired up my Hakko desoldering gun and removed the solder from the pads and then resoldered them:

And this did the trick. The unit is working again. I put on my least favorite record (Sam Rivers) that I use for this type of testing, and pressed PLAY. The arm moved to the lead-in groove and lowered. Cueing worked and STOP. Very good!


Wednesday, January 21, 2015

Beomaster 8000: Volume Wheel (Encoder) Damping - 3D Printed Paddle Wheel

This is a follow up to my last blog entry about restoring the damping of the Beomaster 8000 volume wheel rotation. Often, the volume encoder looses all its damping over time, which can create an unpleasant situation when someone uninitiated to the issue accidentally cranks up the volume to 6.0 because the volume wheel does not stop spinning.
My latest solution involves a 3D printed 'paddle wheel' that press-fits on the volume encoder shaft. Together with a more heavy duty high viscosity damping grease, the Nyogel 767A a very smooth purely viscous damping effect can be achieved. I made a short video about the new part and its installation:


Here is a better picture of the part (printed with a Form 1 stereolithography printer):


Saturday, September 27, 2014

Beomaster 8000: Volume Wheel (Encoder) Damping - The Video

I really like my Beomaster 8000 with yesterday's volume wheel damping update! So I decided to implement the same approach in the 8000 that will go to Australia next week. Can't let it go less than perfect!...;-). I used this opportunity to make a short video about the procedure. Enjoy!


Friday, September 26, 2014

Beomaster 8000: Volume Wheel (Encoder) Damping - Better Solution

*********Note: There is an update to this entry where a 3D printed part is used as paddle wheel to increase the interaction with the damping grease*****************************************


I was not really happy with my recent Beomaster 8000 volume encoder damping restoration effort. So I tried a few more things on one of my own 8000s. I realized that the original damping must have been a very heavy damping grease to achieve a sensible damping of the volume wheel. I ordered a sample kit of damping greases from Nye. I tried out their highest viscosity type, 868VH, but this still did not yield a damping as strong as I would have liked it.

After some deliberation, I realized that torque is the issue, and I decided to increase the radius of the encoder shaft for a higher damping force. I found a piece of 3 mm silicone sheet in my stash, and I drilled a 3 mm hole into it, and then cut around it:


The irregular shape results in some added turbulence in the grease. When installed the piece spun freely on the encoder axis, i.e. did not rub significantly on the grease well housing. This ensured a smooth rotation-feel of the encoder, only damped by the viscosity of the grease.

Here are the pics after installing the silicone piece and adding the Nye 868VH damping grease:


I pushed the grease in with a toothpick. Then I installed the cover and wiped the excess grease off:


It is important to adjust the screw properly to hold the wheel in a position flush to the panel surface when it is installed horizontally. Make sure that the wheel does not scrape the housing when turned. The above procedure yielded a damping which reduced spin to about 0.5 rotation when giving it a pretty hard spin. Let's see how this repair fares over time....


Thursday, September 18, 2014

Beomaster 8000: Frequency Dial Not Working

Today one of my friends came over with his Beomaster 8000 in his arms...I restored this one a few years ago, so I felt responsible. The nice bottle of Napa cabernet that came with the Beomaster also helped...;-).

So I put it on the bench and opened it up. A quick test whether the infrared LED in the encoder is toast is by shining a flashlight into the encoder to temporarily 'replace' the LED. The IR receivers in the encoders are somewhat sensitive to white light, i.e. they work with a strong LED flashlight. If the encoder works with the flashlight, the LED is toast (see my entry about fixing these LEDs: http://beolover.blogspot.com/2012/07/beomaster-volume-encoder-repair.html)

In this case the flashlight did not do anything....so I checked the encoder outputs on plug P79. There I got the proper 5V square waves, i.e. the encoder was working.

The next step was to measure the signal at the Schmitt trigger (HEF40196B, 9IC7). The signal arrived there...so on to 9IC3, the master microcontroller. And bingo: no signal at pins 13 and 14. This meant that in both A/B signal paths from the encoder the vias died...

It occurred to me that back then when I fixed this Beomaster up, I did not yet routinely rework the vias on the microprocessor board (PCB #9) when restoring the 8000.
So, I re-soldered all the vias on the board (I assumed the others were probably also close to no-contact...), and everything was fine!

Saturday, September 6, 2014

Beomaster 8000: Volume Wheel (Encoder) Damping

********This is a historic post. Please, Check here for an updated procedure.******************

After the displays were back in the Beomaster 8000, I remembered that the volume encoder wheel had lost all its damping. The picture below shows the backside of the encoder housing (this is actually from another Beomaster, I forgot to take a pic of the assembled feature). Together with the plastic 'clamp' an O-ring seals a compartment where a viscous material can be inserted to dampen the rotation of the encoder. In the case of volume adjustment, this is desired to avoid any accidental 'dial-up' of the volume by the inertia of the fairly heavy metal wheel (think having a party with many happy people interested in your Beomaster...;-).


Geoff at Beoworld.org recently told me that he fixed the damping by putting in some high viscosity grease into the compartment, which worked great. So, I put in Silicone grease (which is the least problematic grease in terms of 'interaction with other materials', i.e. one can expect it to be inert in most settings). Here is a pic:


I also needed to replace the O-Ring. I used a Buna Nitrile 1/2"ID X 5/8"OD X 1/16"CS ring from theoringstore.com, which seemed to have about the dimensions of the old deformed ring.

This procedure resulted in a fairly well damped encoder.

Time to put the Beomaster back together!

Thursday, July 19, 2012

Beomaster Volume Encoder Repair

I finally got around to looking into the not-working volume wheel (encoder). I put a strong LED flashlight on it, and it worked. This told me that the IR emitter in the encoder pickup must have died. A voltage measurement across the diode confirmed this suspicion. The entire 5V showed on the meter, indicating that no current flows through the limiter resistor.
I replaced the emitter with a "OPTEK TECHNOLOGY - OP240A - IR EMITTER 890NM 0.76MM SIDE LOOKING" from Newark (08F2957). The device has exactly the same package as the original defective unit and pops right in. It has a wavelength of 890 nm and a 1.8V voltage drop. The encoder works now like new.