Featured Post

Beolover SyncDrive: DC Platter Motor Replacement for Beogram 4002 and 4004 (Type 551x and 552x)

Late Beogram 4002 and the 4004 (Types 551x and 552x), which have DC platter motors instead of the earlier synchronous AC motors usually suff...

Showing posts with label hood. Show all posts

Sunday, May 4, 2025

Beogram 8002: Re-Assembly and a Joyful Test Spin with Manfredo Fest

I recently performed a functional restoration of a Beogram 8002 that I had received from a customer in California. This Beogram was in pretty decent cosmetic condition overall, but had a fairly scratched hood. Luckily, the dksoundparts store has new reproduction hoods that look very identical to the original ones. The only issue is that the original aluminum hood trim needs to be transferred if one wants to retain the original B&O labeling. Dksoundparts only offers a generic trim strip for fear of lawyer letters from B&O's suit wearing set. Luckily Co-Beolover Beomazed figured out how to remove the original trim from an original hood without damaging it! 

So, while I was playing the restored Beogram in 'service position' to see if it had any intermittent issues left to cure, I sent the hood to Beomazed and he transferred the trim. This post discusses how he did it. It is a pretty challenging and tedious procedure (and of course involving the heavy use of a Dremel tool!!...;-).

He did an awesome job! The trim did not suffer at all and the new hood looks absolutely pristine!

So when I received it back I re-assembled the deck with the new hood. Here are a few impressions:


Very beautiful! Time for a test spin with Manfredo Fest! I recently discovered this interesting Brazilian keyboarder and composer. It is difficult to find his original vinyls, so I bought a re-issue of his possibly most known record, "Brazilian Dorian Dreams" which was initially released in 1976 on T&M Productions. The re-issue is from the British label Far Out Recordings (FARO219LP). It sounds pretty god in my opinion and the pressing is of high quality with only few clicks and pops. It is available via Amazon in the US. The title song Brazilian Dorian Dreams was an equally educational and joyful experience to me. It is written in the Dorian scale, which I had never experienced before, I think. It gives the track a remarkable sound, which I seem to enjoy very much. The wonderful voice of the vocalist Roberta Davis is probably not hurting this experience either! Check it out, it is definitely worth it! The album is on Spotify for a quick discovery.
Here are a few shots of this magnificent record playing on this fully restored Beogram 8002:

Very Beolovely! I will now play a few more records and then it should be time to return this nice Beogram 8002 to its owner!


Sunday, April 13, 2025

Beogram 8002 Hood Replacement

 The Beolover recently received a Beogram 8002 from a customer in California. As part of the restoration, the customer elected to have the hood replaced with a new one. Luckily, these hoods are now available from the Beoparts store.

The main issue with the reproduction hoods is that you don't get the original trim strip that has the model designation. Beoparts does offer a replacement trim, but it's not an exact match for the original (the original varied over time also, some are brown, some are black), so the best solution is to try to preserve the original.

This is the condition of the original hood, it shows the typical wear and tear:


A lot of that damage could be avoided in the future by using softer cleaning solutions such as a damp microfiber cloth. Windex and paper towels are abrasive to plexiglass.

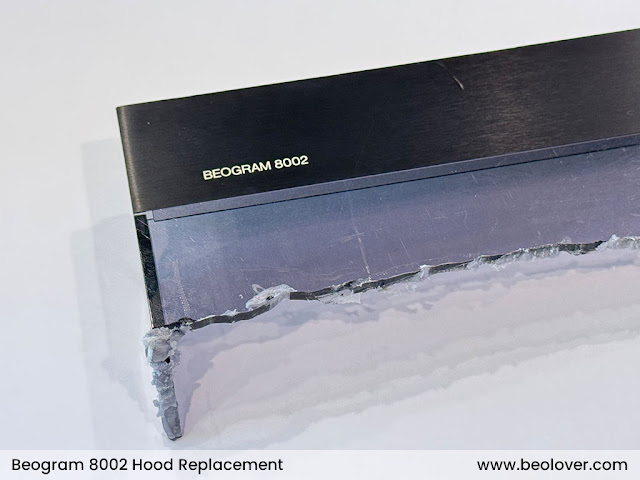
Believe it or not, the photo below depicts the first step in the process I use to extract the original trim. It took several attempts to get this process perfected, I wouldn't recommend it unless you have spare hoods!


The reason for cutting the hood like this is that it's too difficult to work with the large hood and its structural rigidity causes more stress on the trim piece. When cut down to this size, the hood is more flexible and can flex away from the trim, without bending the trim. I apply heat for an extended period of time to loosen the glue and I am then able to pull them apart:


The back side has a layer of glue which must be removed, the X-acto #17 is perfect for this:

Back is pristine, ready to be glued down to the new hood:

The front looks great, has a minor scratch:


I then use masking tape and paper to protect the surfaces while spraying high bonding strength adhesive on the back side of the trim and top of the new hood:


Here's a peek at the final product, which the Beolover will be completing very soon:


Saturday, March 1, 2025

Beogram 4000: Installing a New Carriage Motor and a New Hood

Yesterday, I finally received the first batch of my new custom manufactured Beolover Carriage Motors for Beogram 4000, 4002, and 4004. They are a direct drop-in replacement for the original motors, which also suffer from dry oilite bearings, similar to the DC platter motors of the later Beogram 4002 and 4004.

Unfortunately, these motors cannot be opened up very easily for oil infusion of the bearings and therefore I had a suitable replacement motor designed. Since they use modern coreless technology they draw less current than the original motors at the same mechanical performance. This is great news for the often failing power transistors in the H-bridge of the carriage drive. They also vibrate less. Read about the motors here, where I describe my tests of these motors in comparison with an original motor.

This was good news for the Beogram 4000 from Australia that I recently restored. My customer had opted for upgrading his carriage motor and so this project was on hold until I would receive the motors. This shows the original motor still installed:

I extracted the motor:
This shows the upper half of the housing removed and the new motor for comparison:
The new motor is slightly shorter and so the leads can conveniently be fed through the bottom cutout of the housing:
This shows the new Beolover motor installed:
I positioned the motor inside the housing making sure the carriage belt sat straight between the two pulleys. This is easily done since the motor is held in place by two vibration insulating EPDM rubber rings, i.e. the motor can be laterally shifted within the housing if necessary to achieve perfect fit.

This Beogram also still needed a new hood installed. This shows the new hood from the dksoundparts store in Denmark together with a reproduction aluminum trim:
I used the my alignment aids to center the strip
and marked the position with a pencil:
After installing the re-painted hood hinge and glueing in the aluminum trim I installed the hood on the Beogram:
Beolovely! I will play this deck a bit more, and then it will be time to send it back to Australia!


Thursday, January 4, 2024

Beogram 4004 (5526): Installation of a New Hood and Aluminum Trim

This post is a follow up to the main restoration summary of a Beogram 4004 that I recently posted here. Due to a shipping mishap I had to wait for another hood to arrive from the Beoparts-store in Denmark. The first one  came chipped:

Unfortunately, the Beoparts-store seems to enjoy saving on packaging, and so a minor whacking of the package on its way through automatic sorting machines or while being bounced around in speeding delivery vans can cause significant damage. This shows the damage to the carton at the location of the above chip:
These fairly delicate hoods come in a single cardboard wrapper 
with barely enough space on the inside for a double bubblewrap layer around the hood.
Definitely not enough cushioning. Luckily, the Beoparts-store does not make a fuss about such damages and they replace for free. Though I really wonder if this is very efficient compared to double boxing them outright. Charge a few $$ more for the additional packaging and save everybody some time?

Anyway, the replacement recently made it in good shape, and so I set out to repaint the corroded hinge. This happens fairly often with Beogram hood hinges. Two pictures of the damage:
I took the hinge assembly apart to get the main part ready for spray painting:

Normally, pretty decent results can be achieved by sanding the corroded areas with an orbital sander followed by spray painting with a satin enamel. This is the result of my efforts:
Not perfect, but definitely much nicer than the corrosion!
This shows the hood replacement and the reproduction aluminum strip:
And here after everything was put together:
This concludes the restoration of this Beogram 4004, and it will soon be time to send it on to its owner.


Tuesday, September 19, 2023

Beogram 4002: Installation of a Brand New Hood and Aluminum Trim

I recently received the hood hinge from a Beogram 4002 located in Florida for installation of a new hood. This shows it as I received it:

Closer inspection revealed what had happened:
The hood developed a fracture around the mouting holes, which is unfortunately very common due to the design choices that B&O made back then. The use of flat head bolts created lateral stress in the plexiglass material. Over time cracks develop and eventually the hood breaks off.
Luckily, there are brand new hood available that are faithful reproductions of the original design, but with a better bolt design, which promises to last longer. These hoods are available for DIY from the Beoparts store in Denmark.
This shows the new hood together with a new reproduction 4002 aluminum trim. In the picture the trim is in process of being centered on the hood with the help of two brackets that I designed for this alignment process:
Once the alignment mark is made on the blue tape it is time to bolt the new hood to the hinge. For this it is best to remove the sliding pads that are under the springs. This gives the hinges more room to move laterally, which makes it much easier to put the bolts in:
Once the bolts are in, the pads can be replaced:
The final step is to glue the aluminum strip to the hood, and then we have a brand new hood for an almost 50 years old Beogram 4002!:
This hood will soon be shipped back together with a Beolover internal RIAA pre-amp and a Beolover Commander remote control system. A very nice upgrade! Beolovely! 


Tuesday, September 12, 2023

Beogram 4002 (5503): Installation of Upgrades - Internal RIAA Preamp, Commander Remote Control and a New Hood

After completing the functional restoration of a Beogram 4002 (Type 5503) that I had received from Oklahoma, it was time to install the upgrades my customer desired. He wanted the internal Beolover RIAA pre-amplifier that I recently updated to fit AC motor Beogram 4002s, the Beolover Commander remote control system and a brand new hood to give this Beogram a pristine like-new look.

I started out by preparing the keypad for the Commander remote system. This shows the complete Commander kit for AC motor Beogram 4002s:

The small narrow circuit board to the right in the above picture is the keypad adapter. Since AC motor Beograms still mostly rely on directly soldered wiring harnesses, the installation of the Commander is unfortunately not 'plug and play' like the DC motor version. Instead, a breakout for the keypad signals needs to be created that the Commander can communicate with the control system of the Beogram and take over the keypad functions. 
This shows the keypad PCB after pulling it out from its slot under the keypad:
The solder pads on the left side connect to the wiring harness that sends the keypad signals to the main board. This shows the contact pads magnified:
The keypad breakout fits onto these pads, but a 'corridor' needs to be generated by removing some of the solder that the adapter can be soldered in. This is shown here:
When I took the above picture I already had added some solder flux to the pads in preparation for soldering the adapter in. This shows the adapter (also with some flux on the pads):
The adapter essentially connects the small white connector 1:1 to the keypad pads. When soldering it in, it is best to first tack it on only on two of the terminals so the fit can still be corrected easily. This is shown here:
It is important to make sure the board sits orthogonally respective to the keypad board:
Once the orientation is satisfying the remaining pads can be soldered into place:
Before I continued with the Commander installation I plugged the Beolover RIAA preamp board in since this needs to be done while the keypad is removed. This shows the original output board still in place together with the new green RIAA board on the right:
Implantation is a straight forward board switch. The RIAA board has the same connectors as the original board. This shows the board installed:
Then it was time to slide the modified keypad board back into its slot under the keypad:
Then I bolted the Commander board in (it uses one of the main PCB bolt holes):
After this I plugged the Beogram in and pressed start on the Apple Remote that connects to the Commander board and the carriage started moving. After it had moved sufficiently to reveal the small plastic fixture that holds the output board in place, I unplugged the unit and bolted the grounding connector of the RIAA board on top of the plastic part. The bolt goes directly into the enclosure, i.e. this is a good spot to make a system ground connection:
The last step was the installation of a new hood (acquired from the Beoparts Store in Denmark - these hoods are faithful reproductions of the original ones, made by injection moulding - very beolovely!). The first step was the removal of the hood hinge assembly from the scratched up original hood. To get to the screws one needs to remove the aluminum trim from the sides of the hood. This can usually be done with a razor blade that is forced in-between the trim and the plexiglass:
After unbolting the hinge assembly, I removed the actual hinges and checked them with my template that I recently developed after bent hinges led to the catastrophic failure of one of these hoods. These hinges passed with flying colors and fit perfectly onto my template:
So, on to the installation. I put the hinges back into place and then prepared the reproduction aluminum strip for hood. I usually make a small mark across a strip of blue tape and the aligned aluminum strip with a pencil:
That helps aligning the strip once the hinge has been bolted in. This shows the final result after installing the aluminum strip:
Very nice! This Beogram is ready for pickup! What better reason could there be for a roadtrip from Oklahoma to Albuquerque?!?!...;-)