Featured Post

Beolover SyncDrive: DC Platter Motor Replacement for Beogram 4002 and 4004 (Type 551x and 552x)

Late Beogram 4002 and the 4004 (Types 551x and 552x), which have DC platter motors instead of the earlier synchronous AC motors usually suff...

Showing posts with label trim. Show all posts

Saturday, April 25, 2026

Beogram 4004 Type 5526 - California Project - Completed, Tested and Ready to Ship

This post continues from the last post where the initial power on and start play operations were tested on this Beogram 4004.

Even though most of the functions I tried appeared to work I still needed to finalize moving the new trimmer for the platter sensor circuit to its final position.

Here is the DC voltage check of that platter sensor circuit as measured at the collector of 1TR3.
The new trimmer is adjusted to get 4 VDC at the collector with no platter in place.


That was easy to dial in but when I examined the platter sensor signal with an oscilloscope I could see quite a bit of noise on the signal.  The signal was the expected shape but the noise wasn't expected.


I checked the 21 VDC rail voltage for the circuit and could see noise there as well.


The voltage was good but the noise wasn't.

To remove the unwanted noise on the 21 VDC rail voltage I changed the filtering capacitor I had added to a 10uF value, then remeasured the rail voltage and platter sensor signal.

Much better now.


Even though the sensor circuit appeared to be working correctly, I have seen where noise like I was getting cause strange things with the Beogram control circuit.  

I installed the new Beogram platter speed indicator lamps next.
These are the Beolover LED replacement lamps from the DKaudiolover.com store.


Here are photos of the cleaning and Deoxit treated Beogram control panel contacts.
This Beogram 4004 will be getting the Beolover Remote Commander installed but I want to make sure the manual control button operation is perfect.

This picture shows a couple of contacts cleaned and treated on the left while the other contacts have yet to be cleaned.


...and this picture shows the full set cleaned and treated.


I used the Beolover RPM measurement tool to calibrate the 33.33 and 45 RPM platter speeds of the Beogram 4004.  This Beogram 4004 has a Beolover restored DC platter motor so it must be calibrated to the correct speeds.


Next is the installation of the Beolover Remote Commander (one of my favorite additions to any Beogram 4002 and 4004 turntable).


The installation of the Remote Commander to a Beogram 4004 is slightly different from a Beogram 4002 as the Beogram 4004 has a basic, no-frills remote control circuit that must be tied in to.

A drawback of the built in Beogram 4004 remote control circuit is that it is only functional when the Beogram 4004 is paired with a Beomaster 2400 receiver.  And...the remote control of the Beogram is just play, pause and stop.  The Remote Commander provides all of the Beogram 4004 control panel functions.

Now the Beogram 4004 is ready to be reassembled and some records played on it.


The final step of this restoration project was to replace the original dust cover with a brand new one from DKSoundParts along with a new aluminum trim piece.

The first step is to center the new trim piece and mount the trim onto the top portion of the new dust cover.  The two ends that bend down over the left and right sides are left straight at this point so the dust cover can be mounted onto the metal hinge assembly.


Here is one side of the metal hinge assembly and dust cover attachment screws.


After the dust cover is attached to the metal hinge assembly, the left and right sides of the new aluminum trim can be bent into place.

Note:  This attachment of the trim can be a little tricky. I found that I had to clamp the top and sides in place to make sure the double-sided tape bonded the trim securely (without pulling away).


The new dust cover assembly is now ready for installation on the Beogram 4004 frame.

There are two of these spring loaded mounting clamps that screw down on the dust cover assembly.


I am leaving the protective plastic wrap on the dust cover and Remote Commander remote so the owner of this Beogram can be the first to open them up.


I will listen to a few more records on this Beogram before shipping it back to its owner.

After that, I have another Beogram 4004 to begin restoration on.

Wednesday, October 8, 2025

Beogram 4002 (5503): Installation of a New Hood, Restored Keypad, New Carriage Motor and the Commander Remote Control System

This post describes the additional installation of upgrades and the performance of cosmetic restorations on the Beogram 4002 (Type 5503) that I functionally restored in August.

Like many Beograms at this point in time this unit had a fairly badly scratched hood. This shows the original hood

and some of its scratches:
My customer elected having a new reproduction hood from DKsoundparts installed instead of getting the original hood polished. I like these hoods a lot. They are crystal clear and a perfect copy of the original ones. They even improved the design of the bolt holes for the attachment to the hinge, which should make cracking much less likely. Therefore, replacement is a much better option than polishing.

The installation requires removal of the original hood from the metal hinge part. The screws responsible for the attachment can be fund under the vertical parts of the aluminum trim that is glued to the back end of the hoods. The original trim can in most cases be removed by pushing a razor blade in-between the trim and the plexiglass:
After removal of the two screws on either side the hinge part is liberated. This shows the hinge together with the new hood and a new aluminum trip strip (the original trim usually gets damaged/wiggly when trying to remove it from the original hood):
Before the hood can be bolted to the hinge it is a good idea figuring out the alignment of the trim. It needs to be installed exactly centered that the two parts that get bent down at the sides are exactly of same length. For doing this I use 3D printed alignment pieces that can be attached to both sides of the hood. Their 'wings' make it easy placing the strip exactly centered:
I use a strip of blue tape attached to the hood and a pencil to make a mark once the centered positon has been determined:
This mark is used to place the strip after the hinge has been bolted in. Bolting it in is easily done with a suitable Philips screwdriver:
This shows the hood after putting the new strip on it:
This hood is ready for installation!

The next step was the implementation of the Beolover Commander Remote Control for Beogram 4002 (Type 550x with AC Platter Motor). The Commander uses an Apple Remote for controlling all functions of a Beogram. The Commander even ads autorepeat functionality similar to what B&O implemented in the later Beogram 8000/8002 models. A special function of the AC version of the Commander is that it ads a record swiping function like in the later DC motor Beogram models. Simply press the center button on the Apple Remote while the deck is off, and the platter motor will come alive as long as the button is pressed.
Unlike the plug-and-play version for DC motor Beograms, the installation of the AC Commander requires a small amount of soldering due to the hardwired nature of the board to board connections in the 550x Beogram Types.
The first step is the removal of the keypad from the keypad PCB:
Note that the shown keypad is not the original one that came with this Beogram, but a temporary replacement from my stash that allowed me working on the unit, while I waited for the refurbished keypad to arrive. Keypad restorations are available via the Beolover's DKaudiolover.com store.
This picture shows the area of the keypad PCB where the wire harness is attached to the board:
The installation of the Commander hardware requires soldering a wiring adapter onto the PCB that allows the Commander to communicate with the Beogram control circuitry. For this purpose an area of the solder pads needs to be cleared from solder in order to generate a 'landing zone' for the adapter board. This shows the zone cleared after using my Hakko de-solder pump on it:
Once the zone has been cleared, the adapter can be soldered to the board:
It is important to put the adapter in that the white jack is flush with the board edge. Otherwise, there will be an interference between the adapter and the keypad assembly in some Beogram versions when the board is pushed back into the keypad after installation. This shows the Commander board bolted piggyback ontop of the main board and the white wiring harness already plugged into the adapter jack:
The next step was pushing the keypad PCB back into the new refurbished keypad:
This shows the smudgy condition of the original keypad for comparison:
Original keypads often show such patterns. They represent damage to the clear coat that gives the pads their unique sheen. Over time the coating material deteriorates due to the contact with the oils and acids in the skin and mechanical abrasion. Our restoration process is discussed here.

The next step was bolting the auto-repeat indicator of the Commander onto the keypad assembly under the standard mounting screw:
Then it was time for plugging the white wiring harness into the corresponding jack on the Commander board:
This concluded the installation of the Commander module.

My customer also wanted the original carriage motor upgraded with the new Beolover Carriage Motor for Beogram 4000, 4002, and 4004. While there was nothing wrong with the original motor, the Beolover replacement offers lower noise, fewer vibrations and lower current draw when the motor runs. Therefore, it is an interesting improvement for those who want the best possible performance of their Beogram. This shows the original motor still installed:
Four screws and two solder points later the motor assembly was extracted:
I removed the top, which revealed the motor:
I exchanged it with the new Beolover motor:
It is a good idea feeding the leads through the small window in the bottom part of the housing.
Then I bolted the assembly back in and soldered the leads to the carriage board:
This concluded my upgrade and cosmetic work on this Beogram and it was time for another test run. The Commander remote control worked flawlessly and the new carriage motor yielded a noticeably quieter carriage motion during start!

This shows the completed Beogram playing one of my recently acquired Blue Note re-issues, Donald Byrd's album "Stepping into Tomorrow" which he released in 1975:
What a lovely contemporary combination!
Here a detail shot of the pristine new keypad!
This Beogram is now in a near-new condition with improved functionality and performance! Very beolovely! I will play it a bit more and then it will be time to send it back to its owner in Ontario!


Sunday, April 13, 2025

Beogram 8002 Hood Replacement

 The Beolover recently received a Beogram 8002 from a customer in California. As part of the restoration, the customer elected to have the hood replaced with a new one. Luckily, these hoods are now available from the Beoparts store.

The main issue with the reproduction hoods is that you don't get the original trim strip that has the model designation. Beoparts does offer a replacement trim, but it's not an exact match for the original (the original varied over time also, some are brown, some are black), so the best solution is to try to preserve the original.

This is the condition of the original hood, it shows the typical wear and tear:


A lot of that damage could be avoided in the future by using softer cleaning solutions such as a damp microfiber cloth. Windex and paper towels are abrasive to plexiglass.

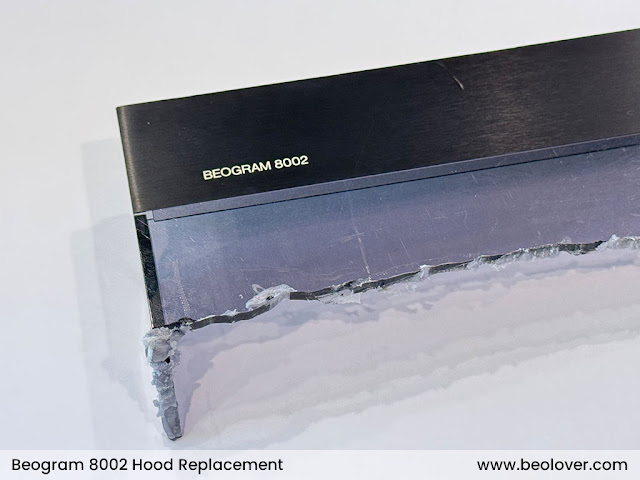
Believe it or not, the photo below depicts the first step in the process I use to extract the original trim. It took several attempts to get this process perfected, I wouldn't recommend it unless you have spare hoods!


The reason for cutting the hood like this is that it's too difficult to work with the large hood and its structural rigidity causes more stress on the trim piece. When cut down to this size, the hood is more flexible and can flex away from the trim, without bending the trim. I apply heat for an extended period of time to loosen the glue and I am then able to pull them apart:


The back side has a layer of glue which must be removed, the X-acto #17 is perfect for this:

Back is pristine, ready to be glued down to the new hood:

The front looks great, has a minor scratch:


I then use masking tape and paper to protect the surfaces while spraying high bonding strength adhesive on the back side of the trim and top of the new hood:


Here's a peek at the final product, which the Beolover will be completing very soon: