Featured Post

Beogram Commander Remote Control: Maybe This is the Final Version!..;-)

This is a follow up to my recent post about the redesigned Beogram Commander remote control board, which now works in both (DC-motor) Beogr...

Friday, April 19, 2019

Beogram 4004 (5526): Final Adjustments and Test Drive with Art Farmer

The restoration of the Beogram 4004 (5526) that I have on my bench has come to an end. Today I did some more work on the hood and then the final adjustments, and then it was time for a test drive with Art Farmer ("Crawl Space" on the CTI label).
The hood needed some more attention after I polished it. The aluminum trim had come off on one side of it. I softened the old glue with a paper towel piece drenched in isopropanol:

After about 30 min the glue came off pretty easily:
I usually glue these side parts with 3M adhesive tape:
After cutting it to size with a razor blade
I removed the protective tape
This tape is ultra thin, i.e. can hardly be discerned. Then I clamped the pieces together:
And after a day of clamping the trim was attached again:
On to the adjustments:

After adjusting the sub-chassis and the platter, and the arms to be horizontally parallel to the enclosure, it was time to adjust the tone arm. First I did the arm lowering limit:
This makes sure the needle misses the ribs on the platter should the electronics malfunction and the arm be lowered onto an empty platter. Then I fixed the counter weight in place. The first step was to replace the flimsy locking washer on the bolt
with a M3 nut and a washer:
This allows locking the counter weight position in place by tightening the nut. Great for shipping a turntable. The next step was to adjust and calibrate the tracking force adjustment wheel:
Most B&O cartridges are specified for 1.2g tracking weight.

The final adjustment was the tracking feedback:
The light intensity trimmer on the Beolover LED light source makes the fine tuning very easy.

After cleaning the aluminum panels and the platter, it was finally time to play this Beogram!
I selected a recent acquisition to my collection, Art Farmer's "Crawl Space" Album, which I prepared for play with a thorough clean with the new CleanerVinyl EasyOne ultrasonic vinyl record cleaner.  Art Farmer recorded this album for the CTI label in 1977. This record has quickly become one of my favorites. Very smooth and melodic. Beautiful trumpet play...another awesome CTI release. What a beolovely sight and sound!:
I will play this Beogram a bit longer to make sure there are no intermittent issues, and then it will be time for it to return to its owner!


Thursday, April 18, 2019

Beogram 4004 (5526): Restoration of the Plexiglass Hood and a New DIN5 Plug

The restoration of the Beogram 4004 (5526) that is on my bench is almost finished. Today was hood polishing day. This usually means a nice workout at the work bench in the garage with some sand paper and polishing compound. Fun! This shows some of the scratches on the hood as received:

If one can feel the scratches with a fingernail, the hood needs to be sanded first to create a homogeneous surface. The scratches of this hood required a few minutes of sanding with 320 grit for equalization:
Once all the scratches are gone, it is time to roll up the sleeves and polish it back to translucency. This requires 8-10 steps of ever finer sand paper finished up with polishing compound. This is how the hood looked about 2 hrs later:
Pretty shiny, but of course not as perfect as a new hood.
The final step of a hood restoration is always the renewal of the rubber bumpers, that make sure the hood closes with a happy sound. As is the case with most Beograms at this point in time, the bumpers were broken off:
They can be replaced with pieces of 2 mm O-ring that are glued into the original cavities. But first the old rubber needs to be removed with a drill bit:
 Then the O-ring snippets can be glued in:
And trimmed to about 1 mm length once the glue has hardened:
With the final result looking like this:
After the hood was done, I moved on to replace the original oxidized DIN5 plug
with a modern all-metal DIN5 plug with gold plated contacts:
Beolovely! All this Beogram still needs before I can give it a spin is a few adjustments.


Saturday, April 13, 2019

Beogram 4004 (5526): (New Beolover Video!) Exchanging the Sensor Arm Light Bulb with an LED Assembly

After getting the DC platter motor finally to run properly, it was time to exchange the last light bulb in the Beogram 4004 (5526) that I am restoring right now, the sensor (detector) arm bulb with a LED. This process has still been a bit 'experimental', but I think we finally have come to a stable process that should be relatively easy to replicate by other B&O enthusiasts around the world. So I decided it was finally time to make a video that outlines this process for those who would like to implement our LED assembly (send an email or use the contact form on the right if you are interested in getting the part). This shows the LED assembly next to the bulb compartment in the sensor arm:
The video discusses the detector circuit, how to upgrade it for reliable performance, and how to install the LED assembly. Enjoy!

Tuesday, April 9, 2019

Beogram 4004 (5526): DC Platter Motor Restoration - Patience Pays Off!

The Beogram 4004 (5526) that I am restoring right now (previous post) seemed to be a 'standard project' until I restored the DC platter motor. The process started out as usual. I extracted the motor,
and disassembled it to get the bearings out for oil infusion:
The bearings are the small donuts on the black pad. I immersed them in motor oil and pulled a vacuum. Immediately bubbling started:
This bubbling indicates that air is being extracted from the pores of the Oilite bearing material, making room for oil to diffuse inside. After a couple days this bubbling stopped, indicating that the infusion process had completed. I extracted the bearings:
Then I reassembled the motor for testing. The top bearing needs a special 'tool' that the tabs for the mounting ring of the bearing can be pressed down properly:
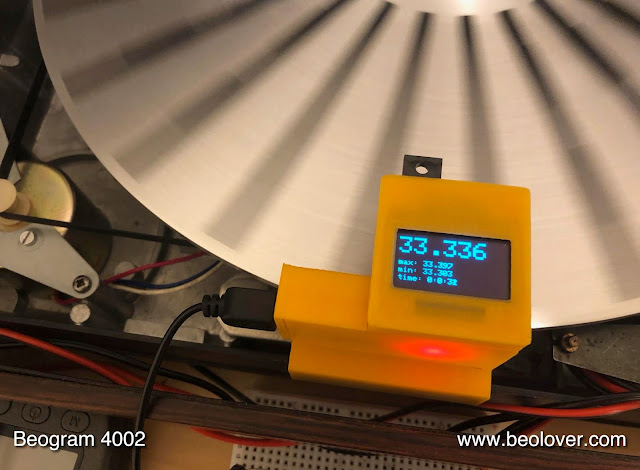
Then it was time to give this motor its 24 hrs RPM stability test. I installed it in the 4004 and measured for 24 hrs with my BeoloverRPM device:
It measures the RPM in 10 sec intervals and logs the data via the serial port of a computer. The top curve in the graph below is what I measured...not very Beolovely! The variations are a bit too large for a restored motor (but probably still too small to be audible):
I took the motor apart again and exchanged the spark snubbers, since they are often the culprit when the motors still run rough after the oil infusion. This shows the rotor of the motor with its original snubbers in place:
I removed them. This shows the original part with the modern (TVS diode) replacements:
I soldered the TVS diodes in:
One needs to make sure that the TVS diodes do not protrude into the commutator plane, since they can interfere with the brushes when the rotor is turning...not good for the life expectancy of the brushes...;-).

After this I put the motor back together and ran it again and measured...and measured...and measured and the results did not get much better than the first curve. The above graph shows a curve that I measured after about a week of run time. You can see that the stability got better, but that there were still some irregularities. That it got better encouraged me to simply run it for some longer. And indeed after about 3 weeks the motor showed a stability that is similar to many other motors that I rebuilt (bottom curve, red).

So in the end this motor is ready again for playing vinyl smoothly. But Beolove has a lot to do with Beopatience, and every 4004 or 4002 has some new story to tell, for sure...

With regard to a root-cause for the phenomenon described here, well, the only thing that I can imagine at this point is that the bearings had perhaps some larger caked on residues on their running surfaces that needed to smoothen out or something of this nature...I think it is unlikely that there is an electrical issue with the rotor etc...since the aberrations became smaller over time. I guess, we will see if this happens again in the future. I do think I experienced this on shorter time scales before, that initial measurements of motors were a bit more erratic than follow ups, but I never systematically looked into this...some more Beoexcitement for future late-night explorations!...;-)


Saturday, April 6, 2019

Beogram 4004 (5526): Replacing the Light Bulbs of the RPM Control Panel with LED Assemblies

A crucial step to make 400x Beograms 'fit for the future' is to replace their incandescent light bulbs with LEDs, which tend to last for a very long time. This helps preventing future breakdowns and trips to Beolover's bench. The RPM control panel of the Beogram 4004 contains two bulbs that provide the scale illumination. This shows the removed panel of the 4004 that I am currently restoring:
The first step is removing the bulb covers:
Then the bulbs can be unsoldered:
And replaced with the LED assemblies. This shows the assemblies pre-installation:
and after install:
They are designed to be 'drop-in', i.e. just connect like the original bulbs. The final steps are putting the covers back on
and trying them out:
The 'natural' incandescent-like glow is a result of using carefully tuned red/green LEDs on the assemblies. On to the DC motor!


Thursday, April 4, 2019

Beogram 4002 DC Platter Motor Restoration

A Beogram 4002 DC platter motor recently arrived from Pennsylvania for restoration. It exhibited the typical symptoms of dry bearings: When I powered it up for an initial test it emitted a screeching noise. Definitely, this motor needed a re-lubrication of its bearings! This shows the motor as I received it:
I disassembled it to get the bearings out for oil infusion:
The bearings are the two small donuts on the black pad. I put them under oil and pulled a vacuum:
Immediately, vigorous bubbling started. This indicated that the vacuum extracted the air from the pores in the bearing material, creating space for oil to diffuse back into the bearing. After about 48 hrs the bubbling stopped, indicating that the infusion process had completed. I extracted the bearings:
I put the motor back together. I used my 3D printed tools for installing the top bearing:
After it was put together, I installed it in one of my Beogram 4002s for a RPM stability test with the BeoloverRPM device:
The BeoloverRPM allows logging the RPM for extended periods of time. After about 36 hrs I had this curve:
This is about as good as it gets with Beogram 4002 DC motors. This motor is ready to serve again! Home you go to Pennsylvania!