Featured Post

Beolover SyncDrive: DC Platter Motor Replacement for Beogram 4002 and 4004 (Type 551x and 552x)

Late Beogram 4002 and the 4004 (Types 551x and 552x), which have DC platter motors instead of the earlier synchronous AC motors usually suff...

Showing posts with label chassis. Show all posts

Tuesday, September 19, 2023

Beogram 4004 (5526): When Disaster Strikes - Ripped Off Leaf Spring Adjustment Bolt

I made good progress with the restoration of the Beogram 4004 (Type 5526) that I recently received from a customer in California. Until I came to the part where I adjust the floating chassis and align the platter etc...what is usually a tedious, but fairly straight forward process quickly turned sour with this unit, giving me fodder for another post in my 'when disaster strikes' series!...;-):

What happened was that when I tried to adjust the height of the three leaf springs to get the floating chassis level, one of the adjustment bolts ripped off. I thought it was turning a bit difficult, but in this case it turned out that one of the previous owners had epoxied the nuts to the threaded sections of these bolts. Since I usually use a ratchet with a nut to turn these screws, I did not see that I was actually twisting the bolt and not just turning the nut!

This shows the assembly before the disaster struck (luckily I took a picture after straightening out the grossly bent alignment pins for the aluminum cover plates). The bolt in question is behind the pin to the right: 

This is the section that came off:
After removing the leaf spring it looked like this. The bolt had separated at a level flush with the threaded hole in the enclosure bottom. Pretty Beounlovely!!:
At least, after heating the bolt with my solder station blower I was able to get the nut separated from the bolt fragment:
The next step was dealing with the broken off bolt fragment that sat flush in its threads. Such twisted off bolts are dreaded by anyone how deals with mechanical things! It is usually a bit of a mess to deal with such bolts. Since I only have a mini drill press for delicate tasks, I opted for drilling the M4 bolt out in three steps. First I made a mark with a center punch as centered as possible on the bolt surface. Then I used a 2 mm drill to hollow out the bolt. I used some oil to prevent the drill from getting stuck:
The next step was re-drilling the hole with a 3 mm drill:
And then I finally went in with a 4mm bit. This cleaned out all the remnants of the bolt:
Then I Installed a M4-45mm stainless steel flat head bolt with a nut and a washer:
This was possible since the mounting posts for these adjustment bolts are hollowed out and accessible from the bottom of the enclosure. The flat head of the bolt fit perfectly and flush into the hollow:
And this is how it looked with the spring installed again:
Looks like it never happened! Beolovely!

Friday, April 19, 2019

Beogram 4004 (5526): Final Adjustments and Test Drive with Art Farmer

The restoration of the Beogram 4004 (5526) that I have on my bench has come to an end. Today I did some more work on the hood and then the final adjustments, and then it was time for a test drive with Art Farmer ("Crawl Space" on the CTI label).
The hood needed some more attention after I polished it. The aluminum trim had come off on one side of it. I softened the old glue with a paper towel piece drenched in isopropanol:

After about 30 min the glue came off pretty easily:
I usually glue these side parts with 3M adhesive tape:
After cutting it to size with a razor blade
I removed the protective tape
This tape is ultra thin, i.e. can hardly be discerned. Then I clamped the pieces together:
And after a day of clamping the trim was attached again:
On to the adjustments:

After adjusting the sub-chassis and the platter, and the arms to be horizontally parallel to the enclosure, it was time to adjust the tone arm. First I did the arm lowering limit:
This makes sure the needle misses the ribs on the platter should the electronics malfunction and the arm be lowered onto an empty platter. Then I fixed the counter weight in place. The first step was to replace the flimsy locking washer on the bolt
with a M3 nut and a washer:
This allows locking the counter weight position in place by tightening the nut. Great for shipping a turntable. The next step was to adjust and calibrate the tracking force adjustment wheel:
Most B&O cartridges are specified for 1.2g tracking weight.

The final adjustment was the tracking feedback:
The light intensity trimmer on the Beolover LED light source makes the fine tuning very easy.

After cleaning the aluminum panels and the platter, it was finally time to play this Beogram!
I selected a recent acquisition to my collection, Art Farmer's "Crawl Space" Album, which I prepared for play with a thorough clean with the new CleanerVinyl EasyOne ultrasonic vinyl record cleaner.  Art Farmer recorded this album for the CTI label in 1977. This record has quickly become one of my favorites. Very smooth and melodic. Beautiful trumpet play...another awesome CTI release. What a beolovely sight and sound!:
I will play this Beogram a bit longer to make sure there are no intermittent issues, and then it will be time for it to return to its owner!


Friday, February 22, 2019

Beogram 4004 (5526): Tracking Sensor LED, Non-Working Carriage Switches, Final Adjustments and Test Drive with Eddie Henderson

The restoration of the Beogram 4004 (5526) that is on my bench is coming to an end. This post describes the final tasks of the project. After replacing the sensor arm bulb with an LED, I tested the carriage functionality and it behaved like the end switch and the turn off switch both did not work. It turned out that the wires that connect the switches to the main PCB had broken off from their solder points (white and grey wires):


I reconnected them (the grey wire needed to be extended a bit since it was pretty short after taking some insulation off for re-soldering):


After this repair everything seemed to work in terms of carriage motion.

The owner decided to also let me replace the bulb in the tracking sensor compartment with a LED assembly. I recommended this since this is also an essential light source, whose failure would disable the Beogram.

This shows the original tracking sensor light source in place:
I removed the bulb housing, which reveals the aperture that activates the sensor in the lower half of the assembly:
This shows the original bulb and the LED replacement in comparison:
The LED is in the same location like the filament of the bulb. This shows the LED assembly in place:
The blue trimmer allows fine tuning of the tracking sensor response, which makes it easier to adjust the system to spec. I also replaced the standard often rusty sheet metal screw that secures the aperture assembly in place with a M2 stainless socket head screw and a matching nut. This makes the initial coarse adjustment of the aperture position much easier.

Now it was time to adjust the platter height and the floating chassis horizontality. Then I moved on to the tonearm adjustments. An important item is adjusting the arm lowering limit. It needs to be set in a way that the needle 'misses' the ribs on the platter at the setdown points as an additional safeguard against needle damage should the record detection mechanism ever fail and the arm gets lowered onto the naked platter. This shows the adjustment result:
Then I moved on to the tracking weight. The first step is usually replacing the flimsy retaining clip on the counterweight screw with a M3 nut. This allows tightening the counter weight position down, which preserves the calibration over time and during shipping. This shows the original setup:
And with M3 nut:
Then it was time to calibrate the measured weight with the adjustment scale. I usually do it at 1.2g, since that is the weight at which most B&O cartridges track best. The weight scale on the adjustment wheel is notoriously imprecise, i.e. it is always best to confirm the weight with a digital gauge:
After this I adjusted the tracking feedback:
And then I tried to play a record...and all I got was a very loud hum from the speakers! Unbeolovely, entirely!
Hum usually means a broken connection in the grounding system between amplifier and turntable. It turned out that the shield connection in the DIN plug was disconnected:
Since the original DIN plugs cannot be opened up without destroying them, I needed to install a new plug:
The gold coated pins are a nice improvement in the signal path over the original corroded pins. This quenched the hum and the deck started sounding properly.
So it was time to listen to a nice record and enjoy this lovely 4004! I picked a recent addition to my collection, "Comin' Through" by Eddie Henderson. Of course this vinyl was cleaned with a CleanerVinyl Easy6 before I played it! Henderson recorded this album in 1977, and there are a few great funky tunes on it. My favorite is "Movin' On" on the first side. 
Beolovely! I will play this Beogram 4004 for a few more days and then it will be time for the return trip to its owner!


Sunday, January 20, 2019

Beogram 4004 (5526): A New DIN Plug, Final Adjustments and a Test Drive with Bob James!

After restoring the electronics and the motor of the Beogram 4004 (5526) that I am restoring right now, it was finally time to make some final adjustments, clean the aluminum surfaces, add a new DIN plug and then enjoy a first vinyl on it. Before making the adjustments, I added a M3 nut to the counterweight screw to enhance the stability of the weight calibration. This shows the original setup with a circle and some paint to hold things in place:
I added the M3 nut and a washer
and balanced the arm for zero weight.
Then I adjusted the tracking weight with a digital scale:
Then I adjusted the platter height and then the arm lowering limit that the needle misses the lower areas of the ribs (located at the set down points) by about a mm:
This is an important adjustment to ensure that the needle does not hit the ribs should it ever be lowered onto the empty platter due to a malfunction in the record detection circuit.
Then I adjusted the floating chassis to ensure a flush alignment between platter and surrounding aluminum panels. 

The final adjustment was the tracking feedback. The final fine tuning was done with the brightness adjustment trimmer on the LED light source for the sensor:

The last thing to do was to update the corroded DIN plug:
The Beogram 4004 came with a convertible DIN7 plug with the two 'additional' prongs removable that it could be turned into a DIN5 when used with non-B&O equipment. Pins 6 and 7 on the DIN7 carry the Beolink signal. This allowed using the remote control of a Beomaster 2400 to start and stop the connected 4004. 

Unfortunately, these convertible DIN7 male plugs are not available anymore. I usually install a female DIN7, which allows preserving the original DIN7 functionality, while allowing the easy conversion to DIN5 and RCA with a suitable adapter cable. 
This shows the DIN7 installed:
and connected to a DIN5 male-to-male jumper, which allowed me connecting the 4004 to my Beomaster 6000 4-Ch for testing.

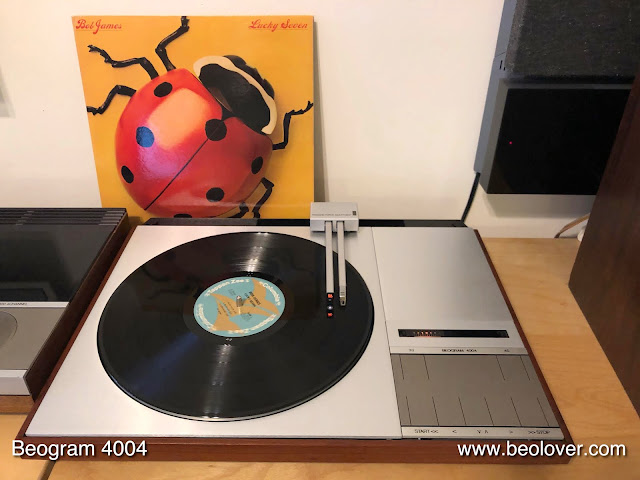
I selected a just acquired vinyl record by Bob James: Lucky Seven: This album was recorded in 1979 and it has a few very nice smooth jazz funk tracks on it, most notably (IMO...;-) "Blue Lick" on the A side. Of course, I cleaned it ultrasonically with a CleanerVinyl Easy6 setup after I received the vinyl from a Discogs seller.

This shows the 4004 in action together with Bob:

Beautiful! And so far it is performing perfectly. The new 1985 motor runs very stable and it is very quiet.


Saturday, May 26, 2018

Beogram 4004 (5526): Final Adjustments and Test Drive with Volker Kriegel on MPS

My current Beogram 4004 (5526) restoration project is coming to a close with making a few essential adjustments and tying up some loose ends. First, I replaced the original black plastic carriage pulley with a new one machined from aluminum:

Then I replaced the metal sheet screw that holds the tracking aperture in place
with a nice stainless steel 2 mm bolt that can be tightened with a ball hex key...much better than the original Philips head to get it fully tightened to survive the rigors of shipping in the calibrated position. This shows the new bolt in place:
Then it was time to adjust the tracking feedback sensitivity:
The intensity adjust trimmer (small blue box) on the Beolover tracking sensor light source comes in handy for fine-tuning the mechanism after coarse adjustment of the aperture and sensor positions.

Then I adjusted the floating sub-chassis to be horizontal, did the arm to platter distance adjustment while making sure that the platter is flush with the surrounding aluminum panel. Then it was time to adjust the arm lowering limit that the needle would miss the ribs if it got accidentally lowered onto the platter without a record present. An important fail safe in case the record detection mechanism fails at some point in the future:

Before playing any turntable for the first time it is important to calibrate the tracking weight. I usually start out by replacing the flimsy locking clip that holds the counter weight adjustment screw in place with a nut to be able securing it permanently once the calibration is done. This shows the original condition:
and with the M3 nut in place:
Then I calibrated the weight adjustment wheel to be accurate around 1.2g, the tracking weight for most B&O cartridges:
This is preferably done with a small digital gauge, which are very precise these days due to advances in integrated sensor chip design (even if they are cheap).

After giving the aluminum surfaces a deep clean it was finally time to present this Beogram in its full glory and play it for the first time. I selected a recently acquired vinyl by the awesome German MPS label: "October Variations" by Volker Kriegel and the Mild Maniac Orchestra, which they recorded in 1977.
In my opinion this is among Kriegel's best albums for its consistency and wealth of great melodies and jazzy fusion sound. The second track on the first side "Ballad Garden & Palm Dreams" is my favorite...perfect for taking a Beogram DC motor apart or soldering SMD components...;-). I will now play this Beogram for a bit longer, and then it will be time for the trip home to its owner.