Featured Post

Beolover SyncDrive: DC Platter Motor Replacement for Beogram 4002 and 4004 (Type 551x and 552x)

Late Beogram 4002 and the 4004 (Types 551x and 552x), which have DC platter motors instead of the earlier synchronous AC motors usually suff...

Showing posts with label rotary. Show all posts

Wednesday, December 2, 2015

Beogram 8000: Replacing the Carriage Belt

Another loose end in the Beogram 8000 that I am readying for shipping I needed to attend to: I earlier noticed that the carriage belt was quite loose, i.e. at the end of its lifetime. On the occasion of my recent effort to replace a cracked BUNA-N volume belt in a Beomaster 6000 I ordered samples of the entire lineup of EPDM 1/16 O-rings at the O-Ring Store with the goal to be ready for future belt replacements of yet unknown diameters. So I thought I probably had the proper EPDM ring for the Beogram 8000 already in stock! And indeed: It turned out that the E70025 (1-3/16" diameter) ring made a good replacement of the original belt. Here are a couple of impressions:

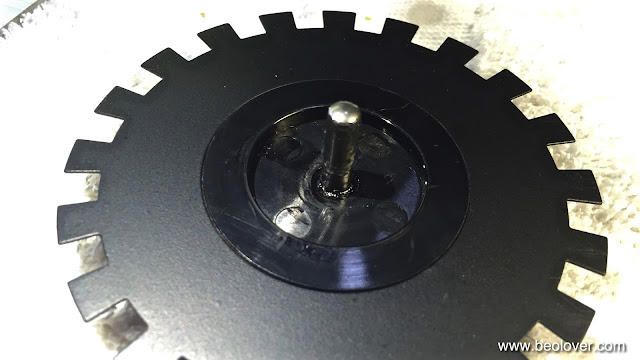
This shows the original belt with rotary encoder sensor cluster removed (just pull the plastic clamp out and carefully pull the board up while making sure that the IR emitter passes through a gap in the encoder wheel), which is necessary to get the belts over the encoder wheel:

And here after installing the new belt:

It is interesting to note that my first attempt with a 1-1/16" belt did not work out. When I checked initially the carriage would move very well with it. However after attempting to play a record, it turned out that the Beogram would have trouble to move the arm to the run-in groove.

What happened was that the firmware in the microcontroller reduces the power on the carriage motor before the touch-down point to get a more precise positioning (and probably also because it just looks more elegant...;-). However this is apparently not done via encoder feedback but rather via a blind  flight power reduction without monitoring the encoder action. This resulted in a very slow movement of the arm do to the unexpected friction caused by the too-tight belt. It would take several seconds from moving swiftly near the position and then via a very slow final movement to the touch-down position. Replacing the ring with the 1-3/16 version cured this issue and now it behaves like with the original ring. All good now under the hood! Playing right now my just arrived 180g reissue of Queen's 'A Day at the Races' - those were the days!...;-)


Saturday, October 31, 2015

Beomaster 8000: Volume Encoder Damping Restoration - The Final Answer

The Beomaster 8000 that is currently on my bench had lost all damping of the volume rotary encoder wheel. This issue is more than a cosmetic one, since damage can occur to the speakers if they are not dimensioned properly if someone accidentally spins the volume encoder up to 6.0. Without damping this can easily happen if attention is not being paid. Up to now I used a method to restore the damping that was based on a 3D printed paddlewheel that I clamped on the back of the encoder shaft and then filled the cavity with a high viscosity damping grease. While this worked fairly well, I always had the feeling I was on the wrong track with this. So yesterday, I finally took the plunge and opened up the volume encoder to have a look under the hood with the goal to understand how the original damping had been done. After taking out the encoder sensor assembly I cut the retaining clips off with a wire cutter (unfortunately this seems to be the only way to get them off) and removed the encoder:

It is held by four adhesive strips and I needed to use a screwdriver to lift it up one corner at a time. Once I had it out I thought what a beautiful big design compared to today's encoders...Anyway, once the encoder is off, one can simply pull out the wheel from its precision sleeve bearing:

And after I saw this everything was clear: The original damping was simply done by putting some damping grease on the shaft and then inserting it back into the bearing. Due to the fairly tight fit this creates a nice damping effect. Unfortunately, over time this grease is entropically driven out of the bearing, and the damping effect wanes gradually. I put some Nyogel 767A on the shaft

And inserted the wheel into its bearing and the wheel was damped again. I put the encoder assembly back onto its posts and clamped it down with new 3mm retaining clips and nylon washers to protect the encoder housing in case it needs to be opened up again in another 20 years for a re-greasing:

Then I adjusted the plexiglass clamp in the back to ensure scraping free operation while being flush with the surface of the Beomaster keypad. I guess the evolution of my fix to this issue is another example of live-and-learn. I should have taken one apart much earlier...;-).


Thursday, October 8, 2015

Beogram 8000: Not Responding to Keyboard Input - Not Working Rotary Encoder Feedback

A Beogram 8000 hailed from Tokyo in search for some TLC. It was initially purchased from ebay and supposed to be in excellent condition. Once unboxed, however, it turned out that the unit did not work properly. There is already an extensive thread on Beoworld.org about the issues this unit displayed. In a nutshell, when pressing start the arm would run to the end of its range and then be stuck.
Yesterday, I opened the unit up and had a look. I immediately suspected a fault with the rotary encoder that is fitted to the spindle that drives the carriage with the arms. In difference to the earlier 400x models, the 800x employ a more modern positioning concept that is based on detecting the angular motion of the spindle and calculating the carriage position from that. This is a concept that is used in most modern control systems involving motors. The encoder unit is very similar to the ones used in the Beomaster 8000 for the volume and FM frequency wheels.
In the Beogram 8000 the evaluation of the encoder signals is done by the microcontroller, which has two inputs that detect the intensity fluctuations on two sensors. The fluctuations are generated via an aperture wheel that sits between the detectors and the IR emitter. Depending on the phase of the fluctuations on the two detectors relative to each other the system can detect the direction of the motion. The number of intensity oscillations tell the traveled distance. This way, the microcontroller always knows where the needle is. This 'feedback' is used to determine where to set down the arm, when it is time to lift and return home etc...
Therefore, when there is no feedback, the controller does not know anymore where the arm is. The firmware seems to be programmed with simple if...then conditionals that cause action depending on the position. If the position does not change in the mind of the controller (in the case of a non-working encoder system) the arm simply continues to travel until it hits the mechanical stop at the end.

All this suggested to me that I needed to investigate the encoder system to get to the bottom of the issue at hand. Below is the relevant section of the circuit diagram. Since I had similar problems already a couple times with Beomaster 8000s that I restored, I first checked on the functionality of the light detectors and the IR diode (OPE1). In the Beomasters the diodes had failed.

With the multimeter I determined 1.2V at the anode of the diode and this told me that it most likely was o.k. (they usually die by going OC). Then I measured the resistance on the photoresistors. They both showed about 1k when shining a strong LED light into the assembly and about 20-40k when just room light trickled into the setup. This seemed o.k., too. 

So I hooked up my oscilloscope and measured at the P2/6 and P2/4 whether I got pulses when manually turning the spindle. Of course the deck needs to be in PLAY mode or another on state to have things powered up. I had it in PLAY with the carriage belt removed, so the motor simply ran but the spindle did not move. This measurement yielded pulses for both encoder channels. The next step was checking the outputs of the opamps. And there I found a first clue to the problem: IC2 had no pulses at the output, while IC1 gave me nice 5V square pulses.
So I had a look at the PCB, and there it was:

The input of IC2 was short circuited to GND. In the above photo that is the IC pin that is associated with R5. It connects to the adjacent GND pad on the left via a gigantic solder ball. In fact if you look at the entire area it is apparent that someone with very little practice in electronics messed around and did some 'expert work'. Another great example of a 'perfect condition' or 'fully restored' ebay unit....(I hope this guy will smolder for a long time in Vintage Hifi Purgatory when his time comes).

Grounding the IC2 input of course results in a zero output signal since then there is nothing to amplify, and that explained my measurement. I fired up my Hakko desoldering gun and removed the solder from the pads and then resoldered them:

And this did the trick. The unit is working again. I put on my least favorite record (Sam Rivers) that I use for this type of testing, and pressed PLAY. The arm moved to the lead-in groove and lowered. Cueing worked and STOP. Very good!