The Beomaster 8000 that is currently on my bench had lost all damping of the volume rotary encoder wheel. This issue is more than a cosmetic one, since damage can occur to the speakers if they are not dimensioned properly if someone accidentally spins the volume encoder up to 6.0. Without damping this can easily happen if attention is not being paid. Up to now I used a method to restore the damping that was based on a 3D printed paddlewheel that I clamped on the back of the encoder shaft and then filled the cavity with a high viscosity damping grease. While this worked fairly well, I always had the feeling I was on the wrong track with this. So yesterday, I finally took the plunge and opened up the volume encoder to have a look under the hood with the goal to understand how the original damping had been done. After taking out the encoder sensor assembly I cut the retaining clips off with a wire cutter (unfortunately this seems to be the only way to get them off) and removed the encoder:
It is held by four adhesive strips and I needed to use a screwdriver to lift it up one corner at a time. Once I had it out I thought what a beautiful big design compared to today's encoders...Anyway, once the encoder is off, one can simply pull out the wheel from its precision sleeve bearing:
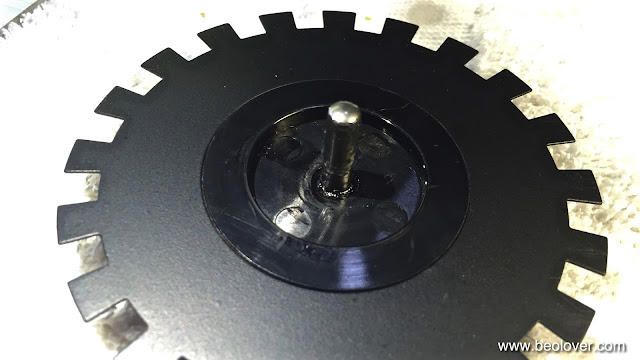
And after I saw this everything was clear: The original damping was simply done by putting some damping grease on the shaft and then inserting it back into the bearing. Due to the fairly tight fit this creates a nice damping effect. Unfortunately, over time this grease is entropically driven out of the bearing, and the damping effect wanes gradually. I put some Nyogel 767A on the shaft
And inserted the wheel into its bearing and the wheel was damped again. I put the encoder assembly back onto its posts and clamped it down with new 3mm retaining clips and nylon washers to protect the encoder housing in case it needs to be opened up again in another 20 years for a re-greasing:
Then I adjusted the plexiglass clamp in the back to ensure scraping free operation while being flush with the surface of the Beomaster keypad. I guess the evolution of my fix to this issue is another example of live-and-learn. I should have taken one apart much earlier...;-).


No comments:
Post a Comment
Comments and suggestions are welcome!