Featured Post

Beolover SyncDrive: DC Platter Motor Replacement for Beogram 4002 and 4004 (Type 551x and 552x)

Late Beogram 4002 and the 4004 (Types 551x and 552x), which have DC platter motors instead of the earlier synchronous AC motors usually suff...

Showing posts with label plexiglass. Show all posts

Thursday, August 24, 2023

Beogram 4002 (5513): Brand New Hood Fatally Damaged Due to Bent Hood Hinges! - Straightening Hinges Out and Installation of Another Hood

I recently restored a Beogram 4002 (Type 5513) for a customer in Florida. This unit also received a new hood, which was procured from the beoparts-shop in Denmark. These hoods are exact replicas of the original ones, i.e. do not have any seams from glueing laser cut plexiglass panels together. They are die-cast like the original ones. Very awesome!

Unfortunately, in this particular case the a strange thing happened: The newly installed hood slightly chafed on the hinge back when closing it. This happened about halfway between fully open and closed. When I installed it I did not really take this issue seriously since it was not very noticeable. I basically put it in the 'in the 70s the manufacturing tolerances were a bit looser than these days' bin and tried to forget about it...;-).

However, blissful ignorance was not an option in this case: After taking his Beogram home, my customer sent me this dramatic picture a few days later:

The hood had spontaneously cracked off one of the hinges. A fracture occurred right at one of the two screws. At this point I thought the chafing was probably the root cause since it put a bit of stress on the hood, but I did not understand what caused the chafing. The metal parts looked perfectly o.k. on first glance.

I sent an email to Martin Olsen who designed these replica hoods and asked him if he knew if something like this had happened before. He answered that "I have an interesting Beogram hood on the bench now from a customer who couldn't make it fit properly. The hood would fit reasonably well one side. At the other side it would sit too high and too far forward, enough to show gaps. Opening the hood, I can see that one hinge buts up against the hinge block as it should, but the other has a gap of 2mm.
I took out the hinges, and they appear to be different, in that they have different angles."

The plot thickened! I removed the hinges from the troubled hood and also the hinges from another hood that I was working at that point on that did not have this issue. This allowed me to directly compare the hinges of the cracked hood with those of a 'normal' hood that did not chafe. This is what I found: Indeed the troubled hood had hinges that had a smaller angle between the two shanks than the normal one. This shows two of them in direct comparison:

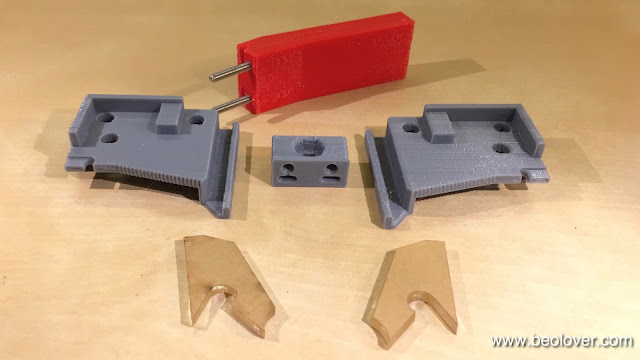
It became clear that I needed to bend the bad hinges back into the normal shape. To do this I needed a way to precisely determine when the correct angle was restored. So I designed a 3D printed template that I iterated a few times until it perfectly fit into the normal hinges. The perfect fit was established by being able to put a bolt through the alignment hole that I designed into the block to line up with the hinge pivot point. It is evident that the smaller angle of the chafing hinge prevented the holes from lining up.
I took the bent hinges to the workbench and used a vise and adjustable pliers to open the hinge up a bit.
I carefully bent it by small amounts until I was able to put the bolt through the hinge into the template block:
I did this for the other hinge, too, and then put the hinge assembly back together. One side was lacking the plastic slider block, so I installed a 3D printed replica:
Then it was time to install another one of these awesome hoods as well as a new replica 4002 aluminum strip:
I used my alignment tools to place the strip exactly centered:
And then I bolted the hood to the hinge and glued the strip into place:

And I am happy to report that this hood did not chafe anymore! Beolovely!

Of course I am wondering what may have cause the hinges to deform in the first place. The only idea that came to mind so far is that the troubled hood was opened a bit too far and with a bit of violence. Considering the way the hoods are constructed, this would indeed reduce the angle between the hinge shanks if bending occurred. Treat your Beograms more gently, people! Pretty please?!?!...;-)


Saturday, April 8, 2017

Beogram 3000 (5228): Restoration of the Plexiglass Hood - Repair of a Cracked Hinge and Installation of 3D Printed Mounting Brackets

A while ago I received a Beogram 3000 with a deteriorated plexiglass hood. The plastic mounting brackets of the hood were broken out
and one of the plexiglass hinges was broken off:
I developed a repair kit containing 3D printed mounting brackets, a special tool for re-inserting the spring tensioning block, and laser cut plexiglass patches for rejoining the hinge:
The video below shows how to use the parts. Like all other Beolover parts, this repair kit is available to other enthusiasts. Just send me an email or use the contact form on the right. Enjoy the video!

Sunday, December 13, 2015

Beogram 4000: Polishing the Hood and a Strange Hinge Pin

I am giving the Beogram 4000 that I restored recently the final touches. The last item to check off on the list is always polishing the hood. Like most Beograms that I saw so far this one also had a badly scratched up hood from carelessly stapling things on top of it while it sat in 'storage'. This unit had a couple more items that needed to be taken car of: One of the hinge pins was not original. At some point the short press-fit pin must have 'vanished' (one really wonders why someone would take it out...but such is the human creativity...;-), and a replacement pin was installed. The 4 mm replacement pin fit well into the hinge parts, but was too long and so it stuck out a bit:

Here a picture from the bottom of the hinge assembly:
I took the pin out and cut it by 4 mm with a jig saw and a metal blade. That allowed the pin to be inserted a bit deeper and it looks original now:
On the other side of the hood the aluminum trim had come off from the plexiglass:

I fixed that by applying a strip of double sided tape and pressing the strip back to the hood body. I recommend to not use epoxy or similar glue for this since the aluminum strip covers the screws that hold the hood to the hinge, and if the hood ever needs to be take off the trim needs to be pried off.

Anyway, after these tasks I set out to polish the hood. this one was special since it also had some issues on the inside, which is much more difficult to fix since it is hard to polish the inside. Luckily the damage was fairly small and most of it appears to have been tape residue:

I was able to remove it with a bit of detergent and a Mr. Clean Magic Eraser Pad. After that it needed a bit of buffing with polishing fluid, and that seems to have done the trick. There are a few more small very localized dings on the inside, but I chose to let them be since it is almost impossible to to a full sanding/polishing job on the inside since one cannot get to the corners.

Then I focused on the main job, the outside of the hood. Here are a couple impressions of the degree of scratching:


Nothing too special, but the depth of the damages required to start out with 200 grit sand paper to level the surface with the deepest damages:

This was followed with 320 grit:
and 400 grit, the first wet-sanding step:

It starts getting clearer already, but a full treatment with Micro-Mesh is required to get back to a fully translucent state:


And finally after buffing it with polishing fluid:

all good in the hood department now! A few more days of testing and this Beogram 4000 is ready for its journey back to Italy!


Sunday, November 8, 2015

Beogram 4002: Polishing the Hood

The beautification of the 4002 that I am rebuilding continues. Today was hood polishing day...always a nice workout, probably the equivalent of 100 push-ups...(but only for one arm...;-). This plexiglass hood had some significant scratches:

So I started out as usual with 200 grit dry paper to equalize the surface:
And then gradually rebuilt the polish with Micromesh polishing cloth:


And the final step with Micromesh Micro-Gloss:

Saturday, September 19, 2015

Beogram 4000: Polishing the Hood

Today I polished the hood of the Beogram 4000 that is on my bench right now (or rather sits next to my Beomaster 6000 4-Channel looking real pretty, even without the hood, playing Miles Davis' The Man with the Horn...;-). Not that I really enjoy the polishing of acrylic hoods, but the effort is definitely worthwhile...these decks just look so much better when the hood is nice and shiny. Usually they come in with significantly scratched hoods. This one was not different. Some deep ones - when one can feel them with a fingernail, one needs to start with 200 grit sand paper to even things out before starting to polish it back to new-like sheen. This one definitely was a candidate for the 200 grade:


And smaller scratches all over the surface.

This shows the hood after the 200 and then 400 grit:

And then during the Micromesh polishing steps:


This shows the end result after polishing with Micro-Gloss:

Pretty! Absolutely worth the multi-hour effort! There is no true Beolove without some degree of pain...;-)


Wednesday, September 16, 2015

Beogram 4000: Installation of Hood Mounting Screw Springs

On the way to the perfect Beogram 4000 I realized that all 4000s that I so far encountered did not have the hood mounting screw springs that the later Beogram 4002 and 4004 have. These springs conveniently push up the screws making it really easy to take off and replace the hood of these turntables. I checked the service manuals, and indeed the Beogram 4000s do not have these springs included. I guess B&O practiced kaizen here and gradually improved their designs (even though I disagree with the change to DC motors and the implementation of the retro analog control system on the 4002/4 models - the 4000 is much more advanced in this department - I'd love to meet this designer for a chat if he is still around). Anyway, a Pilot G-2 07 pen donated a spring to the Beogram 4000 that I am currently restoring, which I cut in half and installed on the two bolts. I made a short video about the process. Enjoy:


On to doing the final adjustments of the platter height, and then there is the polishing of the scratched hood...this means a nice workout is coming up in Beolover's garage!

Monday, May 18, 2015

Beogram 4000: Polishing the Hood

A last labor-of-beolove tribute to the Beogram 4000 that I restored in recent weeks: Time to polish the hood! It is always quite a workout. It usually takes me several hours in a multi-step process. This Beogram had fairly damaged plexiglass surfaces. Here are a few impressions:


Whenever there are deep scratches that one can feel with a fingernail, then it is time to crank out the 220 grit sand paper. With that the surface needs to be sanded until the deep marks are gone, and only the homogenous scratches from the sandpaper are visible. This hood definitely needed this drastic step. But first the B&O trim needed to be protected. It is very easy to 'delete' the B&O labels in the heat of battle when going at it with the sanding block. I usually use three layers of insulation tape:

After this I gave the 220 grit a go:


Looks almost like wood after this step. Once you have a smoothly sanded surface, it is time to work your way back to shininess. This is done by using about 10 grades of sand paper and micro-mesh policing cloths. This is finished with polishing liquid. It is important to change the sanding/polishing direction between every step. Also avoid rotating motions, it is best to just go in linear strokes. The chance in direction allows to see whether one has polished all the scratches left behind by the previous coarser step behind. Here are a few pictures taken in between the steps (not all are shown, but you get the idea):

After 400 grit:
After 800:
After 1800 Micro-Mesh
After 3200 Micro-Mesh:
After 6000 Micro-Mesh:

After Micro-Gloss polishing liquid:

And that is pretty much as good as this can get...it is virtually impossible to get back to 100% like new. But one can get pretty close. And this pretty much concludes the restoration process of this Beogram 4000!