Featured Post

Beolover SyncDrive: DC Platter Motor Replacement for Beogram 4002 and 4004 (Type 551x and 552x)

Late Beogram 4002 and the 4004 (Types 551x and 552x), which have DC platter motors instead of the earlier synchronous AC motors usually suff...

Showing posts with label packaging. Show all posts

Wednesday, June 24, 2020

Beogram 4000 Packaging for Shipping: An Update on How to Secure the Carriage

This post is about a change to my packaging instructions for Beogram 4000, 4002, and 4004. I now recommend securing the carriage by using an M3 screw to bolt the carriage directly to the floating chassis (instead of taping the arms cover to the aluminum platters as shown in our videos). 

The reason for this change is that the Beogram 4000 I recently restored came well packaged, but the arms cover suffered unnecessary damage to its labeling:
Sadly, the 'no-residue' Blue Tape that was placed over it to hold the carriage in place during shipping damaged the labeling when I removed the tape. While I point out in my shipping instructions to place some cut to size paper under the blue tape for protecting any labeling from 'lift off', it keeps happening. And it seems that the arms cover has the most vulnerable lettering of all, potentially due to its different aluminum surface finish. It is not brushed like the other aluminum surfaces, and much smoother. 

I recently learned that all Beograms came out of the box with a screw installed that firmly locked the carriage to the floating chassis during transport. Sort of an additional transport lock for the carriage. Unfortunately, the original screws seem to have mostly gone missing. I have never seen one. They probably get lost since they need to be removed completely during the setup of the turntable.
For this reason I came up with a modern replacement, which I will supply from now on with my Beogram shipping containers:

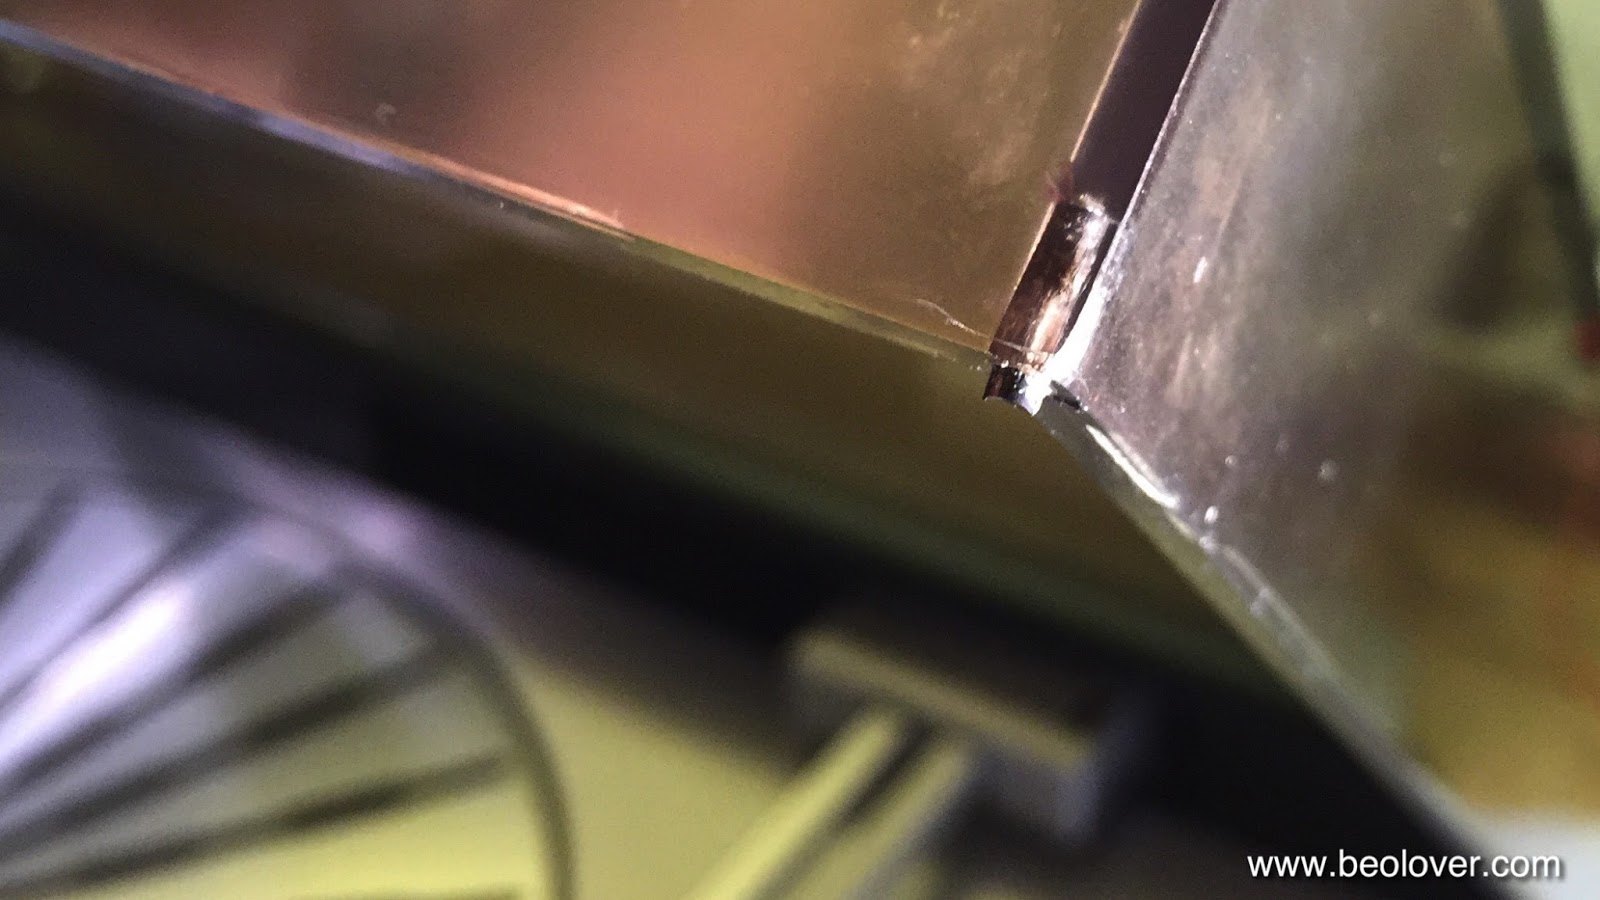
My carriage lock screw fits into the M3 threads that are located under the small hole in front of the solenoid (the bolt threads point to the hole in the picture below):
BTW: This looks identical in many 4002s (the 4004 does not seem to have this feature), just check out the gap between solenoid and PCB.

The carriage lock screw should be bolted down until some resistance is felt, but not too hard. Just enough that it will not come loose during transport. The solenoid wires may need to be pushed aside a little bit when bolting the screw into place.
This shows it installed:
The head clears the aluminum panel by about 2 mm when the bolt is screwed down all the way:
After this is done, it is not necessary anymore to tape the arms down like I showed in my packaging video (please, note that the strip/foam at the end of the arms are still necessary):
If you do not have a suitable M3 screw at hand, you still need to do the tape, but please make sure you put a strip of paper under the blue tape where the lettering is!


Friday, September 9, 2016

Beomaster 8000: Awesome Find on Ebay!

I often help customers to find a suitable Bang & Olufsen unit on ebay or craigslist, then restore it and then send it on to its new home. Almost like going back to the 70s with a time machine and buying it new at a B&O store...;-). Here the task was to find a Beomaster 8000 in nice cosmetic condition. I always recommend to start any restoration with a nice looking unit, since the value of the finished unit is largely determined by its looks...

Recently a very nice Beomaster came up on ebay including the Terminal remote and the original packaging. It was also sold by the initial owner - always a very good sign! I received the unit yesterday, and it was a happy moment. He had the original box double boxed by a mailing place, and so it arrived in a  huge box under a heap of styrofoam peanuts...not my favorite method - too messy when unboxing and more importantly, the inner box can shift around and individual sides of the inner box can end up dangerously close to the outer box, negating the purpose of the double box. In this case all went well, though.

Here are a few impressions:
As I said, a LOT of peanuts...;-). After I shoveled everything in several lawn bags, I extracted the original box:
then came the moment of truth!:
The original owner's manual! excellent! And then the Beomaster revealed itself:
In pristine condition as advertised! I love it when ebay sellers are honest! In this case it was a very pleasant experience from A to Z. Look at the veneer corners!:
Awesome! Almost like new! The best corners I have seen in some time! Lucky day! 


Tuesday, December 29, 2015

Beogram 4000: A New Pulley, Hood Bumpers and Shipping Back to Italy

The Beolover always strives to improve his craft and get things as perfect as possible. So I realized that I was not fully done yet with the restoration of the Beogram 4000 from Italy. My recent efforts to restore a Beogram 8000 from Japan introduced me to the concept of rubber hood bumpers that soften the impact if the hood is closed. It makes quite a big difference in terms of how it feels to close the hood. The sound when the hood seats on the enclosure is just so much more solid when the bumpers are present. Unfortunately they all seem gone at this point in time, and that is the reason that it took me some time to realize that all the classic B&O decks actually have(had) them! All that is usually left are some small holes filled with black degraded rubber remnant. This shows how it looked on the hood of the Beogram 4000:
It is easy to get the black stuff out with a 2 mm drill bit operated by hand (do NOT put it on a Dremel or similar...it is easy to damage the plexiglass):
Like with the Beogram 8000, rubber O-ring segments work well to restore the bumpers. In the case of this 4000, however, I needed to use 2mm diameter metric ones since the 0.1" type I used on the Beogram was too thick to squeeze into the holes. I glued the segments in with a bit of contact glue on the tip of the segment. Then I used my 3D printed cutoff template that I developed for the Beogram 8000 and razorblades the excess length off:
A perfect-length bumper resulted:
It has the right length to right the hood into a horizontal alignment with the plinth. The way the hinges are designed at the back of the hood, a ~1mm gap should be around the entire perimeter between hood and plinth if the hood is to be perfectly horizontal. These bumpers guarantee that. Beautiful!

Beyond this issue I also was a bit annoyed that the carriage ran a bit noisily when returning to the home position after a record was played to the end or OFF pressed. This was the result of a somewhat wobbly pulley, a result of a crack in its set screw assembly:

I exchanged it with a custom manufactured Aluminum pulley provided by Nick (via www.beoworld.org):
This fixed the issue and also looks beautiful. I think I will make this a standard part of my restorations since most pulleys are (or will be soon) cracked and/or run wobbly. This pulley quieted the mechanism down quite a bit and made it much more pleasant to use this Beogram 4000!

After these two tasks it was finally time to send it off. My customer requested state-of-the-art Beolover double boxing, and so I used this occasion to make a short video about the proccess:


May the Force (and gentle FedEx men&women) be with you on your way to Italy!


Wednesday, May 13, 2015

Beomaster 8000: Shipping Damage - Return Trip in a Double Box

Finally, it is time for the return trip for the damaged Beomaster 8000 that did not make it back well to its owner. I made the mistake to trust the original B&O packaging and did not insist on double boxing. This did not go well. Some ruffian must have dropped the package and a cracked uProcessor PCB and erratic performance resulted. Furthermore, and I am not sure if this was related to the shipping accident, my fix of the missing control panel lid spring retaining metal clip turned out to be unstable. The Beomaster sent out a piece of shrapnel and the spring broke out. I fixed this with a 3D printed insert. After fixing all this I put the Beomaster in our living room and embedded it into my Beosystem 8000 to test it for a few days to see if there are any intermittent issues. All this went well, and so I decided to try shipping again.

This time, however, I double boxed it using industrial HD packing foam that I cut to size to create a 2 inch foam cocoon around the original B&O box. The HD foam is perfect for slowing down the deceleration during impacts, while giving solid protection.

The outer shell is a double strength 12x24x36 box that I adapted to be 14 inch high to accommodate the additional foam layer on top. Here are a few pictures. I definitely recommend to make this extra effort whenever shipping one of the heavier B&O units. And this Beomaster 8000 definitely qualifies as heavy! The total package weight is about 70 lbs. Like a nice sack of cement, if you ever carried one up a few floors, you know what I mean...;-). If there is no original box available, a 10x20x30 box and some more HD foam is perfect as inner box.

I usually put some cardboard in between the foam layers to add some resistance to penetration:
Putting the Beomaster in:

I put a sheet of polyurethane foam on top to protect the surfaces a bit better:


This original box had some nice spaces to put the cord:
Here comes the double layer of foam on top
And an additional cardboard shield:
Folding the flaps over:
Due to the open area in the center I added yet another cardboard sheet and then about one roll of tape around everything:
And that's it! Let's try this again. I hope this trip goes better! Fingers crossed! May the FedEx man find some Beolove in his heart this time...;-)!


Tuesday, February 10, 2015

Beomaster 8000: A New Arrival in the Original Box!

A new Beomaster 8000 found its way to my bench for a bit of TLC! And this one came in its original box! Impressive how easy it can be to pack a Beomaster 8000 for shipping if one has the original packaging! Here are the (complex 5-step...;-) instructions as printed on the box:


And here after opening the unperturbed box. Seems everything went well. I will have a closer look on the weekend!


Sunday, December 21, 2014

Beomaster 8000: Double Boxed from Ebay! Amazing!

Another Beomaster 8000 arrived at my door yesterday. It is from eBay and will receive some TLC before I send it on to its new owner in the UK. I was almost impressed by the packaging this unit received (at least for eBay standards). It came double boxed and fully cushioned by well-cut monolithic styrofoam panels.

I would have used industrial strength poly foam instead since it decelerates blows much better than styrofoam, which is pretty hard unless it reaches its yield strength and permanently deforms (I am thinking of some delicate plastic mounts inside the Beomaster, which can shear off in case of sudden acceleration). Also the unit was only wrapped into a too small piece of poly foam sheet inside the inner box which did not protect the sides, so there was potential for chafing of the veneer on the cardboard. I did not like, too, that the plug was positioned in between the heat sink tower and the glass panel.

But, as far as my eBay experiences go: Really Not Too Bad! Here are some pictures:


The Beomaster survived the first leg of its long journey fairly well (which is probably also a result of FedEx's capable ways of handling heavy packages - much better than the USPS where they let small women handle 70 lbs packages without giving them a hand truck - some sad stories there, that I could tell...)

Here are a few pictures of the cosmetic condition of this beomaster after extracting it from the box. It looks fairly pristine in a 20/20 way:


One of my main concerns with the exterior of the 8000 are the veneered corners of the cabinet...usually they take some hits during storage or shipping. This unit is not too bad, but there is a bit of damage. I will probably 'stabilize' this one with a bit of glue that the hanging off part does not fully break off:

The other corner is acceptable:

A point of concern is this slight scratch. I hope it will be reduced with a bit of Mr. Clean Magic Eraser work. There is also a slight dent in the panel at the front...not much one can do there.
 Some smudges around the program keys...hopefully just a cleaning issue:
And a pretty big mark on the back where the paint went missing...oh well, one usually does not spend much time looking at the back of Beomaster 8000s...;-)