Featured Post

Beolover SyncDrive: DC Platter Motor Replacement for Beogram 4002 and 4004 (Type 551x and 552x)

Late Beogram 4002 and the 4004 (Types 551x and 552x), which have DC platter motors instead of the earlier synchronous AC motors usually suff...

Wednesday, November 29, 2017

Beogram 4000: Restoration of the PCBs

After restoring the control cluster of the Beogram 4000 that is currently on my bench I did the PCBs. This shows the main PCB in its original condition:
I usually replace all electrolytic capacitors with new 105C grade Japanese units, put in a new RPM relay and I install new 25 turn encapsulated trimmers for the RPM adjustment. This enables a much more precise RPM adjustment compared to what is possible with the original single turn trimmers. The capacitors need to be replaced since often they dry out/start leaking and that is a recipe for operational trouble. This shows the RPM section in detail in original condition:
and with new components:
This shows the RPM trimmers from the solder side. Their adjustment screws poke through the holes that were used to adjust the original trimmers. This way one can adjust the RPM when the turntable is running:
This shows the entire PCB rebuilt together with the replaced parts:
There is one more PCB, the power supply:
It has only two electrolytic capacitors (the two red dots). To get to their solder points the PCB ends to be lifted up and that usually requires to unsolder the leads that go to the primary winding. They include an in-line mounted fuse that is protected by a yellow plastic tube. It is visible in the back of the PCB in the above picture. When I unsoldered the leads from their PCB terminals, one of the fuse mounts came loose:
Upon further inspection it became clear that the metal ends of the fuse had separated from the glass tubes:
So after replacing the two capacitors, I installed a new fuse into the mounting 'cups' that I bent a bit to ensure tight fit:
Then I soldered the fuse back into the primary line and enclosed it with a length of shrink tubing
And this is how it looks now after bolting the board back in:
On to rebuilding the reservoir and motor capacitors, and the AC platter motor itself....


Tuesday, November 28, 2017

Beogram 4002: Restoration of DC Motor - Oil Infusion of the Bearings and Installation of New Spark Snubbers

Recently, a Beogram 4002 DC motor arrived from New Zealand for restoration. As usual, I first did the oil infusion procedure of the dried out Oilite bearings. This fixes the RPM instability in many cases. This shows the motor:
The upside-down installed pulley indicated that it had been 'worked on' before. I opened it up and extracted the bearings. What I found confirmed this initial impression:
One of the brushes was bent badly. Probably one of the reasons this motor did not perform well anymore. This shows it completely disassembled:
The bearings are the two small 'donuts' on the black pad. I immersed them in motor oil and pulled a vacuum:
Immediately a burst of air bubbles emerged from both bearings indicating a thirst for oil. The vacuum pulls out the air and oil diffuses into the bearings as 'nature abhors vacuum'...;-). After 24 hrs the bubbling had stopped and I extracted the bearings and put them on a paper towel to absorb the excess oil:
I straightened out the bent bearing: Before:
and after:
Then I assembled the motor and installed it in one of my Beogram 4002s for the obligatory 24 hrs RPM performance test. This shows the BeoloverRPM device in action. It can log the RPM performance for extended periods of time.
BeoloverRPM is available to other B&O enthusiasts. A great way to ensure the RPM is accurately adjusted, or to track down RPM stability issues. If you are interested, send me an email, or use the contact form on the right.
This graph shows the curves I measured during the restoration of this motor.

Unfortunately, the red curve was measured after the oil infusion. Clearly, this did not fix this motor. Usually, this indicates the the spark snubbers of the motor are on their way out. They seem to die by occasionally shorting out one or more of the coils on the rotor. So I opened up the motor again to replace them with modern TVS diodes. This shows the rotor with the original snubbers:
The snubber diodes are the three plastic enclosed reddish devices arranged in a circle around the commutator. They can be removed by sucking the solder from the three terminals that connect the windings to the commutator:
After removal of the original snubbers, I soldered three TVS diodes in place:
Care needs to be taken that they are soldered as close to the coils as possible to prevent mechanical interaction with the brushes on the commutator. After this procedure, I put the motor back together and installed it for another 24 hrs run. The blue curve in the graph above resulted. Much better! this motor seems to be ready for duty again. It is time to travel back the approx. 8000 miles to New Zealand!


Beomaster 1900 (Type 2903): Installing The Replacement Slide Potentiometer Contact Bridges

I have been running the Beomaster 1900 with borrowed parts from a Beomaster 2400 until the contact bridge replacements for the slide potentiometers arrived from Denmark. Thanks to Martin Olsen they were sent right away and got here really quick.

Making the swap wasn't too bad. The board with the Bass, Treble and Balance slide potentiometers unplugs from the main board so it is easy to desolder the pots.

Here are the slide potentiometers and the replacement parts lined up for assembly.


The three black plastic pieces in the middle are the new contact bridges.


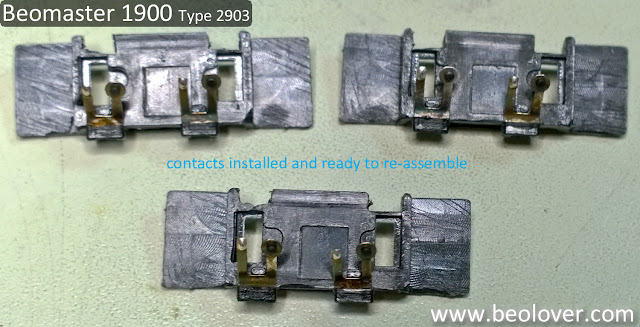
The replacement parts are just the plastic bridges. You must reuse the original contact components.
Here are the ones from this Beomaster installed in the bridges and then assembled into the slide potentiometers.


The bridges are not physically keyed so you could accidentally install them the wrong way. Make sure the bare contacts line up with the metal tracks. It is also important during the handling of the contacts to avoid disturbing the contact with the small, black coal piece.

Once the slide potentiometers are re-assembled their mounting holes to the board are keyed so the only thing to be careful with is that the 50KΩ potentiometer is placed in the Bass mounting location.


The rest of the task is just to snap and solder the potentiometers back into position on the removable board and remount it to the main board.


That is followed by a quick test play to make sure the reworked sliders function properly.


Note that I have the smoked glass display cover removed for polishing.

Sunday, November 26, 2017

Beogram 4000: Restoration of the Keypad

After restoring the arm carriage components of the Beogram 4000 that I am rebuilding right now, it was time to do the keypad. The keypad is the command center of the turntable and contains the TTL logic components of its 'early stage' digital control system. The keypad needs to be removed before one can get to its components. A single screw holds it in place:
The remarkable feature of this particular keypad was that there were no wires visible underneath it. All the other 4000 had the keypad wiring folded directly behind the latch that is bolted down. When I pulled this keypad up I found this arrangement:
An interesting way to do it, letting the wire harness enter the pad from the front. And much less painful to arrange when putting the pad back into its bay. This is how the harness exits the keypad in this arrangement:
Anyway, I thought I go on the record with this finding...You may think Beolover = Beonerd, I could not possibly comment...;-). On to the restoration:

This shows the keypad extracted:
and in 'service position':
The first item to take care is to replace the often frail light bulbs that illuminate the arm position scale and the RPM trimmers. This is the original arrangement:
I replaced the scale bulbs with my red/green LED based assemblies
Like all Beolover parts shown on the blog, they are available to other enthusiasts. Just send an email or use the contact form to the right if you are interested. The RPM trimmer illumination bulbs can be replaced by regular red LEDs and appropriate resistors to limit the current (they run at 12V...):
This shows the LEDs installed:
And 'in action':
The next step was to clean the switch terminals that were oxidized as usual. I pulled 2000 grit sand paper strips through the switches while actuating them. This cleaned the contact area from oxide. Subsequently, I coated them with a bit of DeoxIT D100 to slow down re-oxidation. One of the switches, which is under the 'down' key, needs special attention since it is hard to reach under the keypad hinge. It is best to extract it that the oxide can be cleaned off properly in the contact area. This is how it looked as extracted:
and after gently sanding it:
After I reinstalled the terminal, I checked all switches for proper contact resistance with a multimeter and then I put the pad back together. This is how the LEDs appear from the top of the pad:
Please, note that the position indicator was not installed when I took this picture. This concludes my work on the keypad. On to the electronics and the motor.


Saturday, November 25, 2017

Beogram 4000: Restoration of the Arm Lowering and Tracking Systems

I started working on the Beogram 4000 that joined me recently from Germany. As usual, I first rebuilt the tracking and arm lowering mechanisms. This shows the solenoid and damper arrangement that controls the arm lowering:
This shows the area after extracting the components that need cleaning and relubricating:
And these are the parts spread out:
After cleaning and lubricating I put everything back together, and then it was time to take care of the stuck damper-to-arm linkage. This part can only be accessed after removal of the sensor arm. This shows the arms from the back:
The sensor arm can be removed after taking out the two screws that hold it at the bottom:
This shows the arm with the linkage already removed. After lubricating the pivot point I replaced the arm and adjusted both arms to be parallel and orthogonal to the carriage rods:
This Beogram came with loose carriage rod bearings:
The white part on the rod belongs press fit into the bottom of the carriage plate. The second bearing was also loose already, and so I removed it too. Then I put a bit of epoxy on the parts and pressed them back into the carriage base:
After that the carriage was held in place again and I moved on to replacing the light bulb in the tracking sensor with a LED based assembly. This shows the original setup. The back square is the bulb housing:
After removing it the sensor aperture was revealed:
I installed the LED based assembly and also replaced the rusty sheet metal screw that fixed the aperture to the tone arm base with a stainless M2 screw and a nut. This holds the aperture in place much more solidly than the original screw, which often comes loose due to vibrations during transport etc...:
The next step was to replace the cracking prone carriage pulley with a precision machined aluminum pulley provided by Nick (let me know if you wanted one, too, and I will get you in touch!).
This shows the original pulley:
and the replacement:
I just love how they look like! Beolovely!
While I was 'in the area' I also checked on the the carriage position switches. To get to the switch terminals the carriage motor leads need to be unsoldered and two screws removed, and then the board can be lifted up:
I cleaned the contact areas with 2000 grit sand paper and then coated them with a bit of DeoxIT D100 to slow down re-oxidation. On to rebuilding the keypad cluster.