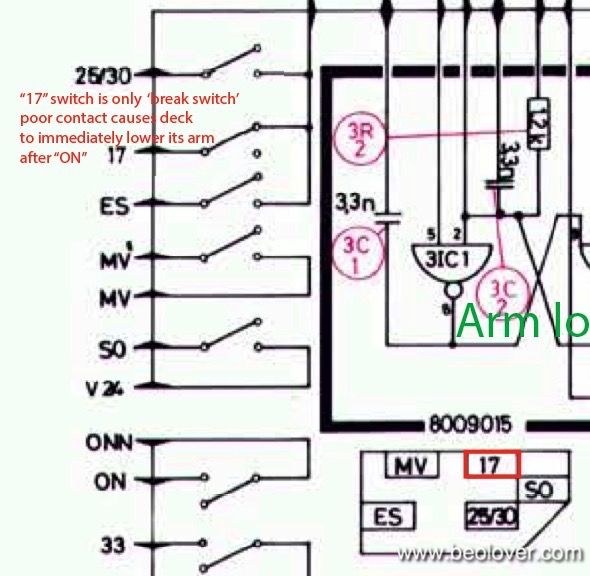
After polishing its hood I though I was done with this Beogram 4000. But not so. After playing a few sides out of a sudden the arm lowered next to the platter after I pressed "ON". Not so great. While nothing bad happened to the tip (due to correct adjusted arm lowering limits it did not touch the aluminum panel) this meant that I needed to look into the "17" position switch of the carriage mechanism. This switch is the most problematic one of the position switches since it is the only "break switch", i.e. it is normally closed and arriving at the singles touch down point opens it. See here in the relevant part of the circuit diagram:
If the switch is open, the control system 'thinks' that it has arrived at the 17 cm touchdown point and therefore lowers the arm. So after pressing ON and clearing the SO switch it immediately stops the carriage and lowers the arm.
Being normally closed means that the circuit depends solely on the spring force of the switch tab to be closed which is a weak point of this design. This shows the switches. The 17 switch is the one that does not have a contact terminal across it, i.e. its terminal is underneath the tab and its spring force presses it on the contact terminal:
When I checked on the position switches they looked very nice and unoxidized so I only put a bit of DeoxIT D100 on them and let them be. But I missed that someone prior had 'worked' on the 17 switch and bent the tab thereby reducing the spring force. It is virtually impossible to fix these switches without taking the tabs out, straightening them and then solder them back in. And that is what I did here. This shows the bent tab:
Note the 'bulge' right next to the solder tab and the fairly wide angle between the solder tab and the blade. A clear sign of 'human creativity'. Here is an impression of the bent back into shape tab:
After soldering it back in I started playing the deck again and now everything seems to be smooth. Another demonstration that it is always a good idea to give these old ladies a good spin to make sure everything is stable before shipping them back to their owners! This is Beolove!


How do you actually unsolder these springs. I have a rather loose one - bent of course - on my "up" key, and I tried unsoldering it but it just wouldn't get out from the board. I wonder if you have a trick?
ReplyDeleteIt basically takes three hands to do it...;-). I have only two, and so I use a solder pump to get the solder out and then I use the solder pump hotend to push the spring tab through the board....it takes a bit of practice, but then is is not too difficult. Make sure you are careful with wires in the vicinity etc...that you do not melt their insulation.
ReplyDelete