Featured Post

Beolover SyncDrive: DC Platter Motor Replacement for Beogram 4002 and 4004 (Type 551x and 552x)

Late Beogram 4002 and the 4004 (Types 551x and 552x), which have DC platter motors instead of the earlier synchronous AC motors usually suff...

Monday, July 10, 2017

Beogram 4004 Type 5526: Starting the Restoration

Just like the Beogram 4002 turntable restoration I recently did, this Beogram has a bunch of debris inside from the disintegrated plastic transport bushings. Due to continuously finding pieces during the Beogram 4002 project I decided to start off with the debris cleanup on this Beogram 4004.


Every nook and cranny has some piece of debris in it.


Even the tangential arm assembly didn't escape the spread of the bushing debris.


Eventually I got everything cleaned up.


Next I decided to start in on the electrical restoration. The first thing is the power reservoir capacitor that mounts to the chassis. I am replacing the original 4000uF capacitor with a Beolover replacement that includes a 3D printed housing so it can mount with the capacitor mounting bracket.


The custom part makes this installation a breeze and professional.

Now for the Beogram 4004 main board. It has a lot of blue tantalum capacitors that need replacing and a few electrolytic capacitors I will also replace. For values 4.7uF and less I like using WIMA polyester capacitors. They are non-polar and last a long time. In a couple places where the larger 4.7uF WIMA capacitors don't fit, I will use Nichicon 4.7uF electrolytic capacitors.

This board will also get three trimmer resistors replaced: the 33 RPM adjustment trimmer, the 45 RPM adjustment trimmer and the calibration trimmer for the photo darlington adjustment. That is the sensor for the tangential arm transport position.

I will also replace the RPM speed select relay with a Beolover custom replacement relay module.

Here is the main board prior to the restoration work.


These next pictures show the new Beolover RPM relay and the trimmers that were replaced.


Here is the finished main board.


Next up is the small output board.

Sunday, July 9, 2017

Beogram 8000: Reworking The Phono Muting Relay...Again

Since the replacement of the Beogram 8000 Control Panel board with a spare I had this Beogram has not had any mishaps with unscheduled pauses during record play.  During retesting of this however, the spare phono muting relay I installed is acting up like the original one did. The problem is intermittent but when it occurs the phono signal is not muted when the tonearm is lifted.

This still sounds like a relay problem and I didn't really like the fact that I had to use a replacement for it from another Beogram 8000 turntable instead of with a brand new relay. The problem is the Beogram 8000 output board is designed for a National type relay that is no longer available.

The Beogram 8002 output board it turns out is interchangeable with the Beogram 8000 and the Beogram 8002 muting relay is still available new from my favorite suppliers.

Before swapping output boards and relays I want to do diligence and measure the Beogram Lift signal.


The Beogram 8000 Muting and Lift circuits are related. A Lift command from the processor causes the tonearm to lower or lift followed by the muting circuit engaging or disengaging the phono muting relay.

I checked out the three test points shown on the diagram on my oscilloscope to see what is happening.


The above picture shows the Lift command in red from the Beogram processor. About 2.5 seconds after the Lift signal (to lower the tonearm), the muting relay engages to allow the phono signals to function.

When the tonearm is raised the Lift signal fires again and the muting relay disengages, shorting the outputs together.


I observed this switching function for a while and never saw any problem with it. However, I did see a problem with the muting relay. While the oscilloscope was measuring the Lift signals I connected my DMM to the phono left and right signals to measure the resistance.

Initially, before turning on the Beogram, the resistance measurement between the left and right channels was a short circuit. I measured about 0.4 ohms. When the tonearm lowers the phono signals are opened up and I measure an open circuit. When the tonearm is lifted the left and right channels should return to a short. There were a few times that I observed around 250 ohms to 280 ohms across the channels instead of a short. So the relay contacts are still the problem.

It was time to go ahead and use a Beogram 8002 output board in place of the original Beogram 8000 output board.

Here is the Beogram 8002 phono output board. The following pictures show changing out the muting relay with a new, sealed Omron relay. I also installed the ground switch option on this replacement output board assembly.


Now it was ready to swap the output boards.


The following picture shows the difference between the two output boards when the phono muting is on.


The new relay does a much better job and I feel much better having a brand new relay installed.

The other test point I wanted to measure is the Beogram 8000 tonearm lowering circuit. The damping of the tonearm when it is lowered to play a record is often a trouble spot. Sometimes owners observe the tonearm just dropping instead of slowing lowering. The control of the arm lowering is via an OpAmp circuit that is used to generate a ramp voltage to engage the tonearm lowering solenoid.

This Beogram has been lowering and raising exactly as it should so I captured some measurements to use as a reference. I measured the ramp signal as it reacts to the processor Lift command.


Whew! The Beogram 8000 is connected once again to my audio system where I will exercise it again before sending it home.

Sunday, July 2, 2017

Beogram 4004 Type 5526: New Turntable Project

With the Beogram 4002 and 8000 turntable projects wrapping up it is time to unwrap the next project.

Here is a very nice family turntable that the owner wants made like new again. It is a Beogram 4004 Type 5526 and has been worked on before. However, the last person to work on it left the turntable in an unusable state. Time to take a look.

The turntable arrived well packed but for me it contained the dreaded foam peanuts. They work okay but I don't like handling them. They end up everywhere and are difficult to work with. When I return this turntable I think I will build a better box. Unfortunately, as with most audio equipment, the original factory shipping box is long gone.


The owner did a good job of securing the inside where the turntable parts are. The pictures below show there is an obvious problem with the tonearm. I was not shocked by this as the owner had told me the Beogram had this issue. He secured it well enough for the shipping and the tonearm will be the first thing I look at. The cartridge attached is a broken one and not the main cartridge for this turntable fortunately.


There is a surprising thing about this Beogram tonearm problem and that is that someone previously worked on this turntable and apparently lost two of the tonearm mounting screws. I'm not sure why but it is extremely lucky that the crucial, delicate phono cable wires remain intact. If those had broken it would mean a big repair.

I have replacement screws for the tonearm so I quickly got them installed so I don't have to worry about anything happening to the phono cable.


It is a good picture to show how the two mounting screws attach the tonearm to a pivot mount. That allows the tonearm to be adjusted so the cartridge stylus is perfectly horizontal with respect to the platter (a later service manual check).

Looking at the rest of the Beogram I can see the usual problem with disintegrated transport bushings.


No problem there as I will install Beolover's 3D printed replacement bushings.

This Beogram 4004 has the metal cabinet guide washers instead of plastic ones that the earlier model Beogram 4002 units had. That is great as it means those won't need replacing.


The control panel buttons on this Beogram are in very nice shape. Very little visible wear. That is unusual but welcome.


The wood trim also looks quite nice.

With the tonearm back in place I gave the Beogram a quick run (without a record of course) to see if the electronic parts work. Everything did function and I was able to adjust the speed for the platter.


The tasks on this restoration should be straight forward. The inside will be fully cleaned and the mechanical moving parts lubricated as needed. I will make sure the tonearm transport is in alignment and fully functional. That includes the raising and lowering solenoid. The transport drive pulley will be replaced with one of Nick's metal pulleys. For the electronics I will replace the old electrolytic capacitors and install new sealed relays for the RPM selection and phono muting. The speed indicator dials will be changed to use Beolover's LED replacement boards. The record tracking sensor and the fixed arm sensor will also get Beolover replacement parts. The nice thing about the Beolover replacement parts is they are all designed to fit in the same mounting that the original parts did. That means owners can go back to the original configuration if they want. Non-destructive modifications. I like it.

The platter motor needed the bearings re-infused with oil so I already had pulled and sent the motor to Beolover when I sent the platter motor for the Beogram 4002 Type 5513 project. So this motor is ready to go.

A final restoration task will be to remove scratches from the dust cover and give it a good polish.

Saturday, July 1, 2017

Beogram 8000: Final Steps

I was kind of lucky I suppose in finding the intermittent pause culprit on the first suspect. However it was the most likely when reviewing the problem. Even though the behavior was intermittent it lined up with a problem Beolover had on a Beogram 8002 project earlier. After replacing the Beogram 8000 original control panel board with one of my spares -


the result has been over twenty error-free record plays.

Returning to the original control panel board to look at repair options I examined the LDR (photoresistor) devices for the forward and reverse controls.


Visually examining them and testing their resistance with different light sources didn't reveal any problems. These devices can become unreliable over time and exhibit the intermittent behavior I experienced so I decided to apply the repair Beolover did on the Beogram 8002.

I ordered the same LED from Newark and some GL5549 LDR devices from a couple of different sources. Replacing the original lamp with an LED requires a load resistor so I used the 1K ohm value Beolover had set his to.


Using the same parts I was hoping the fix would just be a quick install, test and go operation. Unfortunately I found that these GL5549 LDR devices vary in performance by quite a bit. It took quite a while to find a pair of these new LDRs to match and be around 20K ohms when in place on the board.

After finally finding a couple of acceptable LDR devices to try I mounted them with some temporary glue to secure them in their respective mounting slots.


I prepared the control panel board for re-installing into the Beogram. That included adding my little LDR test connector. This time I used 30 gage hook-up wire so the test connector can be left in the control panel. I matched the wire colors to what the Beogram 8000 colors are for the LDR measurements. That makes it easier to remember later if I have to retest the LDR voltages.


The connector is also a female connector so I don't have to worry about anything shorting by it when I leave it in the Beogram.

Testing the reworked control panel board with the new LDRs was interesting. I ended up having to re-adjust the position of one of the LDR devices. That is why I use glue that isn't permanent. Eventually I was able to get the forward and reverse LDRs adjusted within the 600mV - 700mV range necessary for successful operation. The service manual originally asked for 620mV but later updated that value to 650mV. I talked to another Bang & Olufsen technician who told me a solid value between 600mV and 700mV is sufficient.


As you can see in the picture above, the adjustment for a working forward and reverse operation resulted, again, in quite an imbalance in the adjustment screws of the control panel board. The voltages are stable though so I am going to run another play test with this board just to see what happens.

For this project though I am inclined to go with the replacement control panel board that I ran the twenty successful record plays with. The forward and reverse LDR controls are closely matched on that board and I feel will be more of a sure thing. This replacement repair is looking good but I will feel better about it if I can do a long term test with it.

There is one more issue that cropped up during the play testing of this Beogram 8000. Another intermittent problem but one that was easily recognized. A couple of times after a record completed play I noticed that the phono mute did not occur. That means the Beogram phono mute relay is acting up. This picture shows where the muting relay is located. It is easy to get to but does require opening up the Beogram case again. Oh well.


I hadn't planned on replacing this relay but since it has come up I asked the owner if he would like the phono grounding switch to be added. This is a convenience option that Beolover has been doing on Beogram 400x and 800x turntables. The added switch gives a user the option of setting the turntable up as it is originally or shorting the phono signal ground to the Beogram chassis ground.

This is a nice feature for Beogram owners that use the turntable with a non-B&O amplifier. I pair a lot of my Beogram units with my Yamaha C2a, C2x and C-70 preamplifiers. Those pre-amps support two turntable inputs but require using RCA jacks. When I add the DIN to RCA converter I get a hum in the phono signal unless I attach an extra grounding wire on the adapter to the amplifier chassis ground lug. With this switch added to the Beogram I can short the phono signal grounds to the chassis ground in the Beogram and not need the extra grounding wire on the cable adapter.

It's doesn't seem like a big deal but it is nice to have options so we are adding the switch to this Beogram.

First I need to removed the faulty muting relay.


This muting relay is different than the one in the Beogram 8002 turntable where Beolover was able to replace it with a new Omron sealed relay device. That relay pin layout is not a match for this Beogram 8000 output signal board. My only option here is to take a newer output relay from one of my later model Beogram 8000 spares.


If I didn't have a spare I would have removed the clear plastic cover and tried to clean the relay contacts. That still might not have solved the problem if it is in the relay coil.

I installed the new muting relay and then attached the grounding switch.


I used some hot glue in the gap between the output board case and the switch case. This helps secure the switch.

Now it is back to the record play testing again. Success of these tests will result in this Beogram being packed up to return home.


Saturday, June 24, 2017

Beogram 8000: Trouble-Shooting Test Phase 1

I made the choice to try switching the Beogram 8000 control panel board first in the trouble-shooting of the intermittent record play interruption. This is the problem where occasionally the Beogram tonearm lifts to the Pause position while playing a record.

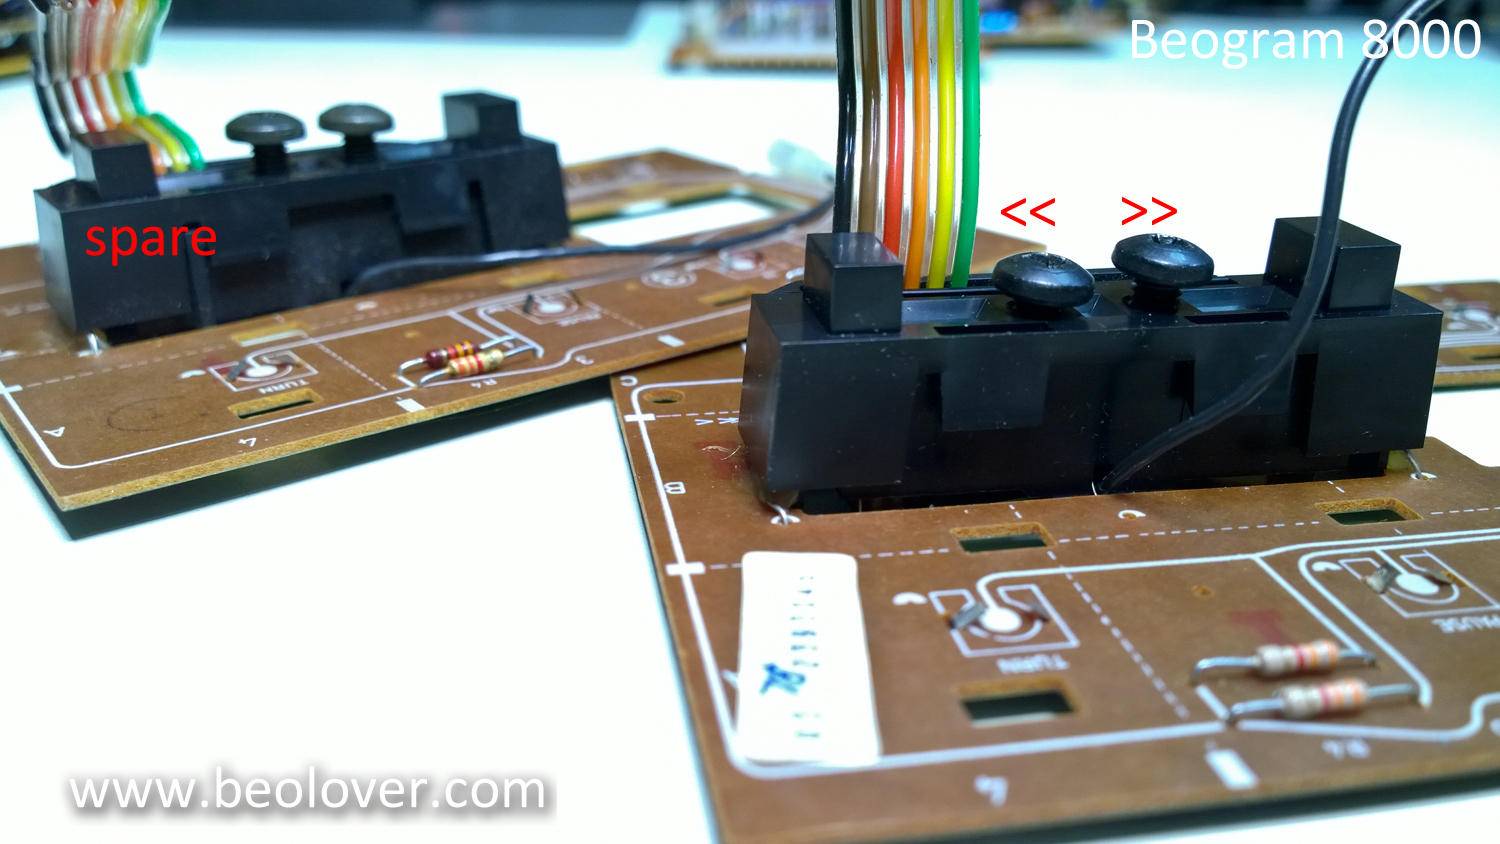
This is the easiest thing to check first and I kind of suspect the photo resistor circuit in the control panel on this Beogram anyway. When I made the service manual adjustments earlier in this restoration I noticed the adjustment for the adjustment screws were quite a bit different between the forward (<<) and reverse (>>). The adjustment screws control how much light shines on the photo resistor. The service manual says the normal voltage across those resistors (when forward and reverse are not engaged) is 620mV.

The following picture shows the control panel board removed. The position of the adjustment screws are where they needed to be to get the 620mV measurement. The difference in position of the two screws make me think one of the photo resistors is weaker than the other. Perhaps that is the reason for the fault I am trying to fix.


On the spare control panel board in the background you can see what I expect their positions to be like in relationship to each other.

One annoying thing about this adjustment is that B&O didn't provide good test points to check and adjust these controls without opening up the Beogram. It is easy to open just the control panel so if there were a nice test connector there I could check and make this adjustment after the Beogram is closed up.


The P5 connector pins 3, 4 and 6 are the nodes necessary to measure for this adjustment.
So I decided to add a test connector that I can access with just the control panel open. I also decided to do this test with one of my spare Beogram 8000 control panel boards.


I used a female connector for the end so I could leave the test connector attached. The picture above shows the test connector with the male test plug attached.

The test connector works great!  The Beogram 8000 is all closed up except for the control panel and I can easily use the test connector to make the adjustments.


I discovered that I will have to remove the test connector in this first attempt as the 24 gauge wires are too big and interfere with closing up the control panel all the way. If I want to have a "leave in" test connector I will have to go to a 30 gauge wire.

For now though it is time to return to the record play testing of this Beogram to see if the control panel was the problem. I am using the spare control panel board with the test connector and adjusted to the voltages specified by the service manual. On this spare board both adjustment screws are pretty symmetrical so that is a good sign that both photo-resistors are a pretty good match.

I am now on the last side of the second record play test. Only about eighteen more uninterrupted record plays (36 sides) to go for me to say the problem is fixed.