Featured Post

Beolover SyncDrive: DC Platter Motor Replacement for Beogram 4002 and 4004 (Type 551x and 552x)

Late Beogram 4002 and the 4004 (Types 551x and 552x), which have DC platter motors instead of the earlier synchronous AC motors usually suff...

Showing posts with label stabilizing. Show all posts

Wednesday, June 8, 2022

Beogram 4000: Repair of Cracked Hood Hinge

The Beogram 4000 that I recently finished up also had a cracked hood hinge. Sadly, this is a common failure due to the unfortunate way these hoods were designed in the hinge area. The use of countersunk screws in combination with a fairly heavy weight of the hood puts more stress on the plexiglass material than it can handle and often cracks develop over time. This shows how this hood presented:

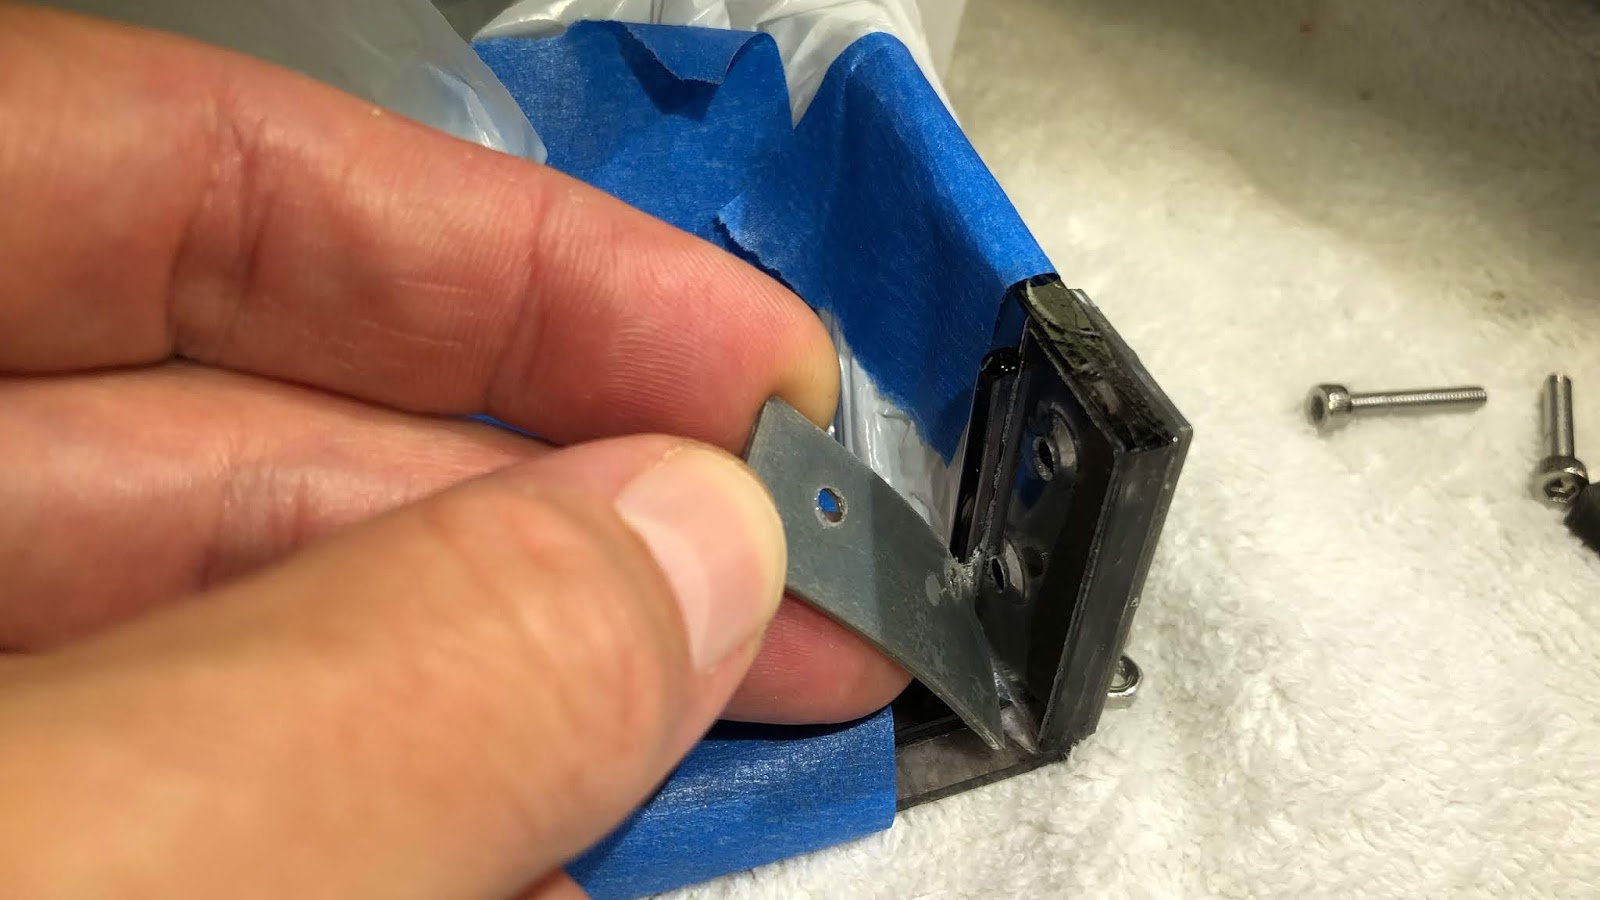
Fortunately, only one piece broke off making a fairly clean fracture and the rest of the hinge was still in place, albeit with an additional crack between the two bolt holes. I carefully cut through the glue that held the aluminum strip in place using a razor blade. This allowed preserving the strip with little damage:
The next step was cleaning off all the old glue on both sides. This usually works well by soaking the area in isopropyl alcohol for an hour. Then the glue can be scraped off. In this case it worked pretty well:
Then I glued the broken off part back into place with plexiglass glue:
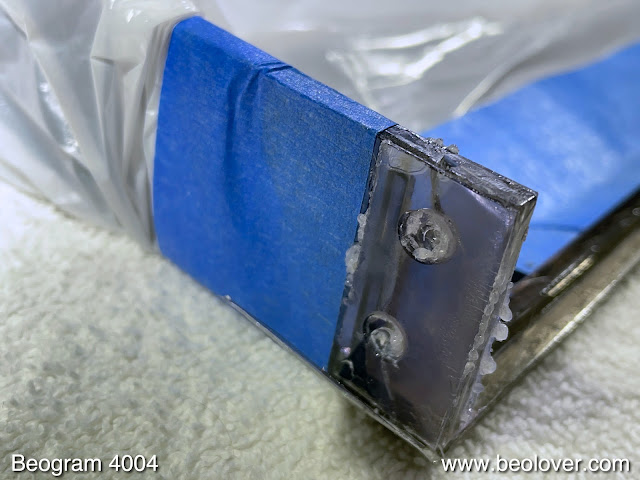
After cleaning up the glue spill out at the crack, I installed Beolover hinge patches. I developed a clamping mechanism that makes use of the two bolt holes to press the patches into the hinge area. The glue usually softens the hinge and the patches can be sunk slightly into the material by tightening the screws tightly:
This is how the outer patch looks like after the glue cured for 24 hrs, and after bolting the hinge back into the hood:
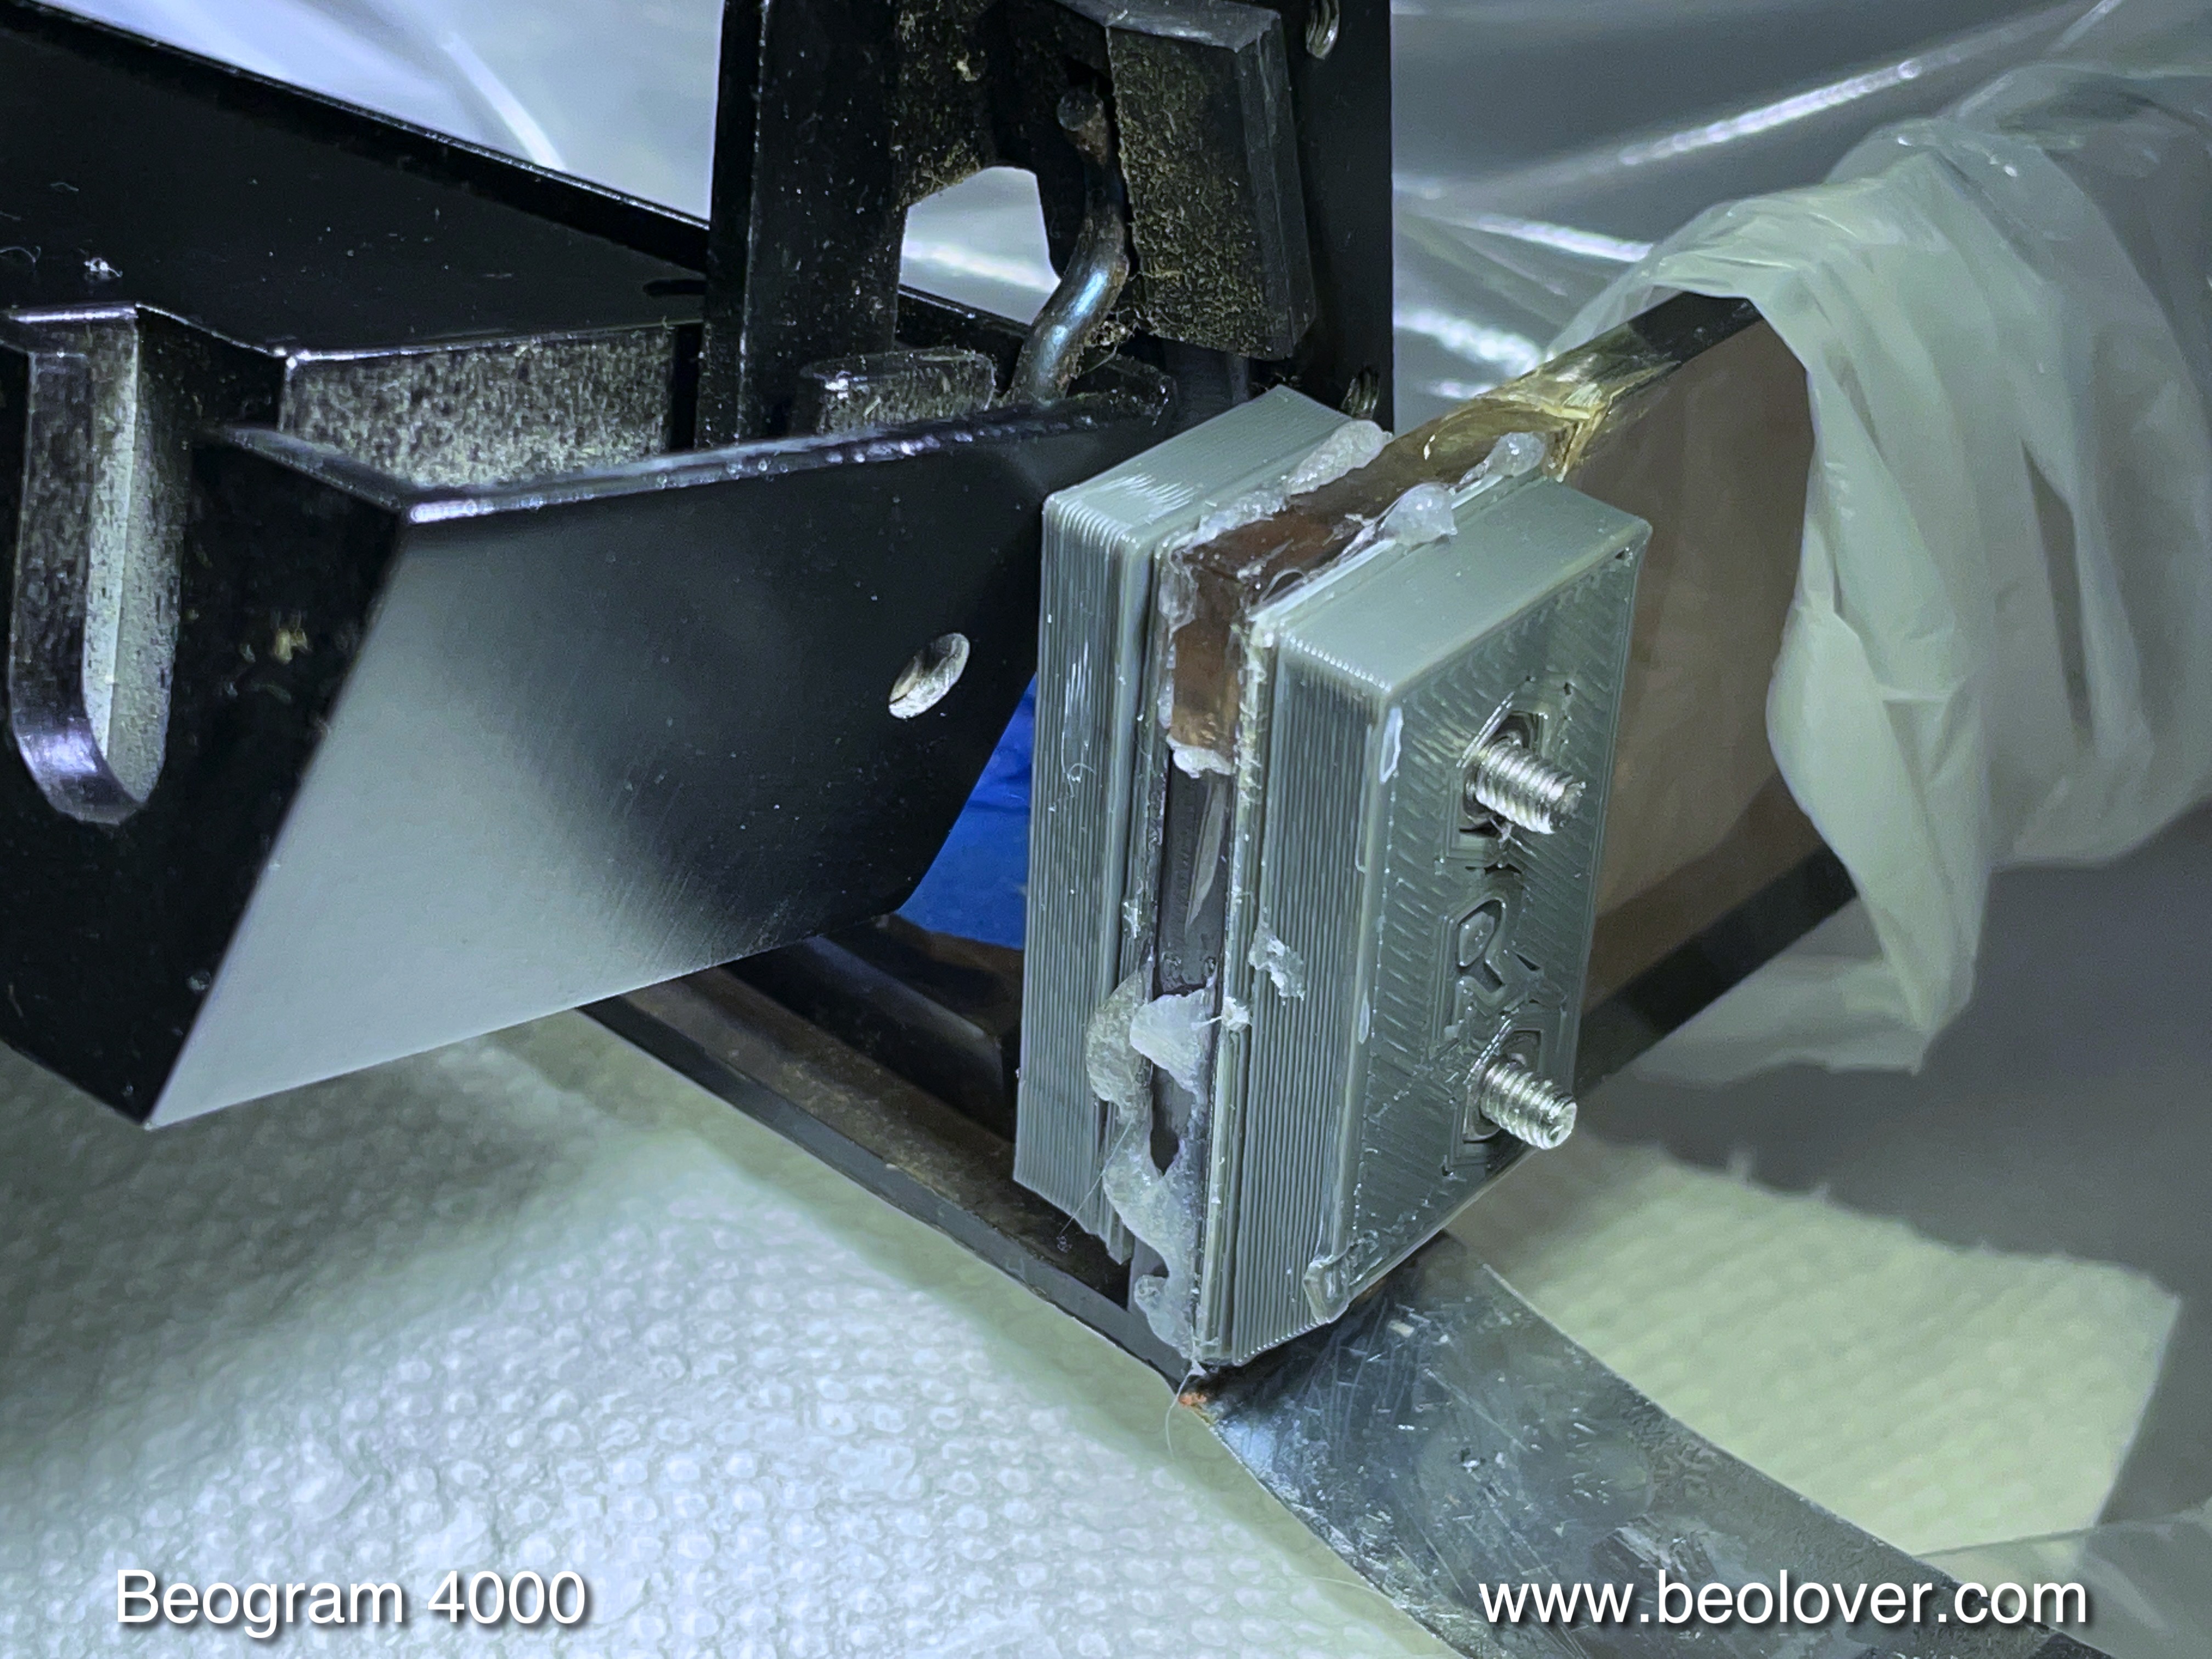
Since the aluminum strip is one of the early 'flimsy' types, the bolt holes need to be 'filled' to make a flush surface with the surrounding plexiglass. Otherwise, the aluminum strip could be damaged if pressure is applied to it from the outside:
Then I applied contact cement to both sides and pressed the aluminum strip back into place after letting the cement dry. Of course, one can see that the hinge has been repaired since the patches add a little to the thickness of the hinge area, and unfortunately, also some glue squirted out towards the front. This is hard to avoid since one wants to make sure the glue really covers the entire patch, i.e. it has to squirt out a bit to  make sure that this happens. But life is mostly a compromise, and so we need to accept that a repaired hood is not as pristine as a new one:
Like pretty much all Beogram 4000 hoods I encountered so far, this one also was missing its rubber bumpers at the front. They usually break off due to degradation of the original rubber material:
I usually carefully (it is easy to crack the thin Plexiglas around the hole) drill them out with a 2mm bit
and then install a 2mm O-ring snippet with some superglue gel:
After letting the gel cure, I cut the snippet to a 1 mm length using a template and a razor blade:
This hood is in business again. I hope it will hold up a while!


Tuesday, December 21, 2021

Beogram 4004 (5526): Repair of Cracked Hood Hinges

I recently received a Beogram 4004 from Florida for some TLC. The first order of business was the repair of a cracked plexiglass hood. My customer decided to have it fixed since it is in a pretty decent shape except the cracked area. As usual, the crack was around the area where the hinge gets bolted on:

Luckily this was a fairly clean break, and all the fragments were still present:

After I removed the hinge and the aluminum strip side parts it became evident that the other side of the hood also had the same issue, but the parts were still loosely together:

After removing all traces of the old contact cement that held the aluminum strip to the plexiglass, I glued the parts back together with Weld-On #4 acrylic solvent. It can be used if the parts still fit together very well, which allows capillary forces to suck the solvent into the cracks. Once the solvent is in, simply press the parts a bit together and hold for a few seconds. That is it:
On the other side I just bent the cracked off part a bit to enlarge the gap slightly, and that was enough to let the solvent in to mend the parts back together:
Then it was time to install my hinge patches. They are pressed into place with 3D printed clamps that allow the application of significant force on the patches. This basically 'immerses' them into the plexiglass of the hood, as is evident from the dissolved material that gets squeezed out on the fringes:
After letting everything harden for 24 hrs, I removed the clamps:
I drilled out the mounting holes and restored the flat head recesses with a counter sink. Then I was able to bolt the hinge back in:
The final step was to glue the aluminum strip sides back to the plexiglass with contact adhesive. this shows the left side of the hood:
And the right side. Unfortunately, a small amount of solvent was sucked under the blue tape that I used to protect the hood. This left a minor pattern on the plexiglass next to the aluminum strip. If this hood were polished it could probably be removed.
Finally, I replaced the worn rubber pumpers at the front of the hood. Their material degrades over the years. They can be replaced with a small piece of 2mm Viton O-ring. The first step is to drill out the remnants of the decayed material with a 2mm bit:
Then the O-ring bit can be glued in with super glue gel and trimmed to 1mm length:
Beolovely! This hood will close gain with a nice soft 'thump' when the bumpers hit the plinth.


Wednesday, March 20, 2019

Beogram 400x: Progress Report on the Repair of Cracked Hood Hinges

One sad way for a Beogram 4000/4002/4004 hood to go is that the plexiglass cracks around the mounting holes where the hinge is bolted to the hood. This area of the plexiglass is especially weak since it has to have holes for the hinge, while it also needs to take the highest stress when the hood is opened and closed. So it is no surprise that cracks develop over time, and finally the hood breaks loose from the hinge. 
I have tried a few different ways to fix such cracks over the years with mixed success. More recently, a promising process emerged from my efforts (see here for the original post, which also shows how to deal with the aluminum strip that covers the cracked part of the hinge).

In recent weeks I received a few inquiries for the patches that I used in the above post, which motivated me to come up with a 'hinge repair kit', which would further simplify this repair.

This post gives a progress report on the development of this kit:

For testing I dug out a hood that was damaged when a careless ebay seller sent me a 4002 in skimpy packaging. This shows one of the hinge areas with a 'nice' crack. I salvaged the aluminum strip prior to this experiment for another Beogram, i.e. if you want to see how to get the side parts off, check out the above initial post)

The first step to any successful patching is the removal of the glue remnants, which are always on the plexiglass after removing the aluminum strip:
This glue is soluble in isopropanol if it is soaked for about 20-30 min. I usually dip a wad of cut to size paper towel into isopropanol and then clamp it to the area with the glue:
If the aluminum trim is present on the hood one needs to do it a bit differently (see above post)...anyway, after 30 min the glue came completely off and it was time to try out the hinge kit:
From left to right, there are a clamping block for the inside with the two bolts already installed. Then there is the inside patch, the outside patch and the outside clamping block with the nuts.

The patches are composites of a 3D printed stencil (for precise cutting and hole punching) glued to the foil-coated PETG sheet with double sided adhesive tape. On the picture the stencil is on the bottom, and the top side is the exposed PETG side with a layer of protective foil.

The first step of the installation is to remove this protective foil:
Now the patches can be mounted on the hinge using the two clamping blocks. This shows the inside block and the inside patch:
On the outside, the other patch
and the block are bolted on using the screws and nuts:
At this point the screws should only be hand tight, to leave a small gap to allow the plexiglass glue tp penetrate via capillary forces between the patches and the cracked plexiglass area. Make sure that the outside patch lines up with the plexiglass (the holes in the patch are larger than the bolt, i.e. the bolt does not force it into the proper place like the inner patch)

The next step is to apply some Weld-On#4 glue, which is usually dispensed from a syringe bottle. It is a good idea to squeeze a bit of air out that the bottle has a bit of a vacuum. That makes it much easier to dose the glue between the to be fused parts.
This shows where to apply the glue at the boundary between the patches and the plexiglass:
Apply enough that some of it comes out at the bottom of the patches. It is a great idea to protect the exposed hood areas with a bag or similar. An accidental squirt of the glue can easily ruin the hood (if it happens, do not wipe the glue off. It will only make the damage much worse. Just let it evaporate and accept the fact that the hood needs to be polished now...;-)

After the glue has been applied, the screws need to be tightened well to ensure that the patches bond tightly to the plexiglass:
Weld-On recommends to let the parts harden for 24 hrs or longer for full strength, but after 2-3 hours the mounting blocks can be removed and we can have a look. After unscrewing the bolts the mounting blocks can be removed. The next step is the removal of the 3D printed stencils, which can simply be peeled off from the PETG surface:
and this is the result:
I tried to get the patches off, but it seems they are bonded very well. If you look closely, you can see how some plexiglass got squeezed out at the bottom of the patches, i.e. the glue did make it there. I recommend watching a few YouTube videos about glueing plexiglass sheets etc...it is pretty impressive how the capillary forces do the trick when simply applying a few drops of solvent to the boundary between the materials.
One more note: If the hinge is more deteriorated or if there are small fragments missing, it is better to use Weld-On #16, which has a more viscous consistency. That will be my next experiment with these patches...I am sure, I will soon have a Beogram on the bench with another cracked hood! Stay tuned.


Friday, November 10, 2017

Beogram 4004 (5526): Repair of a Cracked Plexiglass Hood

The Beogram 4004 (5526) that I am restoring right now came with a hood with a crack in the hinge region. This shows the crack after moving the metal hinge part:
Many Beogram hoods suffer this fate since the holes for the mounting bolts of the hood hinge represent a mechanically weak spot. Combined with the brittle nature of plexiglass and the torque acting on the hinge region this can lead to stress fractures. I recently developed a method to repair such cracks when I needed to save a rare Beogram 4000 hood. For this project I developed laser cut patches that are thin enough to still permit mounting the hinge after the repair. Before applying the patches, however, the first step is to glue the cracked parts back together to maximize strength of the repaired area. This can be done by simply pressing them together and infusing a bit of Weld-On #4 acrylic solvent into the crack. Capillary forces draw the water thin liquid into the crack where the abutting sides are dissolved in the interface region. Evaporation finally cures the dissolved regions into one piece of plastic:
After 5 min of holding the parts together one can let go and add the patches to further stabilize the part:
If the hood area is smooth enough one can also use #4 for gluing the patch on. If the area is rough, higher viscosity #16 is better for the task. Here #4 did the trick. I also applied a patch to the outside and moved on to the other side of the hood where cracks are already developing:
On this side I only applied a patch on the inside, since the crack was not fully developed yet:
After letting the acrylic harden for 24 hrs, I bolted the hood hinge back in and then glued the side parts of the aluminum strip to the plexiglass with ultra thin double sided tape. This shows the side that had the fully developed crack:
The outside patch made the hood a bit wider, i.e. the aluminum strip is slightly offset from the hood surface....Unfortunately, the aluminum strip already had developed a small crack where it is bent, but I was able to catch it in an early stage and it is hardly visible. At least this hood can be used again!


Friday, April 28, 2017

Beogram 4000: Repair of a Cracked Plexiglass Hood With Laser Cut Patches

The most fragile part of a plexiglass hood of any Beogram is the hinge region. That is where the highest torque is applied to the plexiglass, while it is structurally weakest due to the holes permitting the screws that hold the metal hinge to the hood. The Beogram 4000 that I recently restored had a hood with a large crack through the holes and a broken out piece:
Encouraged by my recent restoration effort on a Beogram 3000 hinge that was broken off I decided to develop a similar fix for the 4000/4002 hoods. Unfortunately, the space one can work with is much less in 400x hoods, since the metal hinge part is bolted to the inside of the hood, i.e. if the plexiglass gets too thick, the metal part does not fit anymore. So my approach here is to use two very thin 20 mil (~0.5 mm) patches that are precision matched to the bolt holes and the hood shape.
But the first step is to try to glue the cracked parts and re-connect the broken out part:
I use Weld-On #4 acrylic glue, which is so liquid that is is drawn into cracks by capillary forces. This is a great feature since one does not have to bend the plexiglass any further to apply it. All one does is squirt a bit on the crack and one can see how it is sucked in. One can then simply press the parts a bit together for ~5 min (play some nice music while you sit there holding the pieces together...;-) and then the next step can be done, which in this case was reattaching the broken out part:
Another 5 min of music listening and then I let it cure for a couple hours. The next step was to attach the laser cut patches. This shows the inner patch:
I used Weld-On #16 for these, since the surface was pretty rough due to the broken out part and previous 'repair' attempts. After curing the patch for ~2 hours (=50% strength of the bond) I did the same for the outer patch:
At this point I let everything cure for 24 hrs to achieve a close to final strength of the bond (~80%). Only after a few days such bonds are fully cured and 100% strength is achieved.
In order to have the metal hinge centered, I also applied an inner patch on the opposite side of the hood. This was a good idea anyway since closer inspection yielded that there already were some minor cracks under development around the screw holes.

Then it was time to bolt the metal hinge in with new stainless steel screws:
The next step was to reattach the aluminum trim to cover the screws. This requires removal of the old glue, which can be done with a razor blade and careful scraping. Take care that the aluminum trim is not bent too much or otherwise damaged. These side parts can break off easily if the bend is flexed too often. I usually use an industrial strength ultra-thin adhesive transfer tape (3M 300LSE) to glue them back on. This allows to generate a very thin and precise adhesive layer, which makes a strong bond. 'Thin' was especially important here to minimize the thickness increase due to the outer patch:
After removal of the tape backing, I pressed the trim on and cleaned some glue splotches from previous repair attempts on the metal surface with Mr. Clean Magic Eraser as good as possible:
This is how this side looks from the front:
It looks pretty good, albeit closer inspection of course will reveal that there is a thin patch underneath. The price for a stabilized hood hinge!

One more thing: Like most Beograms of this vintage, the rubber hood bumpers were broken off:
As usual, I drilled them out with a 2 mm drill bit:
and then glued in snippets of a 2 mm O-ring:
Using a 1 mm template, I cut them to size with a razor blade once the super glue cured:
And here is the end result:
The final step was to polish this hood since it had the usual scratches after about 40 hears in service:
I gave it my usual multi-step polishing procedure that started with 200 grit dry sand paper and then worked it back to a wet 3000 grit level through about 10 sanding steps. I had to be a bit more careful than usual due to the repaired crack. I definitely did not want to break it again...;-). This is how it looks now (still has some black protective tape on the trim):
Time to install it again on this lovely Beogram 4000!