After installing a new gold plated DIN 5 plug, it was time to give this Beogram 4000 a first spin. I adjusted the RPM with my Beolover RPM device:
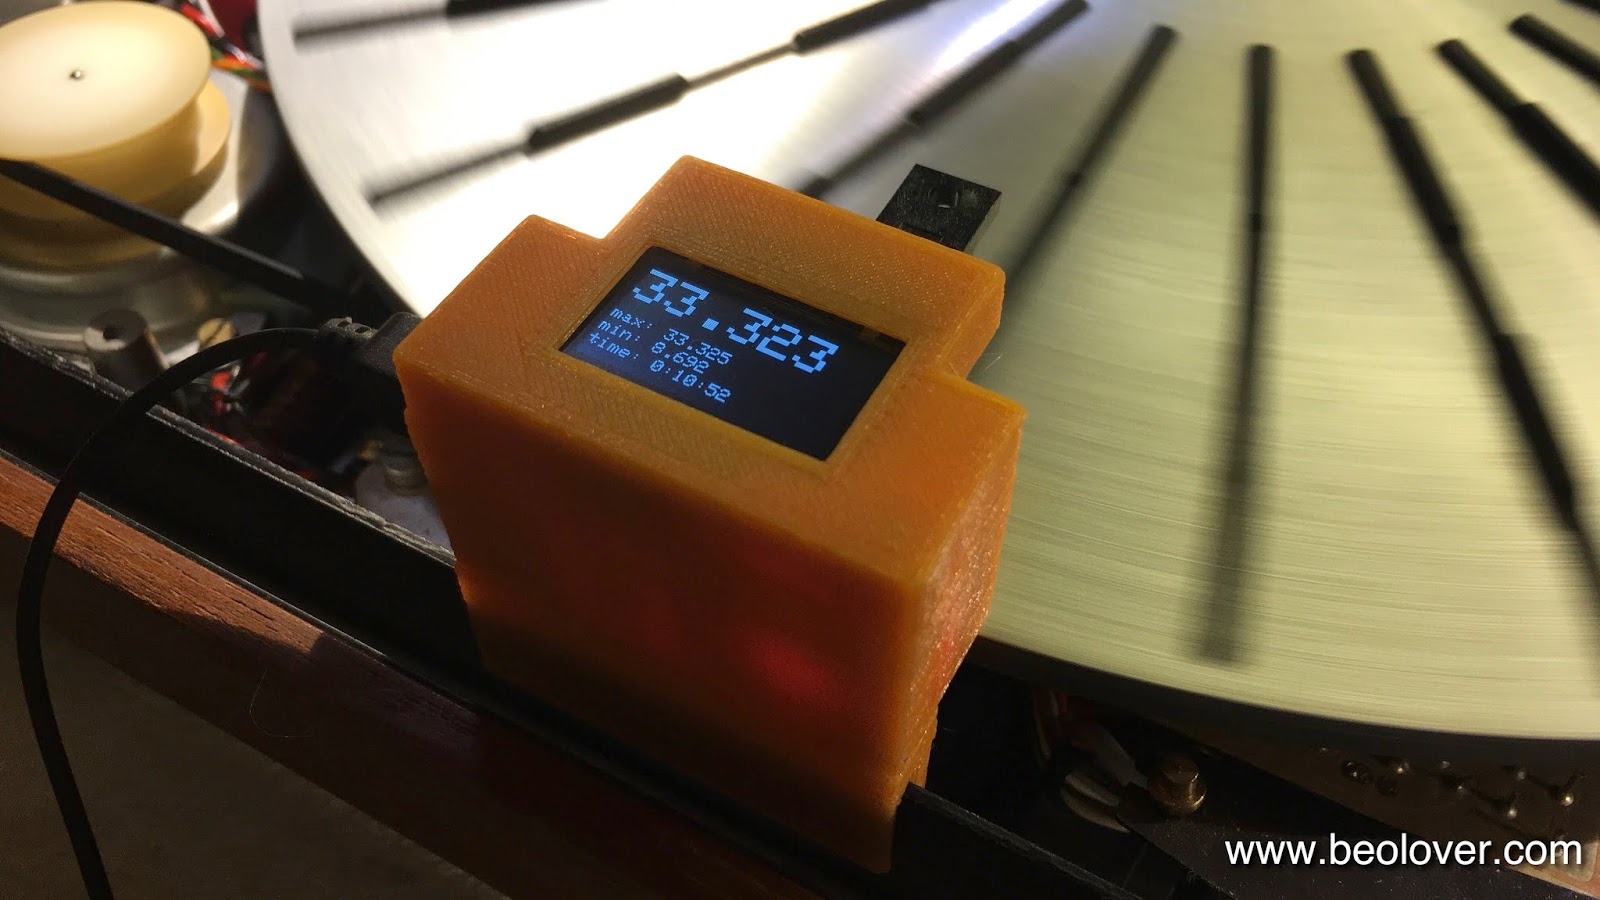
The precision multi-turn RPM trimmers that I installed recently proved very helpful for this process enabling a very precise adjustment. If you do this at home, let the unit run for 15 min or so before doing it since the RPM changes slightly while the motor and the electronics warm up. The Beolover RPM device is available to other enthusiasts, just send me an email or use the contact form. It comes with a separate base that allows to set it up on the assembled turntable for occasional RPM checking.
The next step was to adjust the chassis and the platter height. A concern with the 400x series is always to get the platter centered. The built in adjustment often does not have enough range for this adjustment. To improve the situation I recently developed a 3D printed part that can be installed on the leaf springs that float the table:

This part pulls the metal string a bit outward, allowing to give the floating sub chassis a tug outward if necessary.
Once the platter is in the right spot, the arm lowering limit can be adjusted:

This is an important adjustment to make sure the needle does not accidentally hit the platter ribs in case of a malfunction of the record detection mechanism (a dead light sensor can for example disable the mechanism, and the arm would lower on the platter even if there is no record).
The next step was to upgrade the counterweight mechanism in the tonearm. The screw that is used to calibrate the weight is held in place with a simple locking clip, which allows it to shift in place a bit:

Considering the necessity to ship the Beogram back to its owner after the restoration this is not acceptable. I usually replace the clip with a M3 nut, which can be tightened down for a more permanent calibration:

After this procedure, I gave the aluminum panels a good cleaning (careful here: do not use any harsh detergents. A mild dishwashing detergent, warm water and a Mr. Magic original eraser pad does the job very well)
The next step was to adjust the tracking weight. I used to do this with a mechanical B&O gauge, but I recently upgraded to a digital scale:
This scale can be obtained from Amazon for less than $15. It has a weight range of 5 g and is pretty accurate. I compared it with the B&O gauge and the reading was quite close. In my opinion there is no reason to spend more money on a tracking weight scale.
And then it was finally time to enjoy this lovely Beogram 4000 for the first time. I selected a recent addition to my fast growing record collection, Freddie Hubbard's CTI issue "Straight Life" (CTI 6007). Of course, I cleaned this record ultrasonically with my CleanerVinyl Pro before listening to it. Ultrasonic cleaning can make quite a difference when original vintage vinyl is to be enjoyed. This issue is one of the few green label CTI records of the 6000 series and may well be an original pressing. Here is an impression:

I really enjoy the second side of this record, especially the funky "Mr. Clean", but the more calm "Here's That Rainy Day" is also quite lovely. The centerfold has a great picture of Freddie and Herbie on the inside:

I just cannot seem to get enough records of this very creative jazz period. Awesome stuff!
This is a great post. I like this topic.This site has lots of advantage.I found many interesting things from this site. It helps me in many ways.Thanks for posting this again.
ReplyDeleteאלומיניום