Featured Post

Beolover SyncDrive: DC Platter Motor Replacement for Beogram 4002 and 4004 (Type 551x and 552x)

Late Beogram 4002 and the 4004 (Types 551x and 552x), which have DC platter motors instead of the earlier synchronous AC motors usually suff...

Showing posts with label smudges. Show all posts

Wednesday, May 28, 2025

Beogram 4004 (5526): A New Arrival from New York - First Look

I recently received a Beogram 4004 (Type 5526) from a customer in New York for a full restoration. The unit came safely packaged in a Beolover shipping container (watch the packaging process in the video posted on my 4002/4004 page, it reliably prevents shipping damages). I extracted the unit and put it on the bench:

The hood is quite scratched as if a miniature ice dancer had spun her pirouettes across it..;-):
In absence of new reproduction hoods from the dksoundparts store this hood could be polished back to a decent look, while we wait for them to get their act together (all eyes are on you!...;-). The hood hinges seem in good condition without any discernible cracking. Unfortunately there are a few damages on the inside, which cannot be polished out. But this hood could certainly look more presentable than now after polishing it.
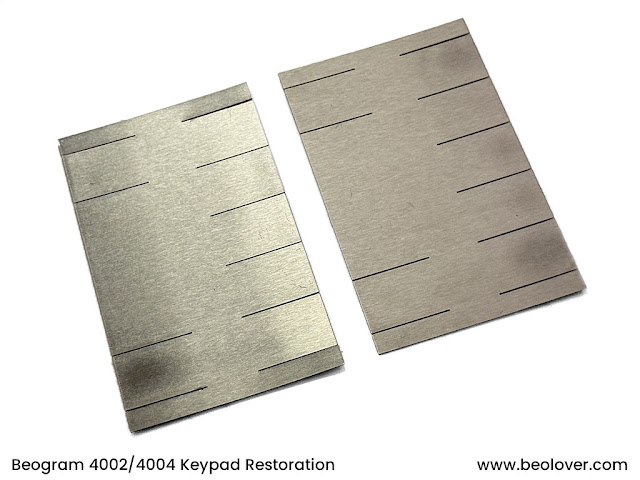
The keypad has the usual use-smudges and also a few scratches:
These smudges come from touching the keys which over time thins and damages the coating. Luckily, we now have a restoration process in place that could make this pad look like new again. Original keypads that still lookg decent can be protected from further decay by installing the Beolover Commander Remote Control for Beogram 4002 and 4004, which allows full control of all functions without needing touching the keys ever again.
The platter is in pretty good condition except one fairly long scratch in the center:
The plinth is also still fairly decent. It only has one small chip on the left corner:
If perfection is desired a beautiful new CNC machined plinth could be installed. They are of much better quality than the original veneer on particle board frames.
The right corner is still pristine:
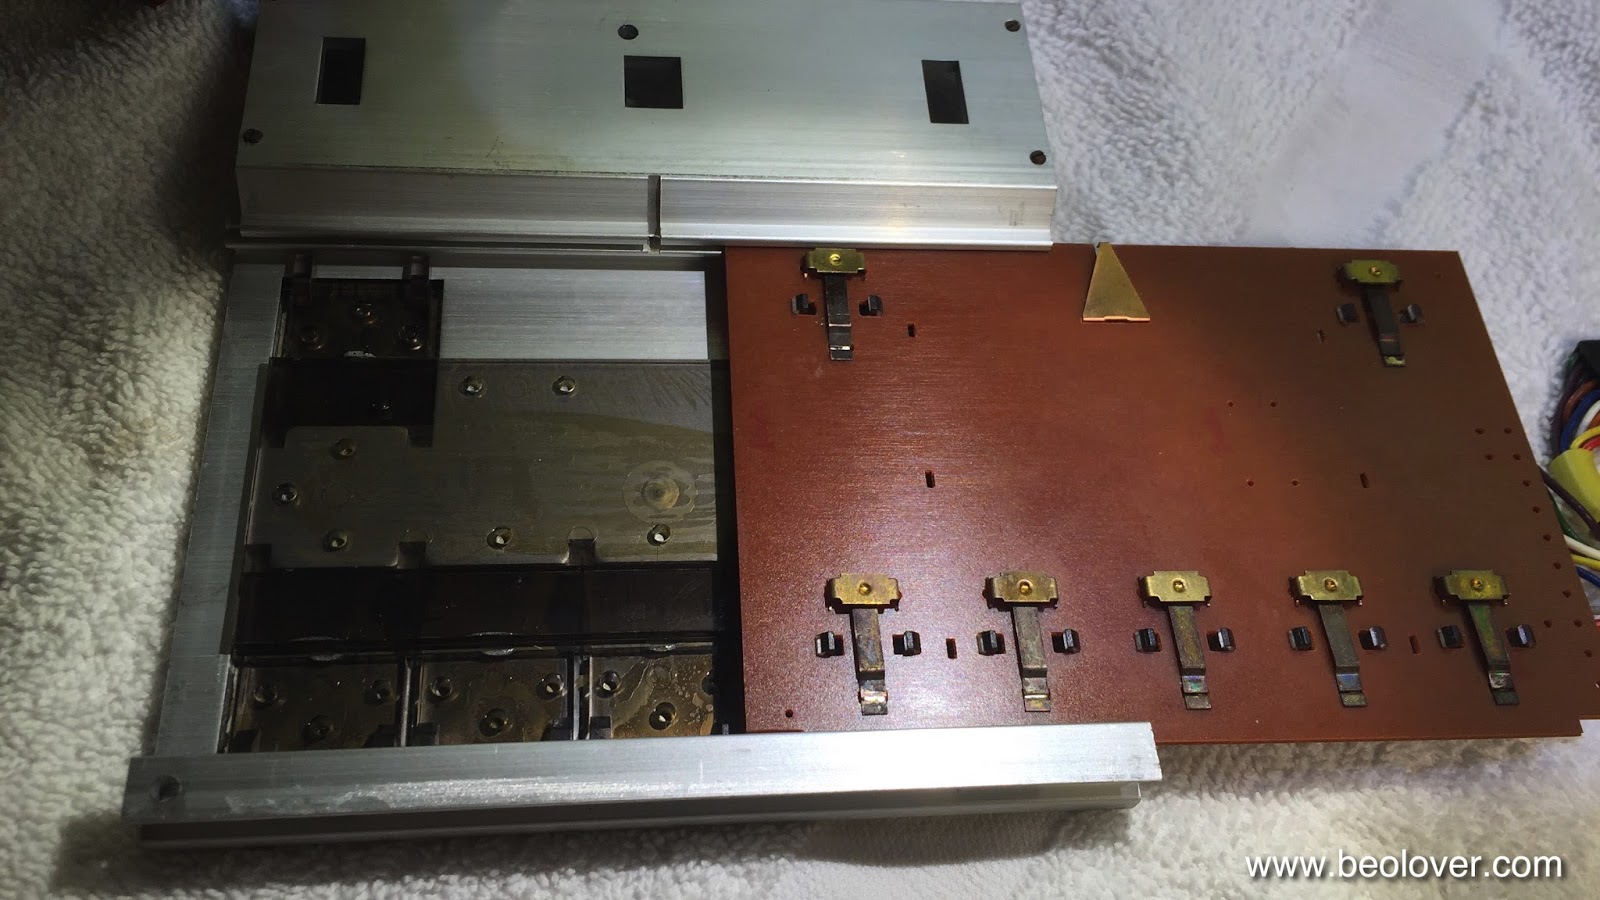
I removed the aluminum plates and the platters:
The deck looks fairly original under the hood. I found the usual orange fragments from degraded transport lock bushings:

After this visual inspection I plugged the Beogram in and pressed START. Nothing happened at all. I had a look at the fuses, but both were still o.k.. This suggested an issue with the carriage drive circuit. I manually drove the carriage off the SO ('switch off') switch by turning the carriage pulley a few rotations. After the switch was cleared, the light at the end of the sensor arm came on, indicating that the unit powered up. Pressing the << >> < > buttons yielded no response. Also the platter motor did not rotate. But I was able to raise and lower the arm. So clearly some mayor issues are present in this unit. The platter motor seemed completely seized and I was not able to turn it by hand. A non-standard too-long screw on the motor mounting plate indicated that there some previous interventions already happened:
Overall, I think this unit is a pretty decent candidate for a nice restoration, especially if the cosmetic issues would be alleviated. I am confident that the functional issues can be cured and like-new functionality will be achieved once I am done with my process. Stay tuned!


Wednesday, May 21, 2025

Restoration of Beogram 4002 Keypad from Boston

 I received a keypad from a restorer who is working on a Beogram 4002 for a customer in Boston. Its surface had the typical wear from years of use, but the keypad frame was in excellent overall condition; an ideal candidate for our full restoration process. Below is how it looked on arrival:

On this keypad, the 33 rpm and Start buttons showed the heaviest wear (typically the Start and Stop keys). I applied gentle, sustained heat to gradually loosen the original adhesive. DC-series models (551x/552x) use an especially resilient, elastic glue.

After removing all adhesive residue, I refreshed the black paint lines around the keypad’s perimeter, which become worn from fingertip contact.


Below is the new replacement keypad plate.

For the back pieces, as part of this service we provide new nylon backs which have better dimensions and don't pull the keys down.

Below is the final result:

This should make for an excellent start to the next phase of the restoration.

Saturday, March 8, 2025

Restoration of 4002 + 4004 Keypads from Germany

We are very excited to have finally launched our Beogram 4002/4004/6000 keypad restoration service, more information in available in this post and on our store listing.

This restoration is for a customer in Germany who elected to have their 4002 and 4004 keypads restored. Below is the original condition of the keypads. Both have the typical shine marks where the keys have been pressed repeatedly over time. Even though the coating has not worn through, they do look quite weathered, which is to be expected. Also note that the finish on one of them may not be original as it is different than the other:


The first step is to apply heat for 20-30 minutes so that the glue can soften up. After this, I can start to slowly lift the keypad plate from the frame, which requires a bit of patience on DC models. The glue will eventually let go of the plate and leave the frame in this condition:


Since I will be replacing the top plate, I don't have to do any restoration to the original part (but will return the original parts to the customer):


I carefully scrape all the glue off the keypad frame and do some a deep cleaning of all the surfaces. The remaining marks you see (for example in the top area that is normally hidden under the RPM speed module) are actually imperfections in the original anodizing. B&O was careful to perfect the areas you can actually see.


I then repaint all of the black lines that run under the keypad plate as they normally have some wear marks and also scrape marks from where glue was removed from the painted area.


I then prepare our replacement back pieces with adhesive. These back pieces are improved from the originals such that they will not pull the keys down below the surface.


I then insert these into the frame and cut the links that connect the key pieces to the center part. The design of the center piece (original version and our version) has a specially banked edge that keeps the keys from being pressed too far, that is its purpose. Each key also has a two hooks that keep the key from being pulled up. These have been adjusted to be correct for the adhesive I am using, which is more accurate than the glue used on the originals.


Below are the final results, another great restoration. In addition to the keypad plates being new, the whole part is much fresher after going through this process of deep cleaning and restoration:


The last step is to prepare these for safe travel back to Germany, where I hope they will provide many more years of service!

Wednesday, October 7, 2015

Beogram 4002 (5513): Restoration of Worn Keypad

I am approaching the detail&beautification stage of the Beogram 4002 (5513) restoration that I am currently doing. This Beogram has (like 90% of them) a worn keypad. The original coating simply is not up to the stresses presented by skin chemistry containing acids and fats. Usually at this age if the deck has seen even only moderate use the pads show ugly finger smudges. I recently had some pads refurbished by a beofriend in Denmark to have them on hand when needed for restorations (I'd be happy to get you in touch if you want to get your keypad rebuilt!)

Here are a few impressions. This is the original worn keypad:

I needed to switch over the PCB that carries the actual switches, hence this was a good moment to refreshen the contact pads. I usually give them a light sanding with 2000 grit paper and then a coat of DeoxIT D100 to prevent further oxidation if they are not bent (if they are one needs to extract them, straighten them out and solder them back into place):

Then it was time to slide the PCB out of the original keypad:

Here is a comparison between old and rebuilt:
And after installation:

Doesn't my friend do an amazing job?? They really look very close to new! Like traveling with a time machine back to a B&O store in the 70s and picking one up!