One of our long-term projects has been to come up with a process to restore Beogram 4002, 4004 (and 6000!) keypads to their original state. We made several attempts over the past 3 years to replicate the original process and were met with many failures. Most steel will bend and just stay bent when buttons are pushed/flexed. Most cutting methods cannot create details as thin as the small gap between the keys. The coating is a challenge, to find something durable that has a similar overall effect.
We have finally landed on the best combination of materials and procedures to fully restore the keypads and are now offering this service in the Beolover Shop. Be sure to read this full article for information on what the restoration process is and how to remove your keypad to send it to us.

Many keypads will start off with keys in this condition:

We originally planned on a process to restore/re-coat the original steel plate, but there are several problems with trying to restore the original. The first problem is that if you strip away the old coating, the areas that had worn through will stand out in certain lighting conditions, even when they have been re-coated. The second problem is that you will likely have some waviness in the material from the extraction process, the glue especially in DC models is very tough and the plate can easily get bends where you don't want them. The third problem is that if anything doesn't go perfectly, you have no backup plan. Below is an extreme example after the coating was stripped, there is waviness everywhere:

Now that we have new keypad plates, we don't have to think about the originals, which is quite a relief. There is no difference between the original keypad with a new coating on it and our new keypad with the same coating. There are minor differences between the new coating and the original coating, which we feel are worth it for the quality of the coating. Below on the left is an original in very good condition, on the right is a restored keypad with a brand new plate (more photos in this post).

How to Remove Your Keypad
In order to send your keypad for restoration, you will need to extract it from your Beogram. All that is needed for this is a flathead screwdriver for the single screw that holds the keypad in place. The process is easy, anyone can do it (takes 5-10 minutes). The first part of the removal process is also discussed in the Beolover Commander installation video (from 0:45 to 2:15). The Beolover Commander product is highly recommended to extend the life of the restored keypad.
1. Unplug the unit and hold the start key to drain any remaining power.
2. Carefully remove the stylus cartridge, taking care not to touch the stylus/needle/cantilever. Store in a safe place!
3. Slide the wood plinth forward to unlock the top plates. If it does not easily slide forward, locate the two black metal tabs at the back inside edge of the plinth (see photo below) that may need to be carefully nudged outwards while sliding the plinth forwards. These tabs are between the case and the plinth on each side.


4. Carefully begin to lift the right side of the right cover plate, taking care not to scratch the paint on the case or the keypad display module. Underneath, it is secured by a copper U-shaped piece and the left edge is tucked under the platter surround plate. Once it is slightly raised, it should slide out to the right.


Note: when re-installing this top plate, it is sometimes necessary to lift the top right of the platter surround plate so that this plate can slide back into the copper support pieces. Some earlier models have two pegs on the keypad module that this plate plate aligns with.
5. Lift the platter surround plate out, taking great care not to damage the case, the platter or the plate itself.
6. Place a cloth on top of the platter and carefully lift the gauge/display module out of the keypad by rotating it backwards slightly while pulling up on it gently. It should click out of place, then you can rotate it to the left and place it upside down on top of the platter.


7. Under the display module you will find a single flathead screw that holds the keypad in place, use a screwdriver to remove it.
Note: When you get your keypad back and have to replace this screw, it can be a little tricky to find the screw hole on the case, it will require a moment of patience as it is on the other side of the audio output board which may not be perfectly aligned with the hole as it moves around.
8. Lift the keypad gently, if you have a DC (551x/552x) model then you can disconnect the keypad harness from the main board. For an AC (550x) model, place a piece of paper or cardboard underneath the keypad as we will be removing the circuit board and don't want it touching the case or audio output board.
9. On back side of the keypad module, locate the triangular copper shape at the top center of the circuit board and lift it slightly so that the pin at the top is above the keypad frame, then slide the board sideways out of the keypad (and for AC models, let it rest on the cardboard/paper you placed previously).

Your keypad should now be free from the unit and ready to mail to us. It is best to use a 8x8x4" box and some foam padding if possible, though there are many ways to pack it safely.
Our Restoration Process
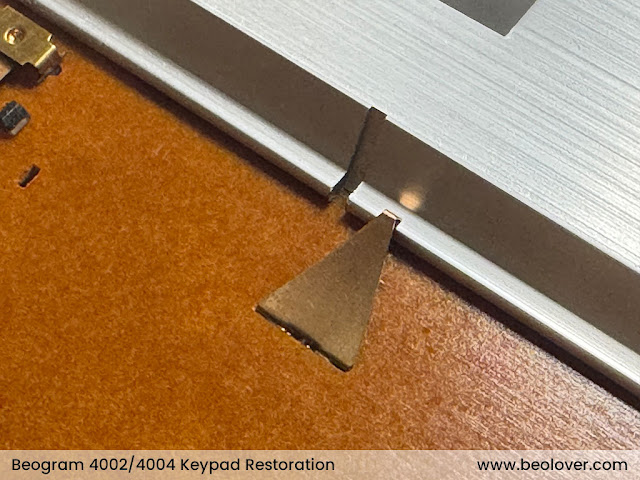
Each keypad sent to us will go through the same procedure to restore it. The first step is to warm up the keypad, to a level that will not affect the black paint of the screen printed lettering, but will loosen the glue and make it easier for us to remove the original pad and back pieces. Once it is warm, we can start with a large flathead between two of the keys, a small turn and they will break loose:


Lifting the original steel pad is challenging, especially on DC models where it can be very stubborn, eventually it will let go:

Nest, we have to clear all the old glue:


We re-paint the black edges under the keypad:

Optionally, upon request, we can also take this time to paint the area below the keypad so it cannot be seen from above when looking down at the Beogram:

We then use high bonding strength adhesive on both the keypad frame and the steel pad and join them. Here is the new keypad plate before it has been glued down:

Replacement Back Pieces
The last step is to install the back pieces. The original back pieces are not ideal for several reasons. One reason is that they are not quite thick enough, especially the 550x models which have 2.85mm back pieces. The later 551x/552x have 3mm back pieces. The original pieces have a tendency to "pull the keys down" below level, here you can see an original keypad - exactly as B&O left it; the START key (and all the other keys) are actually "below" the level of the sides:

We wanted to fix this so the keys would always be level and so we could use a consistent-level high bonding strength adhesive tape, rather than contact cement (which introduces variability to the level). We have created new back pieces which are 3.15mm thick and leave the keys perfectly level every time:

We were also able to reduce key travel slightly so that the buttons are closer to the electrical contracts. The new back pieces are made from black nylon and look like this (not that anyone will ever see them!):


Finished!
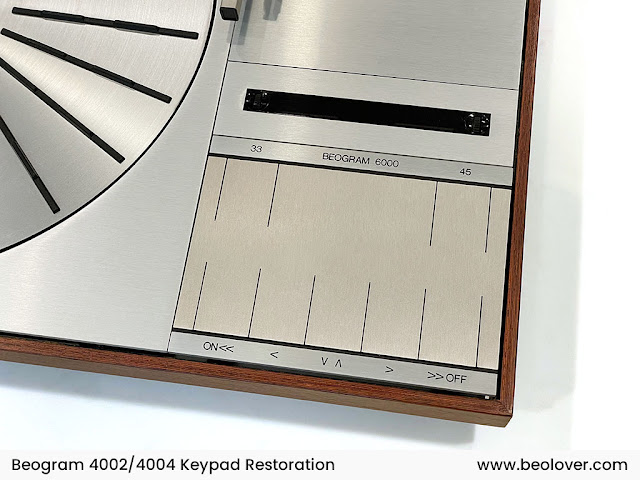
Once you receive the keypad back from us, simply follow the keypad removal steps in reverse. The final product, once installed in your Beogram:

No comments:
Post a Comment
Comments and suggestions are welcome!