Featured Post

Beolover SyncDrive: DC Platter Motor Replacement for Beogram 4002 and 4004 (Type 551x and 552x)

Late Beogram 4002 and the 4004 (Types 551x and 552x), which have DC platter motors instead of the earlier synchronous AC motors usually suff...

Showing posts with label 2021GWBG8002. Show all posts

Friday, May 28, 2021

Beogram 8002 From North Carolina: Finishing the Reassembly and Playing Records

I really wanted to start listening to this Beogram 8002 today so I continued on from the previous post and finished the reassembly of the turntable.

The remaining reassembly tasks were to attach the dust cover, tonearm compartment lid, hinge bar and a couple of trim pieces.

I started with the dust cover and the tonearm compartment lid mount. Both of those attach to the back of cabinet with the long metal bar hinge. I lined things up, applied a little dry lubricant on the bar and slid it through the hinge mounts to secure the lids.


Notice how flat the back of the dust cover lid looks now that the hinge back part has been changed (from the original cracked one). 


With the dust cover in its closed position I checked how two new dust cover lid spacers I printed up fit.
They work really nice as replacements for the original pads that had deteriorated.


Before I install the leaf spring damper to the dust cover lid I changed focus over to the tonearm compartment lid. It needs to be reattached to its hinged mounting piece with some of the same 3M VHB tape I used on the deck panel. 

While the tonearm compartment lid has been off I refilled the damping mechanism for its lowering lever with new damping grease (Nyogel 767A).

Here is the reassembly of the tonearm compartment lid.


Now I can finally install and setup the dust cover damping spring assembly. It seems kind of funny finishing up with the thing that started out all of the cabinet problems.

The installation was non-eventful (as it should be). The leaf spring fat end fit under the set screw while the narrow end fit into the bracket that presses the rotating hinge against the stationary hinge (mounted to the dust cover).  The adjustment of the leaf spring tension was easy and the task was soon done.


The hinge bar remains straight now and the dust cover damping works properly.

The last two pieces were the trim piece to hide the dust cover damping mechanism and the small, metal lid that fits under the tonearm assembly.


This now looks like a proper Beogram 8002.

I grabbed an MMC-2 cartridge, a Beogram 8002 phono cable and moved the Beogram to my office stereo. The first record I grabbed was a new pressing of Band of Gypsies by Jimi Hendrix. It is a live recording I have always liked and should sound great on the Beogram 8002.


I gave it a listen as I created this post.  It doesn't get much better than this.  

Beogram 8002 From North Carolina: One Last Cabinet Repair and Starting the Reassembly

The Beogram 8002 is getting close to being ready for record play operation again.

I reinstalled the new, replacement dust cover back part to the Beogram cabinet to check its fit and as the first step in the cabinet reassembly.


All of the original mounting tabs are present on this replacement back part so no extra help to attach the part to the back of the Beogram cabinet is necessary.  Once I get to the reattachment step of the dust cover lid I expect the raising and lowering to work as originally designed.

Before I can get to that step though...There are still other repairs to be made on the cabinet.

In the previous post I cleaned off the old deck trim repair attempt and cleaned all of the surfaces.
Now I applied some 3M VHB 0.8mm double sided tape to reattach the metal trim.


The fit is perfect.


You can see that this Beogram has a small battle scar in the top left part of the wood trim.
Before sending this turntable home I will see if I can find a small piece of rosewood veneer to patch that so it is less noticeable.

I had to make one last repair on the damaged cabinet before I could begin reassembly of all the internal turntable parts.

The last damaged area of the Beogram 8002 cabinet was along the cabinet end (on the right side) where the top of the cabinet mates with the metal base of the cabinet.

There is another bar hinge along the right side of the cabinet for these two parts so the top part of the cabinet can lift up like a car hood for servicing. While that is a nice feature, you have to be careful that the top part of the cabinet that lifts up doesn't bend too far.  It was not meant to fully open where it lies flat on the other side. I don't know if that what happened to cause this damage but the result was a section of the hinge mount cracked.


The broken area doesn't look too bad in the photo but it is cracked completely through and any movement of the hinge (as in opening for service) will stretch the mount open and the bar will pop free.

I know from experience that epoxy alone on the damaged area will not hold up.
The only hope to repair this type of damage is to reinforce the area and epoxy it.

I fashioned a support piece to be the reinforcement on a 3D printer.
It has enough material to bridge across the damage and it has right angle material that fit into the hinge slots to support the side of the cabinet.


I applied JB Weld gray epoxy along the surface of the reinforcement part that mates with the surface of the cabinet and clamped everything in place.


After 24 hours of curing I removed the clamps and protective tape.
The repair looks good and works well. The reinforcement part will not be noticeable unless someone bends down and looks underneath for it.


I am able to open the cabinet to its service position without the hinge coming loose now.
Care should still to be taken in the future if the Beogram cabinet is opened up for servicing but fortunately there is no daily stress on the hinge area when the Beogram is in normal use. The repair should hold up fine.

Before reinstalling the dust cover and the tonearm compartment lid back on the cabinet I will install the Beogram 8002 turntable internal parts.  The reason for that is I would like the Beogram all bundled up tight and working before messing with the dust cover hinge and aligning the metal lid for the tonearm compartment.

I also want to get the base and top of the cabinet locked down as soon as possible so I don't have to worry about any extra stress on the repaired service hinge.

The first thing I had to do on the internal parts was to reattach the metal lid to the microcomputer board.
That requires some thermal paste along the heatsink bar on the lid that mates with the top of the microcomputer IC.


I installed the board assembly inside the cabinet but didn't get a good photo of the process. It was too difficult to be careful with the cabinet, install the board and take a photo all at the same time. 

I also installed the floating chassis which meant closing the cabinet from its service position and attaching the hangers to the leaf springs of the suspension. The leaf springs are located on the cabinet top assembly.


The cabinet is now closed.
Before locking the cabinet down though...I will install the transformer and give the Beogram a quick test. I want to make sure all of the electrical functions work. If something isn't working now is a good time to find out.


As you can see in the photo above, the transformer is installed, plugged in and the Standby light is on.

I put the top platter on and pressed Play.


The Beogram silently and smoothly scanned for a record then returned. Beautiful.
This Beogram 8002 is feeling new again.

In the next post I will attach the lid components and be ready to hook this turntable up to an amplifier.


Monday, May 24, 2021

Beogram 8002 From North Carolina: Dust Cover Repair Part 2...ongoing saga

My feeling of enjoyment after the Beogram 8002 dust cover repair (in the previous post) was short lived.

As I spent time adjusting the dust cover lid damping tension and exercising the dust cover, as with typical use, I started to notice that the little bump in the dust cover from the original problem was becoming a problem again.

I had been a little worried about whether the epoxy repair would hold up.  The original problem was that the dust cover hinge assembly was bent upward at the point the lid damping fixed hinge mounts to the back part of the dust cover. 

In hindsight I should have completely disassembled the dust cover lid and examined the back part more closely.  

Performing some careful removal of my epoxy work I was able to successfully disassemble the Beogram 8002 dust cover assembly.

Sure enough...I discovered that the over stressing of the dust cover damping spring on the fixed hinge, in concert with the fact that the back part of the dust cover was not properly attached to the cabinet, resulted in a cracked joint on a crucial hinge attachment.


That break point isn't in a location where epoxy on the joint, by itself, can hold up to the damping spring force on the fixed hinge. 

The best solution in this case is to get a replacement for the broken dust cover back part.  Fortunately I have such a replacement in my parts archive.

Here is a side by side look at the broken back part and the replacement.  


Looking at the two parts side by side I noticed that the location where the fixed hinge mounts to the back part hinge bar has a broken tab on the faulty back part.


Here is the back of the Beogram 8002 cabinet with the dust cover components removed (again).


Here are the dust cover assembly and tonearm compartment lid components disassembled.


Another problem I had noticed with this Beogram 8002 cabinet was that the deck trim and tonearm compartment lid did not seem to be securely in place. 

I pulled off the deck trim piece and separated the tonearm compartment lid from its hinge plate.


You can see that whoever worked on this Beogram 8002 before me did not bother to remove the old, original B&O mounting tape residue. They just added more tape.

I will reset everything and start with clean surfaces.
The first step was to soak the old tape residue in some GooGone for a few hours.


Once the GooGone had done its job I was able to scrape off the old tape residue and wipe the surfaces clean in preparation for reattachment of the parts.


Everything now looks clean and proper for reassembly.  That will have to wait until the next post :-)

Wednesday, May 19, 2021

Beogram 8002 From North Carolina: Repairing a particularly troublesome dust cover

When this project began and I was doing the initial assessment I noted that the dust cover mechanics were not working properly.  A Beogram 8002 dust cover mechanical problem is not rare. I have often mentioned that it isn't one of my favorite Bang & Olufsen engineering decisions. While the design is the expected elegant and simple design, its components don't hold up all that well.

The dust cover mechanism on the Beogram 8002 is the same design as the Beogram 8000.  The leaf spring for the damping of the dust cover hinge differs in shape sometimes but the mechanics are the same.

Looking at the Beogram 8002 dust cover hinge design here are the main mechanical parts...
These first two photos are from other Beogram 8002 turntable restorations I have done but they are good to post again in showing the hinge assembly.


The operation of the hinge is supposed to work where the fixed bracket, shown mounted to the plexiglass dust cover lid, mates with the pivoting bracket.  The pivoting bracket mates with the leaf spring that has an adjustable tension (via a set screw).  The tension dampens the lowering of the dust cover lid and provides just enough force to keep the lid open.


In order for the hinge mechanism to function properly the dust cover lid must mate tightly to the back of the Beogram 8002 cabinet.  The fixed bracket on the plexiglass lid must also fit tightly against the lid and not move.

A common cause of a Beogram 8002 lid mechanism failing is that the fixed hinge piece comes loose.
Unfortunately, just like the Beogram 8002 deck panel and tonearm cover lid, Bang & Olufsen used a foam type double-sided tape to secure the pieces. That tape eventually deteriorates to the point where it no longer secures what it is attached to...and the pieces separate.

That is what happened at some point with the Beogram 8002 of this project. 

Further problems developed when some previous technician who was not familiar with Beogram 800x turntables made poor decisions in attempting to repair the dust cover mechanism.

Here are some photos again of this project's Beogram 8002 dust cover hinge.
You can see by the lines I marked on the photo in red that the fixed hinge piece separated from the dust cover lid. 


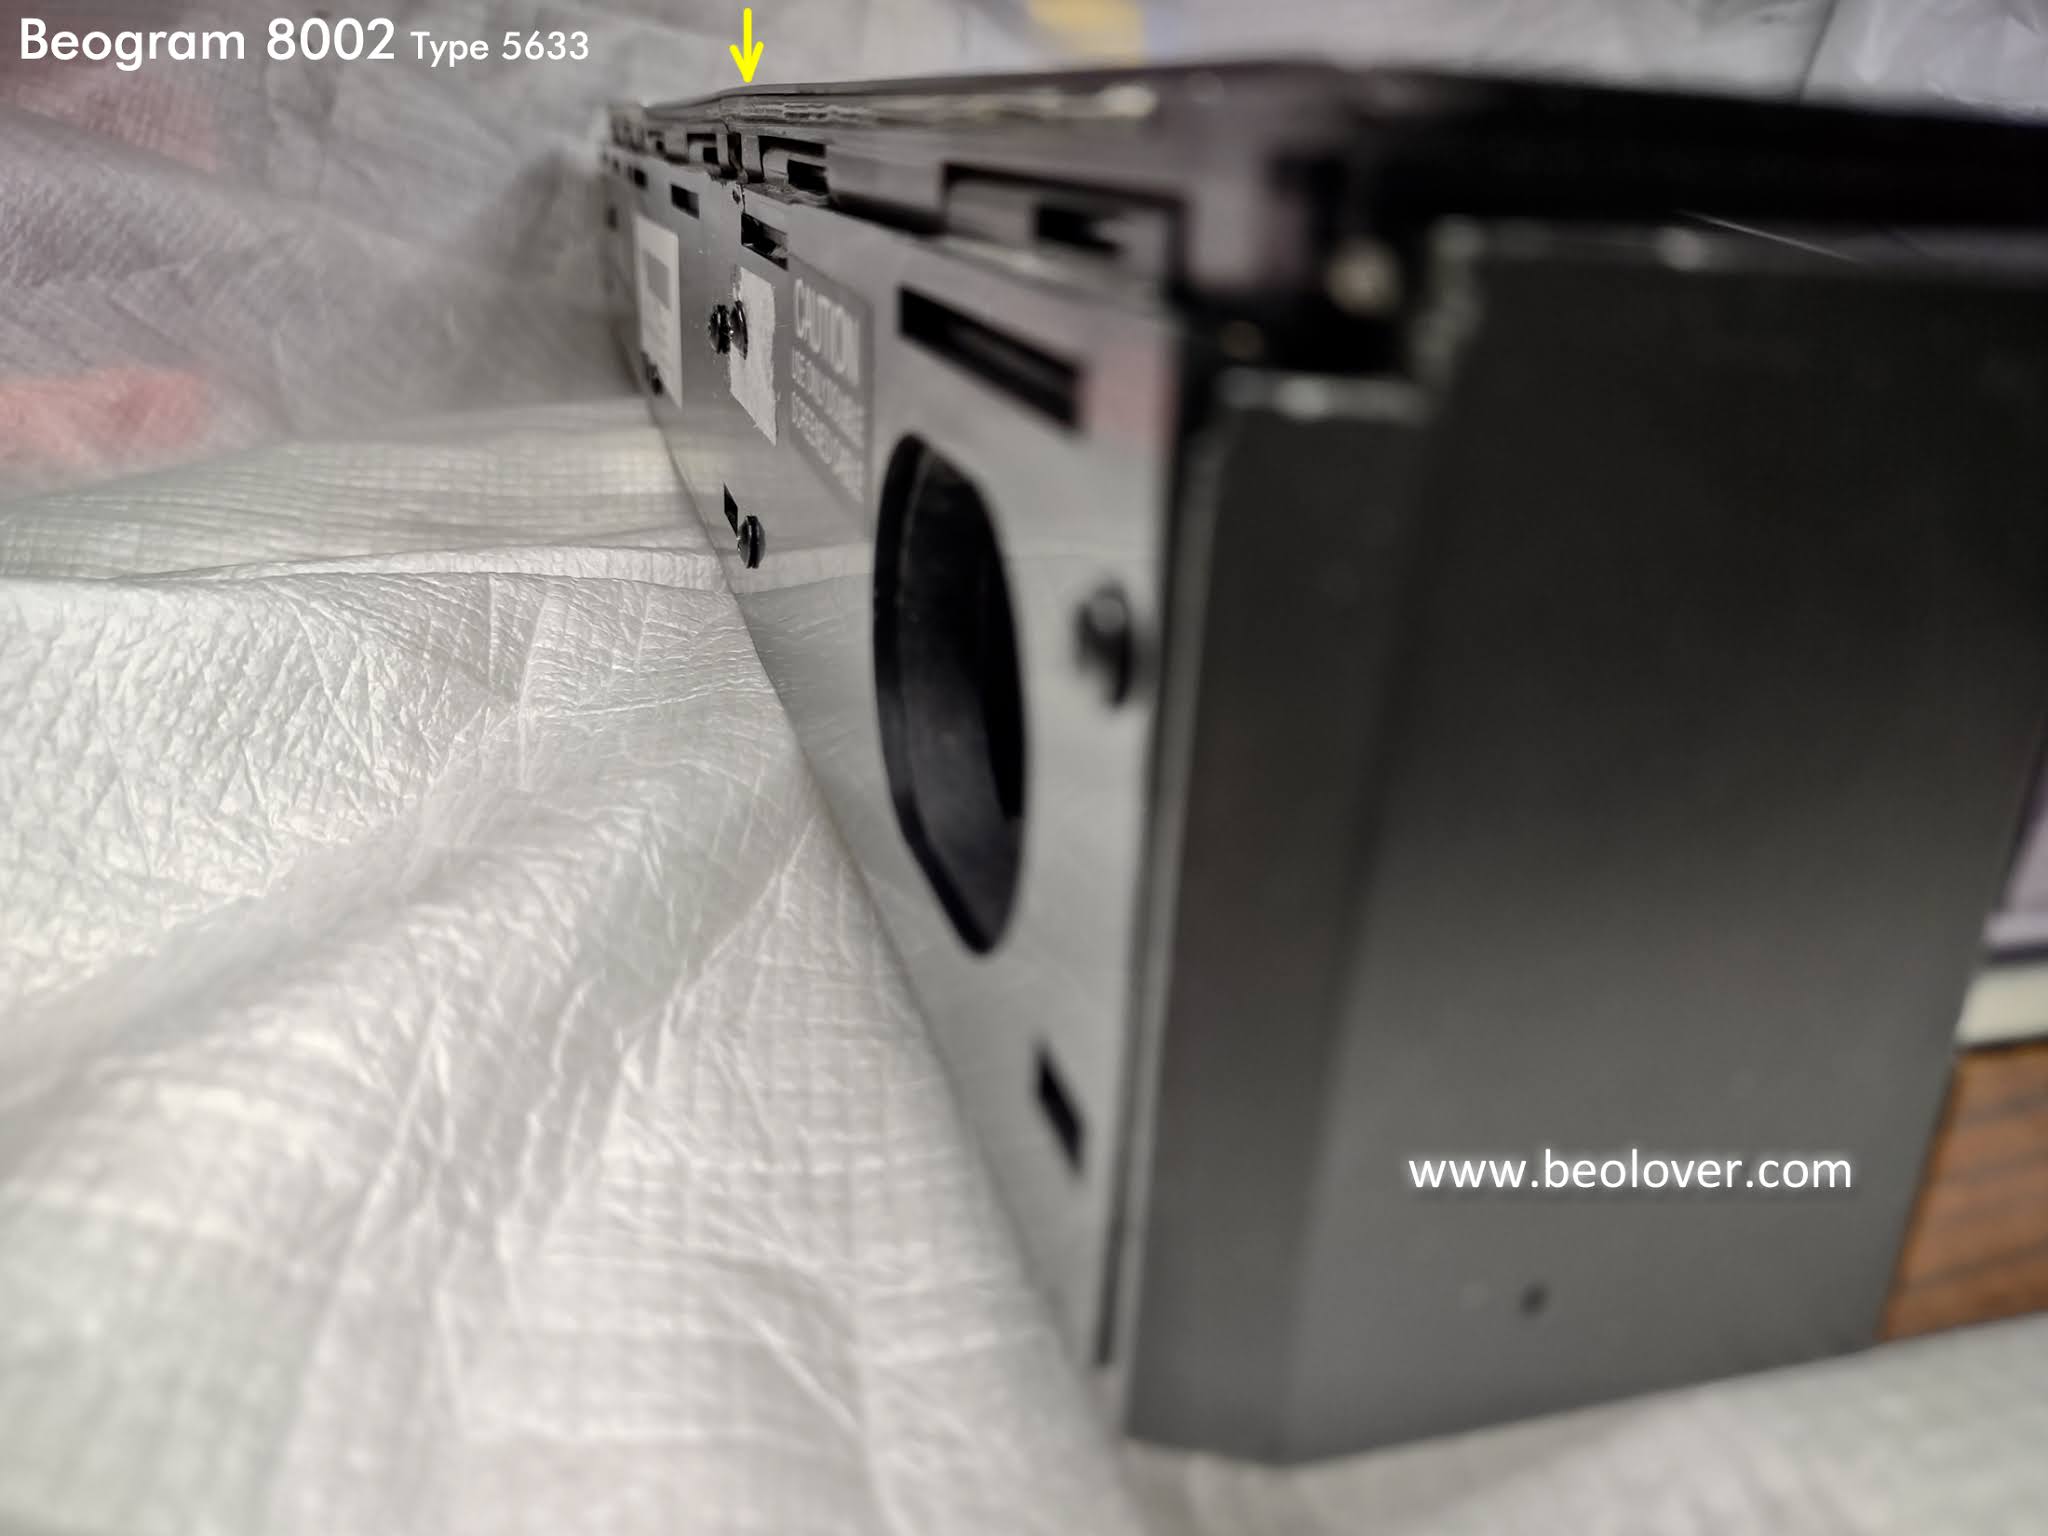
During whatever sequence of repair attempt events, the previous work on the dust cover involved some hot glue and some force that bent part of the Beogram 8002 dust cover lid mechanism.


What this failed repair attempt did was secure the dust cover enough where it was in place on the cabinet but there was way too much tension on the leaf spring where it forced the moving hinge bracket so hard against the fixed bracket that it bent the long, piano type, bar hinge.  Another contributor to this problem was that the back of the Beogram cabinet and back of the dust cover hinge were not secure.  The dust cover top was forced up and beyond where it should ever be leaving a bulge in the lid.

I have to say I have never seen a Beogram 800x dust cover hinge improperly adjusted this badly.

The person should have noticed that the leaf spring tension was too much and was forcing the whole dust cover assembly upward from the frame.

Too late for that now. 

One lucky thing was that their poor attempt at repairing the problem with glue resulted in deciding to use hot glue. Not good for permanent glue repairs but a good thing here because the hot glue was easily removed.

Now for the repair of this mess and yes, this dust cover assembly is worth saving.
Surprisingly, in spite of what it has gone through, this dust cover assembly is in excellent condition.

The first step was to remove the dust cover assembly (with the tonearm compartment lid).
With the dust cover laying flat upside down I cleaned off the old adhesive material and glued the fixed hinge bracket in place using epoxy.  I let that cure for twenty-four hours.


Back on the Beogram 8002 cabinet where the leaf spring and moving hinge bracket live I examined the spring compartment from the back.  There is a teflon or teflon-like material where the smooth plastic edge of the leaf spring's plastic guide slides during operation of the hinge.

The teflon strip of material needs a bit of realigning so that became part of the repair task.


When testing the fit and adjustment ability of the leaf spring and its tension set screw I discovered the fit was not so good and the metal sleeve for the set screw was loose.


I wanted to make sure that the set screw sleeve didn't have any play in it so I epoxied the under side end of the sleeve to the cabinet frame.  Now only the set screw is the piece that will move.


On the inside cabinet wall, where the plastic guide piece slides along during operation of the hinge, I removed the teflon strip of material.  I epoxied in place a strip of Dura-Lar then put the original teflon strip on top of that.

A test fit of the leaf spring and moving hinge bracket assembly showed that everything on this part of the mechanism is back in good working order.


Regardless of how traumatized a Beogram 800x dust cover hinge mechanism is an important thing to remember is that the back part of the dust cover lid (the long, thin flap of plastic) must fit tightly against the back wall of the Beogram cabinet.

These photos attempt to show how the dust cover flap is supposed to mate with the back of the cabinet.


This photo shows the back of the Beogram 8002 cabinet and how the back flap of the dust cover assembly should be flat against the cabinet rear wall.

There was one added screw in the back of the Beogram to help secure the dust cover assembly to the cabinet but as shown earlier, it was not sufficient to prevent the tension in the leaf spring from bending the dust cover upwards at the hinge mount.


I actually went through a few iterations of fitting the dust cover onto the rear wall of the cabinet.
I tried some additional mounting screws and while they helped a little I realized that the only real option I had was to epoxy the dust cover assembly and cabinet frame together.  The added screws would be useful in pulling the pieces together while the epoxy cured.


I also had to make sure there was some epoxy around the dust cover to cabinet mount points where the dust cover hinge had bent.  At the same time, I had to be careful no epoxy got on any parts that are supposed to move.  With the epoxy curing for twenty-four hours and the dust cover clamped tightly to the cabinet frame I hoped that would result in a solid working dust cover hinge.


Looking carefully I can tell there is a very slight bend in the line of the dust cover hinge but it is very minimal now.  I think this is as good as I can get it. The slight bend in the back is not noticeable from the front of Beogram 8002 and it doesn't increase with the movement of the dust cover like it did before the fix.


I just need to add some damping grease to the tonearm compartment lid hinge and I will be ready to put the Beogram 8002 turntable components back into this cabinet.