Featured Post

Beolover SyncDrive: DC Platter Motor Replacement for Beogram 4002 and 4004 (Type 551x and 552x)

Late Beogram 4002 and the 4004 (Types 551x and 552x), which have DC platter motors instead of the earlier synchronous AC motors usually suff...

Showing posts with label quiet. Show all posts

Thursday, October 27, 2016

Beomaster 8000: Step One - Rebuilding the Output Amplifiers

While we wait for Nick's awesome specially made pulley for the Beogram 4002 (5501) that I just finished up, it is time to get started on the Beomaster 8000 that will also go on to the UK once restored. It recently arrived and I gave it an external inspection, which suggested this 8000 is an excellent starting point for a full restoration.
My first step in any Beomaster 8000 project is to rebuild the output amplifiers. They are the most crucial part of the restoration of the 'power' part of the unit. A failure of their often corroded quiescent current trimmers usually neatly kills all output transistors with a bit of smoke emission on that channel before the main fuse protects the transformer (and the breaker of the house grid on which the 8000 resides while this burnout happens). These old trimmers often go open circuit during transport, so my approach is to not even turn the unit on when I receive it, but I go straight to the amplifiers and rebuild and test them to make sure that the above does not happen.

Here are a few impressions from this effort on this unit:

This shows the right channel as it came:
We see from the two clunky (white) emitter resistors that the above mentioned disaster already must have happened at some point. When the transistors burn out, the emitter resistors usually brown like a chicken in the oven due to the immediate heat emission. But usually this does not affect their performance down the road since they are wire wound types. An ugly replacement like seen here is definitely not an improvement in the Beolover's eyes! Also, whoever did this did not learn 'The Lesson'...he did not replace the trimmer! I always put in 25 turn precision encapsulated units to prevent this from ever happening (again). Multi-turn trimmers drift only very little and so the quiescent current adjustment is very stable over time. This is not the case for standard single turn trimmers, and that is one of the reasons that the 8000 often presents with one or two hot heat sinks, if it runs at all.

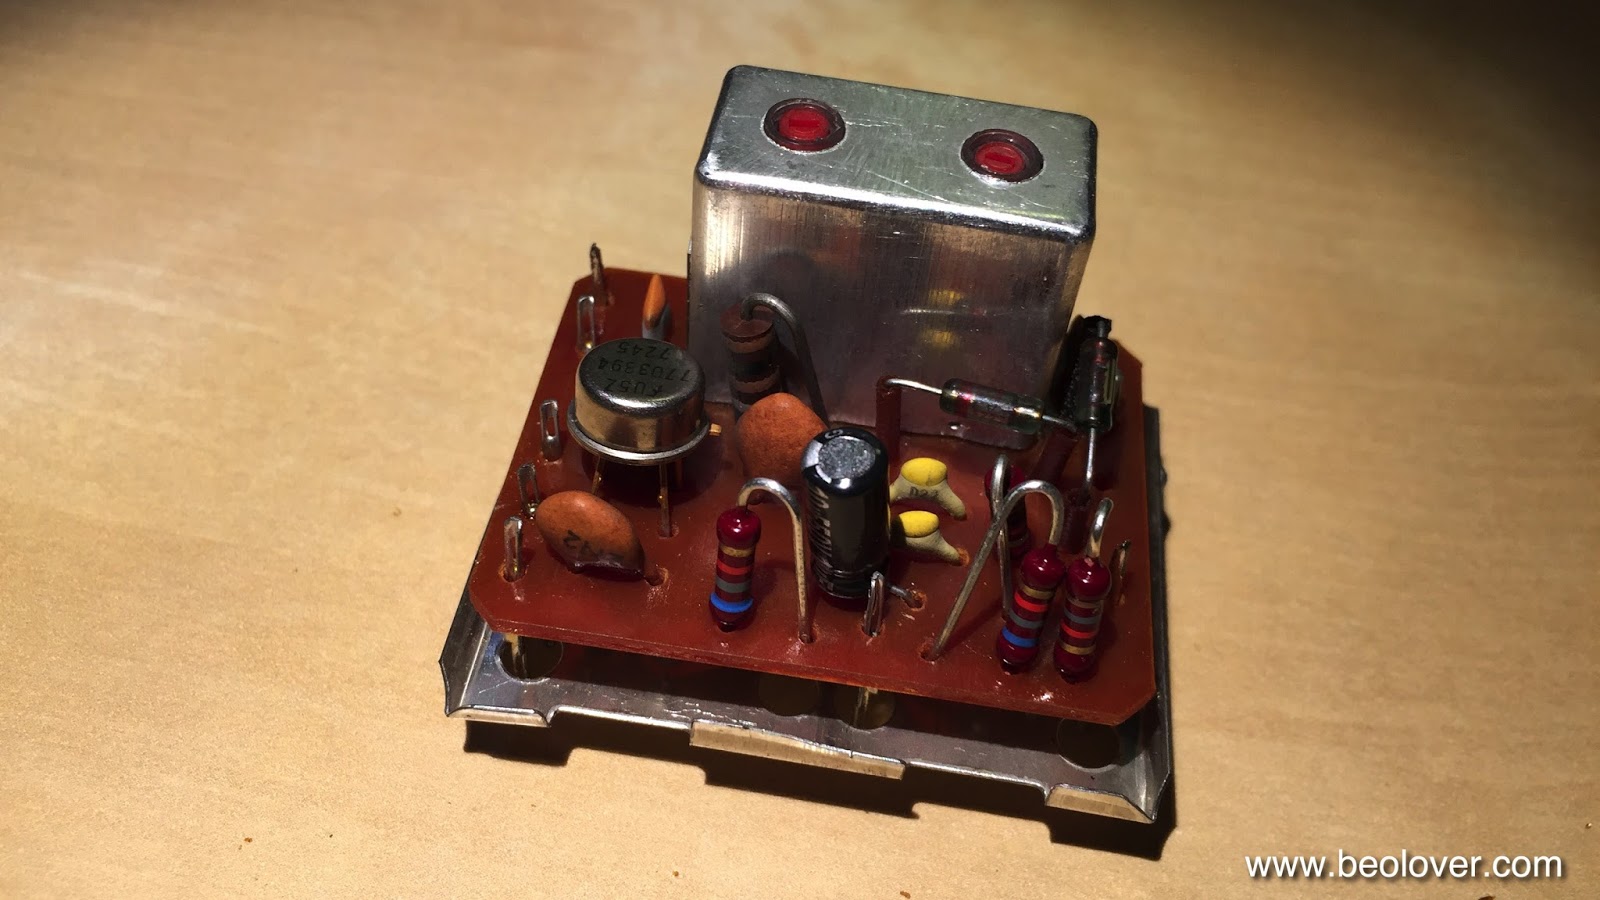
This shows the rebuilt board with new electrolytic 105C type capacitors and prettier resistors and the 25-turn trimmers:
Beautiful! I did the same to the left channel, which did not have new emitter resistors, but (slightly browned) original resistors. And then it was time to run these babies from external power supplies to test for any silicon failures, cracked traces and the like. This shows my hookup:
And here with the multimeter connected to the test points at the emitter resistors after powering the board up:
When installing a new trimmer make sure that the resistance is close to zero. This may be counterintuitive, but in this setup it turns off the output transistors preventing significant current flow between the +/- power rails. This shows my bench supplies at this point:
The left two are the - and + rails, which draw 60-70 mA while the quiescent current trimmer is close to zero Ohms. The right supply provides the 15V control voltage that is used by the Beomaster to enable the output by controlling the constant current source used for biasing the output transistors.

Adjusting the quiescent current means to ramp up the resistance in the potentiometer to set the working point of the output transistors that there is a 18mV voltage across the two emitter resistors:
At that point the power rails draw 0.1 (+) and 0.11(-) A:
I did the same for the right channel:
All good now in the output amplifier department! On to rebuilding the power supply board before giving this unit a first spin!


Friday, April 1, 2016

Beomaster 4000 (2406): Exchanging the Electrolytic Capacitors and Adjustment of the Quiescent Current

After testing the new toroid transformer for a while (and coming to the conclusion that it works very nicely - no hum in the amplification chain whatsoever) it was time to complete the restoration of this Beomaster 4000 and replace all electrolytic capacitors on the various PCBs with new 105C grade major Japanese manufacturer units. While time consuming, this is not too difficult to do, but a few of the capacitors are challenging to access since the 4000 is from a time when board-to-wire connectors were not commonly used in consumer electronics. In other words, it is difficult to take out boards since most connections are soldered. So it is best to just leave everything in and work your way around a few obstacles like the power switch that obscures a solder point or the vertically installed loudness board. But with a bit of patience, a few tricks and a steady hand it is a straight forward process. Here are a few impressions. The first step is usually to take out the preamplifier board that is directly bolted to the frame with four screws next to the DIN jacks on the back. This picture shows the board in its original state:
And after exchanging the capacitors:
Then it was time to work on the two main boards. Unfortunately the preamp board does not disconnect like in the Beomaster 4400 where a rare wire-to-board header allows this convenience. In the case of the 4000 the board needs to be left connected and dangling from the frame while one works on the main PCBs. But this is not such an issue if one props up the Beomaster vertically using a couple of carpenter clamps affixed to the heatsinks (use cardboard shields to prevent scratches).

This shows the output amplifier board in its original condition:
The four red resistors at the bottom are the emitter resistors that can be used to adjust the quiescent current. In between them are the associated trimmers. I replaced these with modern encapsulated units along with the capacitors. This shows the board after restoration:
Next up was the FM tuner and 15V power supply board. this shows the original condition:
And after rebuilding it:
This board has two EMI cans. On the right is the FM 'front end' that selects the right carrier frequency and on the left is the 'detector' that converts the frequency modulation audio information into amplitude change that can be amplified and analyzed into an audible stereo signal. Unfortunately there is one electrolytic capacitor in each can and so one needs to get in there. The easy one is the front end, where the top and bottom covers come off easily. Note that the bottom one has a soldered ground connection which needs to be unsoldered before it can be taken off:
This shows the solder side of the PCB after taking the bottom cover off:
And here is a peek into the top:
The capacitor is in the top part, a brown/black tantalum type. This shows it replaced:
Care needs to be taken to not disturb the inductors. If they get accidentally 'adjusted' one may need a FM signal generator to recover. After putting the covers back on I turned my attention to the detector. Here the board is piggybacked on top of the main FM board and so one has to unsolder it first before the bottom of the PCB can be reached for soldering. The top cover can simply be pulled off. This is how it looks after it is off:
Then I took the board out:
The capacitor is up front center (also brown/black; 10uF). Before one can unsolder it the bottom shield needs to be taken off. One of the pins is soldered into the PCB, making the ground connection, i.e. it needs to be unsoldered first. Then the shield comes off:
And then I was able to put the new capacitor in:
After putting everything back together in reverse I took this picture:
On to the loudness board that is right behind the loudness switch on the front panel. There are two capacitors (red):
I should have replaced them while the transformer was out, but it did not occur to me. So I did some 'artistic soldering'. Copper brain is very useful for such situations when the desolder gun is too big to fit. After a bit of effort I had them out and replaced with new units:
Alright! Almost done. On to the FM preset capacitors that are soldered directly to the preset switches and a ground wire:
I also replaced them with new units:
The next step was to adjust the quiescent current with the new trimmers:
I elected to ignore the prescription of the service manual to measure the current in the output transistors directly with an ampere meter connected into the circuit. The setup allows for that via two pin headers that are not soldered. However, I did to like the idea to connect a multimeter with an internal resistance of about 5 Ohm in mA mode into the circuit and thereby altering the setup. I instead calculated the current that corresponds to the prescribed 80mA quiet current in the 0.15 Ohm emitter resistors in each of the B-style push-pull output branches (12mV), and hooked up my multimeter across these resistors and adjusted the trimmers to get the 12mV. Now this Beomaster is running cool. When it arrived one of the channels got pretty warm indicating trimmer issues, as they are frequently found in this vintage of B&O.


Sunday, October 18, 2015

Beomaster 8000: More Output Trouble - Broken TR207 Collector Trace

After I fixed the broken PTC thermistor lead in the left output of the Beomaster 8000 that I am restoring right now, I thought I was finally done with the outputs, but no: When I tested it for a while it ran happily, and then out of a sudden the fault switch triggered again a shutdown of the output supply. This one was difficult to find since it turned out to be intermittent. After a while I finally figured out that the trace that connects the collector of TR207 (voltage gain stage) to the positive 55V rail was cracked. After removing the delaminated trace, I fixed it with magnet wire:

I like to use magnet wire for fixing traces, since the polyurethane insulation of the wire can conveniently be burned off with the soldering iron, resulting in short circuit proof connections that are insulated right up to the solder point.
Unfortunately, this did not fully fix the output issue. While the 8000 came on again reliably, I realized that my repair efforts must have caused some other problems. More trouble shooting finally yielded another broken off lead to the heat sink. It must have broken off while I lifted the board up to do fix the trace. The many alterations on this board and also the left channel suggest that the previous owner had a hard time to pinpoint the issue with the intermittent trace and the fault switch issue, and therefore the board was lifted a few times too many for replacing components finally compromising the integrity of the leads that go to the heatsink. This time the (green) lead to the base of IC205 broke at the solder terminal on the PCB. This caused this Darlington to be turned off. It was remarkable that the output still amplified under this condition. I only noticed the issue since after repairing the trace I ran the output with external power supplies while measuring the voltage drop across the R236/7 emitter resistors, which could not be raised anymore above 3 mV. This indicated that there was something wrong. After I reconnected the base of IC205 everything was finally good again. Live and learn. No Beolove without some degree of pain, I guess...;-)


Monday, October 12, 2015

Beomaster 8000: Fault Switch Gets Triggered by Disconnected PTC Thermistor

Oh well...I guess I was a bit too enthusiastic when I declared victory in my last post about the output amplifiers of the Beomaster 8000 that I am restoring right now. It turned out that there was an intermittent issue that triggered the 'fault switch' and that in turn turned off the relays that enable power to the output stages. Here is the relevant circuit as shown in the Beomaster 8000 'Technical Product Information' booklet:

Here is how it works: TR16/17 form a latch that is triggered by a >~1.5V voltage coming from the "fault output" of the output stages between R254 and R253. When the latch is set it turns on TR15, and 15V apply to R68. That pulls up the base of TR11 and it turns on, which in turn turns on TR12. This pulls up the base of TR18 and the relay looses power. This cuts the power to the output boards, and the 8000 goes silent. All other circuits remain on, i.e. the display are functioning normally etc...

The two failure modes that can trigger the latch are:
  1. A DC voltage at the 'AF OUTPUT' (this usually means that one or more TIP transistors burned out due to overload or failing quiescent current trimmers
  2. The heatsinks get too hot. This increases the resistance of the positive temperature coefficient (PTC) thermistor that is connected to the junction between R353 and R252 and GND. When it is cool it has about 50 Ohms which pulls the fault output to GND. If the resistance increases, a DC voltage develops due to the pull-up to 55V and the latch is triggered.


In my particular case, the receiver came on, played for about 30 sec on the left channel and then it went silent. One could also hear three clicks in rapid succession right after starting it up, which is one too many. Normal are two clicks, which correspond to the start-up sequence during which the two relays that control the current into the toroidal transformer get switched in succession to limit the inrush current into the transformer. The third click meant that the fault mechanism turned the relays off again. In the beginning I was a bit confounded by the fact that the left output was continuing playing for half a minute. It turned out that this is possible due to the charge that is in the reservoir capacitors, i.e. it shut down when the voltage dropped close to zero in these capacitors. Why it did not do that on the right side, comes from the fact that the right supply also powers the preamplifier via an attached ±30V supply. This causes the charge on the reservoir caps on the right side to dissipate more quickly.

Since the output stages showed perfect current values during my test with external power supplies, I first thought that the fault switch itself was at fault. So I tested it by grounding the fault output from the output stages, and this caused the issue to disappear.
Note: This test needs to be performed from a cold start, since the latch in the fault switch only resets when the 15V rail turns off, i.e. the Beomaster needs to be turned off for that. However, the Beomaster runs a turn-off sequence after pressing the off bar on the keypad, where the 15V remain alive for another 60-90 sec. This means that one needs to wait a couple minutes before turning it on again to see if the grounded fault output disables the fault condition.
In my case this test yielded a functioning fault switch, and therefore the issue had to be in one of the outputs! It turned out that the left stage had a PTC that was intermittently disconnected from R253/R252, which caused it to loose its ability to pull the fault output to zero at normal temperatures. The picture shows the broken white-blue striped lead that connects the PTC (which is mounted on the heatsink) to the fault switch voltage divider. The tricky part here was that the lead looked perfectly o.k. since it was attached by the insulation to the solder terminal and the lead was only broken off in the inside.

After restoring this connection, the Beomaster started working normally.

Saturday, October 10, 2015

Beomaster 8000: Rebuilding the Outputs, A New Interesting Output Failure Mode, and First Startup

I started working on the Beomaster 8000 that I recently acquired via eBay on behalf of an B&O enthusiast in the UK. The 8000 is definitely one of my most favorite restoration projects. An absolutely awesome design. The Beomaster 8000 was sold under the premise to be fully working but to have had some 'amplifier trouble', which supposedly had been 'professionally' repaired. Oh well, I heard such claims before, and especially on eBay the unsuspecting buyer needs to be aware that there are not many repair outfits left who can or want to tackle these units. Instead there is a lot of amateurish effort going on with the aim to make a fast buck and turn these sought-after units around for a ransom 'in restored condition'.

With that in mind I approached this Beomaster with caution and gave it my usual 'fix outputs first and then turn it on' treatment. So I opened it up and found a fairly clean situation. However, three screws are missing under the speaker switch cover:
And the cardboard shield that is supposed to keep the solder points on the display board from shorting against the toroidal transformer was installed incorrectly:
An interesting feature is the late-series microprocessor board that has soldered on EMI can lids and a sticker that says 'Sealed unit. To be returned to the distributor for service'...we'll see to that...;-)

After I lifted the display/uProcessor boards into service position and took the input socket panel tray out I looked at the output PCBs. And I made an interesting find: The quiescent current trimmers were replaced on both channels with 47 Ohm resistors. A very creative, but questionable fix to the corroding trimmer problem that commonly leads to frying the transistors in one or both outputs when the trimmers go open circuit. Here is a picture of the left channel board:

The resistor in question is in front of the third electrolytic cap from the left. Very crafty! I hooked the right channel board up with three external power supplies providing the ±55V rails and the 15V control bias:

The multimeter shows the voltage across the two emitter resistors R236/7 as 4.7mV. This is much lower than the prescribed 18mV. Well, at least the 47 Ohm resistor errs on the 'better side' by running the output Darlingtons IC203/204 at a too low operating point. Had the 'expert' who did this elected to use the next standard resistor value of 56 Ohms, most likely the unit would have run pretty hot. The problem with running at a too low operating point is that class B amplifier cross-over distortion is introduced in the output signal since the two half-waves are not 'connecting' smoothly at the cross over point. Since all TIP141/146 pairs are slightly different, trimmers are needed to find the perfect operating point for each unit independently. 

I installed as usual 25 turn encapsulated 100 Ohm precision trimmers
in both of the output boards and also exchanged all the electrolytic capacitors with 105C level quality Japanese units. This shows the left channel:
And here is the right:
Then I ran the right board with my external supplies and adjusted the trimmer to yield 18mV across the emitter resistors:
The power supplies showed the usual 0.11A (-55V), 0.1A (+55) and a close to zero current on the 15V control voltage pin


Very good! Then I did the same for the left channel, and I was surprised: No matter to what value I would set the trimmer, the multimeter would show zero voltage across the emitter resistors. Something was not working!
I poked around and measured the voltages across the TIP141 and TIP146 'columns' in the output. The voltages seemed reasonably close to the values shown in the service manual. Very strange! Then I measured the voltage at the base of the npn Darlington (IC203) while turning the potentiometer. Nothing happened. It stayed constant at about 1V. This was strange, since the potentiometer is supposed to adjust this voltage to about 1.2V to set the operation point of the Darlington. I did the same at its pnp match (IC204) and this base changed the voltage depending on the trimmer setting. A bit of head scratching lead me to the root cause of this phenomenon: The yellow lead between the emitter of IC203 and the PCB was open circuit. I unsoldered the lead and found that it was only hanging on by a shred of insulation, but that the wire had disconnected:
I took some insulation off and soldered the lead back in, and then everything was as it should be.
Time to plug this baby in and finally turn it on:
Allright! First light! This marks the start of another Beolover restoration!


Monday, May 18, 2015

Beomaster 4400: Full Recap and Output Trimmer Replacement

Today I completed the replacement of all electrolytic capacitors in the Beomaster 4400 (2419) that I am currently restoring. I also replaced the quiescent current trimmers of the output stages. This is probably the most important item to do in these models due to the design of the output stages. If these trimmers go open circuit due to old age, the output transistors immediately die, i.e. whenever one opens up this model, these trimmers should be replaced and the quiet current adjusted properly.
But first I removed the input/output board that is bolted underneath the main PCB. Here you see it still bolted on:

It is easy to remove it. It is only held with the four screws next to the Tape 1 and Phono jacks. Take the screws out and the board can be removed:

It is connected with one wire-to-board connector to the system, so it is easily taken out. I really like the models they designed after they discovered the existence of such connectors. It makes it so much easier to work on them. The 4400 design is somewhere in between..still a lot of directly soldered connections, which can make id difficult to work on certain areas in these units. Anyway. Here it is taken out:

While I had it out, I decided to do the caps first. So I replaced everything with quality Japanese made 105C types for a long lasting restoration:

The next step was to remove the shield of the power switch. It makes it hard to get to a couple capacitors that are located underneath the switch. I did not want to touch the switch, and it seemed that after removing the shield, there would be enough space to get the task done. This shows the switch as I found it:

And here after unsoldering the resistor and taking the shield out:
Then I replaced all the electrolytic caps on the main board and put in new trimmers. Here some impressions of the original condition:
Left channel and a view on the tone control and preamp section:

And the right channel:

A few capacitors had been already replaced by a previous tech, but he used low grade 85C types, so I decided to bring everything up to 105C spec. Here are a couple pics:

This shows the left channel. I replaced the original single-turn 100 Ohm trimmers with 25 turn cermet trimmers. These are encapsulated and allow a precise adjustment of the quiet current that will remain without drifting over time. My experience shows that regular single turn trimmers can drift through repeated temperature changes, while the worm gear mechanism in a multi-turn trimmer will effectively prevent this, since the gear cannot turn as long as the 'worm' is not turning. This is the left channel:

And here is the right:
The next step was to adjust the quiescent current in both outputs. The manual prescribes to adjust it to 10-15mV across both emitter resistors in the output. The way the resistors were soldered in in this unit, it was more convenient to do the measurement just across one of them, and adjust to 50% of the above range. Here is how I did that:


I prefer to adjust to the lower end of the range, since this will make it run much more cooly. I checked with the oscilloscope, and there was no measurable crossover distortion in this unit with this adjustment.

After all this I fired the unit up and I listened a bit to the radio. It sounded very nice, and the heatsinks stayed very cool. When I received the unit it it ran pretty hot, indicative of misadjusted or problematic trimmers. Even after extended periods of low-volume listening the heat sinks should never get warmer than 30-35C. 
After the radio got boring, I decided to hook up the Beogram 4000 that I recently restored to try out the Phono input. And this was disappointing. It worked briefly, and then started cutting out intermittently on both channels. Still some issues I guess...time to explore the circuit diagram...I always enjoy doing that. This is Beolove!