Featured Post

Beolover SyncDrive: DC Platter Motor Replacement for Beogram 4002 and 4004 (Type 551x and 552x)

Late Beogram 4002 and the 4004 (Types 551x and 552x), which have DC platter motors instead of the earlier synchronous AC motors usually suff...

Showing posts with label first play. Show all posts

Monday, November 2, 2020

Beomaster 2400 Type 2902 - Canada Project Assembly and Last Adjustments for the First Play Event

The no-load (idle current) adjustments and the power supply adjustments were made earlier.  The lamps were replaced and I performed a little test measuring the source switching volume mute circuit. Now it is time to finish up a couple of adjustments for the FM tuner, partially reassemble the Beomaster 2400 and see how it sounds.

The service manual has a couple of easy FM tuner adjustments that can be made.
One is for the FM tuning voltage on the FM tuner potentiometers. 
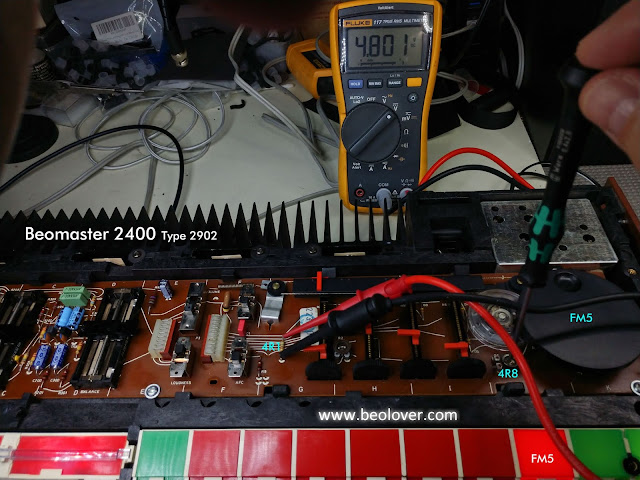
FM1 preset is turned to the dial stop for 88MHz and a test point (4TP1) is measured across resistor 4R1. The voltage should be set to 4.7 volts using trimmer 4R2.
The same measurement point is used again to measure FM5's potentiometer set to 88MHz. On this adjustment, trimmer 4R8 is adjusted to get 4.8 volts (across 4R1).


Another quick FM tuner adjustment is for the tuning indicator lamps. Test point 2TP3 is shorted to ground and the Beomaster 2400 is turned on by selecting an FM source.  Trimmer 2R31 is adjusted so the brightness level of the two tuning indicator lamps are equal brightness.


Finally it is time to hear what this Beomaster sounds like after all of the restoration work.
I connected up an iPod Nano to the Beomaster 2400 Tape source input, my FM antenna to the PAL FM plug and the Speaker 1 outputs to the Beovox S-55's that I keep next to the test workbench.


Standby lamp on...


Tape source on


FM1 on


The Beomaster 2400 sounds good.  The control sliders for Bass, Treble and Balance all work nice and cleanly. A nice milestone in a project to hear music coming from the restored components.

I will do more reassembly of the Beomaster 2400 cabinet and continue testing. I will test out the remote control functionality next. That includes testing out a nice Beogram 4004 as the Phono source. In case you didn't know, the Beogram 4004 can be remotely controlled from a Beomaster 2400. 

Sunday, July 26, 2020

Beomaster 4400 Type 2419: Personal Project: Initial Power Checks

I couldn't end the day with just having the board restoration work complete.

I am always curious whether the audio components will actually work now.

First step was to reinstall the preamplifier and FM boards.


The Beomaster is ready to power on. Like I always do with this type of amplifier I connect the power cord to my variac, ammeter, voltmeter and dim bulb test device.  That device will protect against any hidden short to grounds on the power signals and it will tell me if something is drawing too much current.

In this case...I got nothing. No lights, no voltage on the power supplies.


After a bit of investigation I discovered that one of the AC cable wires was not connected internally in the Beomaster.  That explains that.

I checked the other wires around it and checked for any shorts. Other than the disconnected AC wire everything else looked fine.

Here is my repair of the broken wire.


That looks much better.

On the second round of the power checks I still don't get any lights illuminating on the Beomaster 4400 but I do have power on the supplies.

Here are the +15 VDC and +35 VDC supply checks


and here are the ±35 VDC rail voltage checks


It looks like the Beomaster 4400 is ready for a quick listening check.

I did a quick, initial setting of the idle current for the output amplifiers by adjusting the left and right channel trimmers to get 10mVDC across the respective channel emitter resistors.


Once those were adjusted I connected an iPod Nano to the Tape 2 source input and used a pair of headphones to check if I had sound.

Success!


I connected up an FM antenna to the Beomaster 4400 antenna input and tried tuning a station.
Another success.  The FM tuner section is working great. The tuning indicator and stereo lamps do come on as well.


So for certain the Beomaster 4400 power on lamp is not working and the lamp that illuminates the radicator (the FM signal strength meter) is also not working.

I am not sure about the overload lamp but I can test that when I replace the power on lamp.

Sunday, January 5, 2020

Beomaster 2400: Reassembly and First Play

The Beomaster 2400 lamps all function. The power supplies are good and the no-load current adjustment is complete.


Note that the phono jack on this Beomaster 2400 is the 7-pin DIN type plug. It supports the Beogram 4004 remote control connections.

This Beomaster 2400 had a couple of shoddy left and right cabinet trim pieces. I found a couple of good ones, did some light sanding and applied some boiled linseed oil.


Before I attach the tone controls and FM tuning panel and before I attach the bottom plate there are a couple of service manual adjustments I need to complete. There is an FM1 tuning voltage adjustment and an FM5 tuning voltage adjustment. In both procedures a trimmer is adjusted while monitoring the DC voltage at 4TP1. The measured voltage level in both adjustments should be 4.7VDC with the tuner at the 88MHz stop.


When I attached the Beomaster 2400 bottom plate I also had to replace the four plastic feet. All of the Beomaster 1900 and 2400 units I have encountered so far all have deteriorated (or missing) cabinet feet. Fortunately Martin Olsen can source these.


Now for a quick play test. I connected an iPod Nano to the Tape 1 DIN input and my FM antenna cable to the Beomaster 2400 antenna jack. I am currently out of functioning Beogram 4004 turntables so I will have to wait to test that.


As you can see from the photos I also checked out the Beomaster 2400 remote control. The receiver works and sounds great.

I will let it run for a while to burn it in before I hook up my dummy load resistors to run some performance checks.

This is the fun part.

Sunday, February 24, 2019

Beomaster 1900 Type 2904: Service manual adjustments and first play

After the indicator lamp replacement I set up the Beomaster 1900 for the no-signal current adjustments of the amplifier.

The adjustment procedure is to measure the voltage across the left and right emitter resistors (R256/R356 respectively) and adjust the left and right trimmers (R249/R349 respectively) so the voltages read 12mVDC.

The emitter resistors are in a bad location to connect up probes from the top of the main board so I connect the measurement probes on the underside (trace side).

There is just enough room to get to the trimmers on the component side for the adjustment.

Here is the left channel


The measurement and adjustment are to be made when the amplifier is cold and first turned on. The volume level should be at its minimum and no speakers should be connected.
Here is the measurement for the left channel emitter resistor


Here is the right channel


Another service manual check and adjustment is for the FM1 tuning voltage.
This test measures across the tuning board 4R1 (4TP1) while setting the Beomaster 1900 to FM1 and the FM1 tuning slider to 88 MHz.  The 4R2 trimmer is adjusted so 4.7 VDC is measured at 4TP1/ground.


The same type of test is performed for FM5. The measurement is again measured across 4TP1 to ground but the FM5 is the selected FM source. The FM5 tuning wheel is turned to 88 MHz then the 4R8 trimmer is adjusted to 4.8 VDC at 4TP1.


Once these adjustments were made I connected up my FM antenna and my workshop Beovox S55 speakers.

This Beomaster 1900 is playing music again and sounding quite nice.


I let the Beomaster play overnight to burn in the new components.  Later today I will start reassembly of the Beomaster then run some performance tests.