Featured Post

Beolover SyncDrive: DC Platter Motor Replacement for Beogram 4002 and 4004 (Type 551x and 552x)

Late Beogram 4002 and the 4004 (Types 551x and 552x), which have DC platter motors instead of the earlier synchronous AC motors usually suff...

Showing posts with label FM dial. Show all posts

Sunday, April 8, 2018

Beomaster 6000 (2702) restoration: mounting the FM dial display and fixing a new dial cord

The FM dial display has been restored before (click here). One thing I forgot to mention is the importance to have the dial band under the tiny clips that guide the band in a straight line and avoid it rubbing against the red plexi panel that comes on top. These clips are so tiny that it's easy to not spot them.


On most units that I have restored the dial cord is broken (or about to be). The cords used on a Beomaster 6000 quad are very thin (about 0,4 -0,5 mm diameter)  compared to cords on many other vintage radio's. That's probably why it is extremely difficult to find vintage cord with that size. The best alternative that I have found is fishing line. I know that some hardcore vintage restorers will hate this, but it works, if you select the correct type ! The typical yellow/transparent nylon ones will NOT work. They are to stiff and slippery. I have good experience with high quality DAIWA 8EVO Tournament Braid type of 0,45mm.


There's a drawing in the service manual that describes exactly how to fit the dial cord. Important is the 3 turns on the main pulley, the 2 turns counterclockwise on the shaft coming in from the top and leaving at the bottom.


But before you break your head on this drawing and try to figure out the correct sequence of fitting the cord, watch this excellent videoclip by Beolover that shows you exactly how to do it in this post: click here.

Below is the DAIWA fishing line cord installed on this unit.


The dial cord is attached to the FM dial band with a plastic clip with 3 dents. Best is to remove some tension from the cord before attempting to fix it on the clip. A small dot of glue will help it stay in position once you have the correct setting. Tuning into a known FM frequency and then set the red line to the corresponding numbers on the red plexi display is the way to do it. It often requires a bit of trial & error to get it correct.


The next posts will mainly be on the restoration of the key panel, the red plexi display and the wood plinths. We want this Beomaster 6000 quad to look as good again as it sounds ! And that will require some different skill sets other than electronics.....

Tuesday, February 6, 2018

Beomaster 6000 (2702) restoration: FM main dial screen

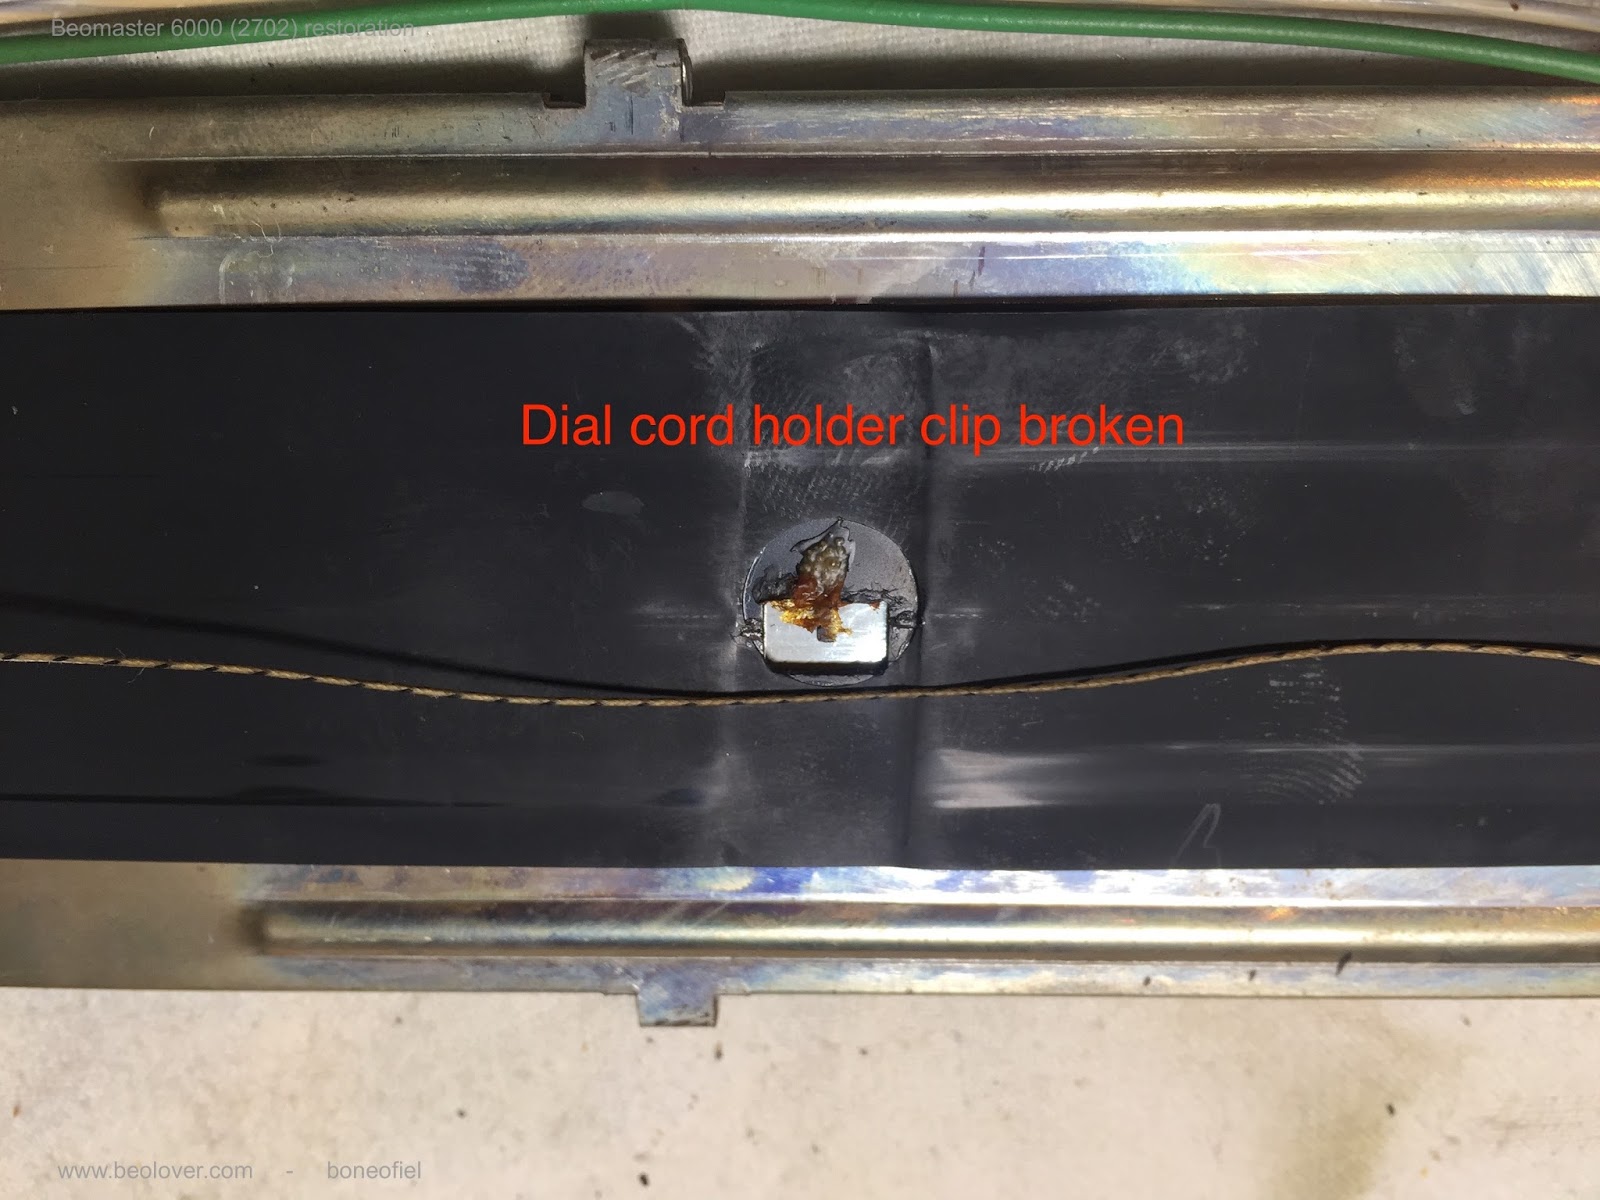
The dial cord that activates the FM potentiometer through a big circular wheel and shaft also serves as the link to a band with a red dial to indicate the FM channel frequency. This dial band is attached to the cord with a small plastic clip that is glued to the back of the dial band. Unfortunately this clip was broken. Apparently some glue was put on in the hope to keep the cord in place. This may have worked for some time but finally got detached again.


I wanted to re-fabricate the plastic clip and therefore it needed to be removed. Turned out not to be an easy task. The band is very fragile. Think of it like the magnetic reel-to-reel tape or cassette type of stuff. Anyhow I got it of with some light damage to the band.


Because of the damage, I made the new plastic clip a bit larger to cover completely the damaged area and have a strong bond between plastic and tape. Off course I first checked if this would not harm the free movement of the band over the complete width. The clip was made out of 1mm thick plastic sheet. Exactly the same thickness as the original one.


This clip was then glued wit Pattex GOLD to the tape and some pressure used for an hour.


I used this time to further overhaul the dial screen. The plastic rollers at both ends where removed, cleaned, greased and put back. Also the 4 glass bulbs where replaced with new ones.


The new clip is firmly in place now.


And now time to test the dial screen for good illumination !


Beomaster 6000 (2702) restoration: broken FM dial wheel shaft bearing

When dismantling the Beomaster 6000 quad, I already noticed a damage to the ball bearing inside the shaft/bearing house of the FM dial wheel. The retainer clip was also missing and the 3mm nut was the wrong one. It needs to be a self locking nut. So time to start fixing this.


I guess the bearing got damaged while trying to remove or fix the (missing) retainer clip. It looks like someone pierced hard with a screwdriver on the metal shielding of the bearing. It turned out to be hard to remove the shaft as well due to some light damage to the end (where the retainer clip sits). Some force had to be used to tap it out.


The ball bearing is a SKF 625R type. The R stands for a low friction one sided metal dust shielding. The other side is open. That allows to put some (silicone) grease in it.


All is good! Another issue fixed. Up to the next one...