The Beogram 4002 that is on my bench right now came with a hood that was cracked around the holes where the hood hinge is attached. In this particular case the left side was completely broken out
and the right side had a crack all the way through around one of the attachment holes:
As usual, the first step was to 'save what could be saved', i.e. I glued the cracked parts back on using Weld-On #4 acrylic solvent. This solvent is extremely low viscosity and can be directly injected into a crack where it gets sucked in due to capillary forces. This shows the broken parts fused back together:
If done right, this step already creates a pretty strong bond between the broken parts. The solvent dissolves the plastic at the crack and after the solvent has evaporated the plastic is (in theory, at least) again a homogeneous part. But of course, nothing is as strong as the original cast material after is gets broken into pieces.
Therefore, the best way to finish this repair is to fuse thin patches onto the cracked areas. Unfortunately, these patches need to be very thin. On the inside due to the tight fit of the metal hinge part, and on the outside for cosmetic reasons since the patch needs to 'hide' underneath the aluminum strip that is glued onto the outside areas to hide the screws.
This time I made the patches manually myself from a 20 mil PETG sheet using 3D printed templates, scissors and a hole punch. PETG was necessary, since apparently there are no thin acrylic sheets available. PETG bonds well with acrylic since it is solvent compatible. This shows the hole punch in action on a cutout patch:
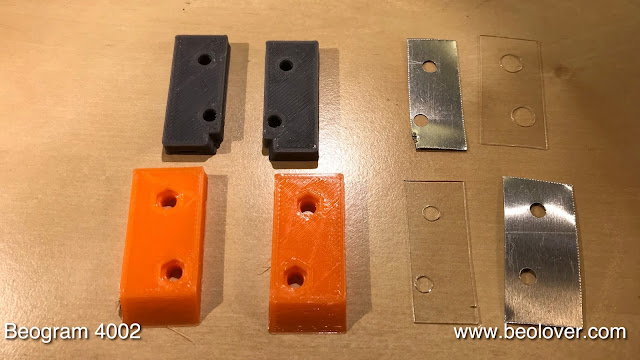
In the past I was not satisfied with my hood repair protocol since it was always difficult to clamp the patches properly to the hood all over their contact area. So this time I improved my method by using 3D printed clamping parts that could be directly squeezed together via bolts through the hinge holes. this shows all the used parts for this repair:
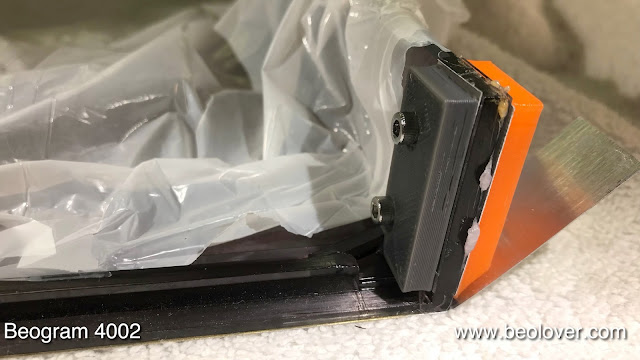
The metal parts are necessary to prevent the 3D printed PLA parts to bond with the plexiglass while the glue is squeezed out at the fringes. This shows the parts in action on the left side:
you can see some dissolved plexiglass and Weld-On #16 (higher viscosity since the glued back together hinges are a bit rough, so #4 does not work that well) being squeezed out on the sides. This is great since it essentially 'sinks' the patch a bit into the hinge bulk. This results in a lesser thickness increase, making the repair less intrusive for the optics of the outside of the hood. This shows the process for the right side:
After doing this for both the inside and outside patches (it is difficult to do both at the same time since the solvent bonds quickly) the squeezed out acrylic/PETG can be trimmed with a razor blade:
After letting it cure for 48 hours I bolted the hinge back in:
Once the bolts are in, the aluminum trim needs to be glued back on. I usually use industrial strength 3M 300LSE laminating tape. This is essentially a glue layer on a piece of wax paper. Difficult to handle, but it does not add any significant thickness to the laminated stack. After trimming the tape with a razor blade along the aluminum trim, I took the paper off and pressed the aluminum trim on. Then I fixated everything in place for a day with locking pliers:
I protected the aluminum trim with a thick piece of cardboard. The red part is one of my templates to mark up the PETG sheet for cutting out the outer patches. It distributes the force of the pliers.
This shows the hinge areas after removing the clamps:
The patches are almost invisible! The 3D printed blocks really helped flattening the patched areas.
Now it was time to finish the hood up with a polishing workout. It had the usual scratches on the top surface:
This warranted an initial sanding step with 320 grit paper to equalize the surface. Then I polished it back in several steps with ever finer grit paper. This shows the surface after the 400 grit wet polishing step:
This is how it looked after the final step:
Pretty shiny, but of course not perfect. Polishing can only do so much, and small imperfections can be seen under certain lighting conditions. But for the usual presentation of the Beogram on a sideboard or similar, this looks pretty newish! So far so good! The final act on this hood was to install new rubber bumpers to ensure that the hood is level when closed. Rubber bumpers also ensure a good sound signature when the hood meets the plinth. This shows a degraded bumper:
I drilled them out with a 2 mm bit:
Then I superglued sections of a 2 mm O-ring into the cavities:
After the glue had hardened, I cut them to length using a 3D printed template:
They need to be about 1 mm in length that the hood is horizontal when closed:
And that was it! This hood is back in business!


I'm french. My BO TT bas the same problem.
ReplyDeleteI will use thé same method to fix it.
Regards