Featured Post

Beolover SyncDrive: DC Platter Motor Replacement for Beogram 4002 and 4004 (Type 551x and 552x)

Late Beogram 4002 and the 4004 (Types 551x and 552x), which have DC platter motors instead of the earlier synchronous AC motors usually suff...

Monday, December 20, 2021

Beogram 4000: A New Arrival from Germany En Route to California

I while ago I received a Beogram 4000 from Germany that was purchased by a customer in California. The task is to restore the unit and send it on to its new owner.

Unfortunately, the unit was not packaged properly, and the keypad plates came loose during shipping. This caused some minor damages to the plates themselves as well as some dings and scratches to other surfaces under the hood.

This shows the unit after extracting it from the packaging:

The aluminum surfaces are surprisingly o.k. considering the liberated keypad plates:
However there is a post glued to the main plate, which may have been used to mount a wet-play brush. We will need to see if this comes off without damage:
On the positive side the plinth is in pretty good condition with near-pristine corners up front:
The hood is in need of polishing, but does not seem to be cracked around the hinges, i.e. it could be polished back to a decent appearance.
The MMC mount is chipped. An often encountered issue with the 4000. It will need to be replaced with a reproduction mount:
After taking off the aluminum plates I found this:
The red position indicator is still o.k., which is great! They are often broken off or cracked:
As usual the plinth guidance washers are cracked:
Human creativity can be observed around the reservoir and motor capacitor section, where some units were replaced in a less-than-pretty way:
I also found the strobe light to be liberated from its mounting points on the bottom of the enclosure:
At this point I switched the unit over to 110V and plugged it in. Immediately, the AC platter motor started running and the strobe light came on:
Miraculously it survived transport despite being able to bang around inside the enclosure.
Other than these two signs of life, however, the deck did not respond to pressing any keys on the keypad. Also the scale and RPM trimmer illumination was completely off.
I checked the power rails and it turned out that the 6V rail was dead. 6V is used for controlling the functions of the deck via the hardwired control logic circuit inside the keypad cluster. Further investigation revealed that the reed relay that controls the non-AC motor 24V and 6V rails during startup only switched 24V, but not 6V. I jumpered the 6V relay and that brought back the control system. 
So far so good. It seems this deck is a decent starting point for a restoration.


Friday, December 17, 2021

Beogram 4002 DC Motor Restoration

I recently received a Beogram 4002 DC platter motor from the UK for restoration. This shows the motor as received:

I disassembled the motor to extract the bearings:

The bearings are the two small donuts on the black pad upfront. I submerged them in motor oil and pulled a vacuum. Immediately strong bubbling occurred:
This bubbling is indicative of air being drawn from the empty pores of the Oilite bearing material. Once it is extracted, oil can diffuse into the bearing, replenishing its oil reservoir. After about 3 days the bubbling stopped and I extracted the bearings:

I re-assembled the motor and installed it in one of my Beogram 4002s for testing with the BeoloverRPM device:
The BeoloverRPM is able to log the RPM in 10s intervals for extended periods of time. This is ideal for detecting intermittent RPM fluctuations. This is the curve I measured during approximately 24 hrs:

This is a pretty good result, indicating that this motor is ready for duty again. 


Tuesday, December 14, 2021

Beocord 5000 Type 4923: Initial assessment of another Beosystem 5000 companion component.

Here is another companion to the Beomaster 5000 that I recently completed. Those components are of course part of a Beosystem 5000 produced by Bang & Olufsen in the mid-eighties.

This Beocord 5000 is the second cassette deck by Bang & Olufsen to carry that product name.  The original Beocord 5000 was Type 47xx and produced in the late seventies.  They are quite different but both very good cassette decks.


The sized and look of the Beocord 5000 Type 4923 matches the Beomaster 5000 Type 2323 and the CD50 Beosystem 5000 components.  The displays and controls are accessible from the front and via a master remote control.  The system audio components were designed so they could be neatly stacked on top of each other.

They all have a neat mechanical mechanism to remove the top cover for servicing.
Two screws at the back are loosened, slid upward, then re-tightened to release the cover.


Here is the Beocord with the cover removed.


On the bottom cover of the Beocord 5000 there are four plastic transport locks that secure the sliding cassette deck unit during shipment.


Those locks are turned to the Open position, removed and placed in their respective storage slots.


It is fairly common for those to be missing if you pick up a used Beocord 5000 Type 4923.  
So it is nice that this unit still has these original transport locks for a change.

When the transport locks are removed the Beocord 5000 sliding chassis becomes operational.
As mentioned earlier, the Beosystem 5000 components were designed to be stackable. 
For that reason the Beocord 5000 slides forward, out of the cabinet to reveal the controls and the cassette tray. There is a motor and belt in the Beocord 5000 specifically for moving the sliding chassis.


This Beocord arrived non-operational so it is my task to get it operational again.

Like the other Beosystem 5000 components the Beocord has a service position design for technicians to work on the unit.

The first step in putting the Beocord 5000 into service position is to remove the cassette control area plastic panel.  There are two plastic tabs on either side of the panel that are pressed in so the panel can be lifted up.


The panel is lifted off and a single cable is unplugged to get it out of the way.
The bright red, plastic clips shown need to be removed to release the main circuit board for servicing.
There are actually six plastic clips as the photo below shows that I already removed the first one.


After the plastic panel is removed there are two screws on either side of the Beocord front panel that will now be exposed.  Those are removed to tilt the front display panel forward.


The group of cables going from the cassette mechanism tape heads to the main circuit board are held in place by a couple of plastic clips highlighted in the photo above. Those cables need to be freed from the two clamps so they have room to move when the main circuit board is tilted up into its service position.
In addition, there are two metal rods that hold down the circuit board that need to be pulled from their lock positions (and tilted out of the way). 
The front connector to the display panel needs to be disconnected.

Finally the main circuit board can be lifted up and put into a couple of slots on the side of the cabinet in the service position.


On the back side the two metal braces can be tilted forward and used to lock the main circuit board upright.


Now the cassette transport assembly can be removed and examined.
Not surprisingly, there is a broken belt.  I am very relieved that the belts have not deteriorated into that gooey tar like state I have run into before.  When that condition occurs it requires a lot of clean up.
This task will be just be to remove the old belts and install the brand new ones.


Here is the belt on the mechanism that opens and closes the Beocord 5000 sliding chassis.  
I will replace that as well.


The owner of this Beocord 5000 purchased it new along with the other Beosystem 5000 components back in the eighties.  The system has been well taken care of and I don't expect any unusual electrical issues so my plan for any electronic restoration work on this cassette deck is to just replace the electrolytic capacitors in the power supply.  That is one area that has been a cause of failures after thirty-five years on some of these units.


I did't have those particular axial, electrolytic capacitors on hand so while they are on their way from Mouser Electronics I will start on cleaning the inside and replacing the belts.

Monday, December 13, 2021

Beogram 4002 DC Platter Motor: Replacement of Spark Snubbers

A Beogram 4002 (5513) DC platter motor that I restored in 2016 returned to my bench due to noticeable RPM variations. In 2016 I had re-infused the bearings of this motor with motor oil, but did not replace the spark snubbers. At the time, the motor performed well after the infusion process.

I first installed the returned motor in one of my 4002s and took a 24 hr RPM stability measurement. What I measured is the blue curve in this graph:


The erratic spikes in this curve suggested one or more malfunctioning spark snubbers. 

I opened the motor up and extracted the rotor. This shows the commutator end of the rotor with the original spark snubbers (blue devices):


I removed the snubbers. This shows the original ones with their replacements (modern bidirectional TVS devices):


I soldered the TVS units between the rotor poles:


Then I re-assembled the motor and ran another 24 hrs RPM test. This test yielded the red curve in the above graph, which is similar to the curve I measured in 2016. This motor is back in business!

Friday, December 3, 2021

Beomaster 5000 Type 2323: [UPDATED] Solving a troublesome mechanical door latch problem

 I have seen owners of Beomaster 5000 receivers complain on various forums about problems with the control panel door. The door either won't respond to the "Open" button command, is slow to open or won't close properly.

This Beomaster 5000 receiver had all of those symptoms. Pressing the "Open" section of the front press-bar would often do nothing. No click from the internal door latch solenoid could be heard.  Sometimes it would seem to magically engage the solenoid but then the door would either not open or just slightly open.
Then, finally, closing the control panel door would often result in the door not latching closed.

If the door never operated the solenoid I would suspect the electronics as there is a ribbon cable from the main electronics of the Beomaster 5000 to the control panel door. Sometimes that ribbon cable fails over time and has to be replaced.

In this case the ribbon cable is still functioning and the problem was a mechanical issue.

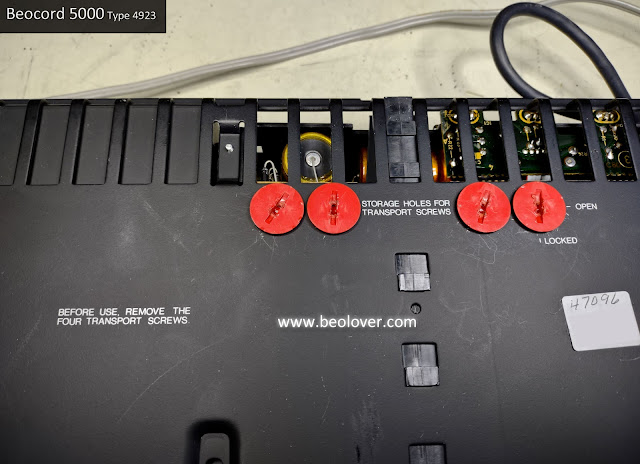
Here is a picture of the Beomaster 5000 turned on with the control panel door closed.


Pressing the open part of the control panel bar (shown highlighted in the photo) would bring disappointment (and frustration) in the door not opening.

With the Beomaster top cover removed I could observe some of the activity that goes on when the door is being operated.

This photo shows some of the key components and how far the door would try to open during the times that the "Open" button got the control solenoid to engage.  It didn't have enough force to open fully.


I checked several things first.

The control panel door damping mechanism controls the opening of the door so that it slowly and gently opens up.  I checked that the damping mechanism wasn't hanging up and was correctly configured.

In this case it was good.

The photo below shows the door open actuator that the door bar presses against to release the door.
That actuator is spring activated and simply presses a rod that moves the metal door inward.
When the press bar is released the spring returns the bar to its normal position.
Pushing on the press bar also moves a plastic actuator to press against a flat, metal contact located on the keypad circuit board (PCB 5).
That is the actual, electrical button component that operates the door latch solenoid.

This photo shows what a disassembled Beomaster 5000 control panel door looks like from behind the "Open" press bar.


I noticed that when I applied pressure to the back of the control panel door (the black plastic frame) as I pressed the "Open" section of the press bar that the solenoid would always engage.

So electrically it appeared that everything was good.

Another issue with the door opening is that the door would not fully open up when it was unlatched.
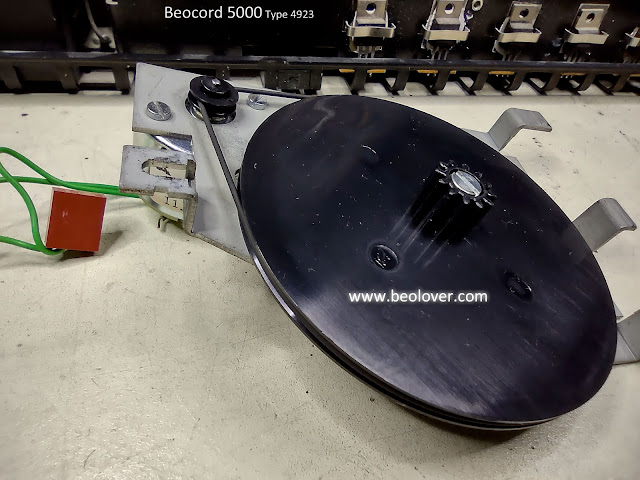
Once the door is unlatched there is a center spring in the center of the door hinge rod that presses against the cabinet base and causes the door to flip open.

Here is what that spring looks like.


The spring is intact and it is pressing against the metal part of the cabinet base so that is not the source of the door not fully opening.

Checking the attachment points of the panel door hinge rod along the bottom of the door I discovered that there are two key mounting/pivot points.  It also looked like those two pivot points were sticking.

I worked in some dry lubricant and the door panel became much easier to rotate open.
Now an unlatched door rotated completely open.


That left the "Open" function intermittent operation and the problem with latching the door closed.

It turns out that those were related.

Here is a look at how the Beogram 5000 control panel door latch/unlatch mechanism works.
This is a photo of a disassembled Beogram 5000 front panel.  It shows the solenoid and the lever that latches and unlatches the control panel door.


Here is a closer look at the solenoid that operates the unlatching.


Looking at the catch for the door here are photos from the top looking down at the door latched and unlatched.


When observing these mechanics operating during latching and unlatching I initially thought there were two problems.

One of course was the unlatch solenoid operation being intermittent.
The second was the plastic door catch would often not move well enough to latch and to unlatch the door.

After many iterations of operating the door I found that if I helped the door panel "Open" actuator by holding the back of the panel firm, the solenoid would engage and unlatch every time.  It wasn't intermittent under that condition.

The door catch would also sufficiently move to unlatch and let the door open.
Surprising the latching function also improved.

Re-examining the "Open" push bar operation and comparing this Beomaster 5000 with the photo of a disassembled Beomaster 5000 control panel I realized this Beomaster panel has a missing plastic tab.

Here again is the photo of a disassembled control panel.


Here is a photo of the Beomaster 5000 door with the intermittent operation problem.
Notice the missing tab.


That explains why the door works when I manually hold the black plastic frame in place when pressing the "Open" press bar.  When the missing tab or my finger is not keeping the plastic frame secure it will move with the press bar and fail to engage the open door button contact.

The next problem was how to fix the faulty door mechanics.

After some more testing iterations I decided that I would try supporting the control panel door compartment behind the left side of the panel, where the "Open" actuator is, with a cut-to-fit rubber block.  I considered just gluing the keypad circuit board (PCB 5) where the missing tab is but rejected that idea because I wanted to keep PCB 5 where it can be easily removed if future repairs are ever necessary.

There is plenty of room behind the panel door for a rubber block and it would be like my finger in supporting the back of the panel.
Here is the rubber block glued in place.


The result is a success. 

So far the door opening mechanism works 100% of the attempts.
The door latch operation also works properly now.

I believe that too much flex developed on the left side of the control panel door, press bar over time.
That caused the mechanical operation to become unreliable.
The rubber block is providing needed support when the press bar is engaged so the latch/unlatch lever can fully travel and complete its task.

Here are a couple of photos of the working control panel door.


A few important things to note after wrapping up this issue...
  1. A completely non-functioning door unlatching problem (solenoid not working) could be an electronic problem involving the ribbon cable.
  2. When working on the door latch/unlatch mechanics, avoid the temptation to try and solve the problem with oil or other lubrication. The solenoid and its lever assembly work better dry.
  3. There could be a need to lubricate the mounting/pivot points of the long, door hinge rod. In that case use a dry lubricant like Tri-Flow Dry Lube.
Now back to my listening tests.