Featured Post

Beolover SyncDrive: DC Platter Motor Replacement for Beogram 4002 and 4004 (Type 551x and 552x)

Late Beogram 4002 and the 4004 (Types 551x and 552x), which have DC platter motors instead of the earlier synchronous AC motors usually suff...

Showing posts with label tangential drive. Show all posts

Saturday, May 12, 2018

Beogram 4002: From Oil Cleanup to First Operational Test

My restoration plan for this Beogram 4002 project encountered a detour. After restoring the main board I intended to do the reservoir capacitor replacement and the output board. However, the rust and corrosion I found when starting the project got me thinking that I need to address that first. Applying rust neutralizer and painting takes time because you have to let the parts dry between applications.

Here are a couple of pictures of the worst rust spots again.


This Beogram is interesting in that it has some really nasty looking rust damage but the overall condition of the turntable is actually really good.

I decided to apply three coats of the rust neutralizer.


After 24 hours I painted the parts with black, oil based paint.


Now I can proceed with the normal restoration. Since I had to disassembly the chassis to get to all of the rusty areas I discovered there were a few puddles of oil in the Beogram. People often make the mistake of applying thin oil to the Beogram turntables...and too much of it.


Thin oil applied to the moving turntable parts end up being slung against other turntable parts. My next step was an oil clean up job.

I had removed the floating chassis to get to the first oil spill.

The tangential arm assembly needs going over anyway so I moved those steps up in my project schedule.

There is a lot of wet oil around the spindle bearing nut. That means thin oil instead of grease was used on the tangential arm drive spindle.


The tangential arm drive spins as it moves the tonearm and you can imagine how that would really throw loose oil like this around.

There was quite a bit of oil on the surface of the floating chassis but I found the most gathering of oil in the tangential drive sensor housing.


The oil could interfere with the sensor preventing it from working properly.
I cleaned all of this area up and put the tangential drive sensor assembly back together.


The tangential arm sensor should be in good shape now when I get to the record tracking adjustment procedure.

I moved on to the arm lowering damper. It was in good shape but I cleaned it and applied some light grease to its piston.


I discovered the tangential drive pulley had small, hairline cracks as most do by now. That makes the pulley deform when the set screw tightens to the spindle shaft. The result is a wobbly running spindle.


I am still amazed that the transport bushings on this Beogram are still really good. That is a rare sight.
Here is the new pulley. It is one of Nick's aluminum pulleys and it works as great as it looks.


I also performed and initial tonearm tracking force calibration. It is easy to work on the tonearm assembly when it is removed like this.


Note that I installed the usual Beolover mod where a small locking nut is added to insure the tonearm counter weight stays where the calibration put it.

That takes care of the initial tangential arm mechanical restoration tasks. Now I can get back to the electrical step of replacing the reservoir capacitor.  Here is the original one as pictured before I started the rust and oil clean up.


Here is one of my favorite Beolover replacement parts. The 3D printed housing with the new reservoir capacitors.


Before this nice assembly I use to glue the new reservoir capacitors to the cabinet floor. This is so much nicer and it uses the original Beomaster clamp.

I am getting close to running an operational test on this Beomaster. First I went ahead and changed the capacitor and muting relay on the output board. I still need to add the grounding switch but I will come back to that.

Here is the before picture of the output board.


...and here is the after.


Now for some reassembly. I have to re-install the rust repaired chassis components so the floating chassis can be put back. I also have to re-install the DC platter motor that Beolover restored for me.

Here are some pictures of various components as they are fitted back into the Beogram chassis.


Whew. It is looking like a Beogram again. I should be able to install the sub-platter, belt and top platter then give this Beogram a test run.


I love it when things work the first time.

Even though this Beogram thinks it is ready I don't trust it enough to try a record yet. I will run through the service manual checks first to make sure it is ready to play a record.


Saturday, September 16, 2017

Beogram 8000: Fabricating a Fix for the Tangential Arm Drive Problem

Since I have the two broken pieces of the tangential drive bearing for the Beogram 8000 I thought of a way I could fabricate a repair. Any attempt to glue the tiny broken tab back onto the bearing by itself would be pointless. There isn't enough surface to attach it so that it wouldn't just break off again.

I re-installed the rear rail, drive screw, bearing and bracket to check what the clearances are around the bearing. There is plenty of room to add some reinforcement to the broken side of the bearing in the fix attempt.


What I needed was something I could epoxy all the way around the broken side of the bearing. My solution for that was to find a flat nylon washer to fit the job. After some experimenting I found that a #10 (SAE) size washer would be a good candidate. 


To glue the nylon washer to the broken side of the bearing I needed a clamp. It turns out that an M5 - 0.8 screw, washer and nut work perfectly as both a clamping mechanism and a secure mount for the bearing. The tangential drive screw is also an M5 - 0.8 threaded part.

I glued the washer onto the bearing first and let it begin to set up.


The broken sliver of plastic that was the bearing tab snugly snaps into the space between the washer and bearing. All I needed to do was add some epoxy there and everything will bond up nicely.


I let that dry for a couple of hours then removed the repaired bearing from the makeshift clamp. A test fit shows promise that this solution will work.


Tomorrow I will re-assembly the various Beogram components and see how close I am in having this turntable back in operating condition.

The best solution for this problem will still be to create a 3D replacement part. I was lucky in this case to have the broken tab piece to fully build the bearing part back up. Had that tab piece been unavailable (as is the case with some of my other spare Beogram 8000 units), I would have probably tried to build and wall there with some epoxy. Fortunately I didn't have to deal with that scenario.

Beogram 8000: A Tangential Arm Drive Problem

In cleaning and lubricating the Beogram mechanics one of the first things I wanted to check on is the small plastic bearing that travels the tangential arm drive screw to move the tangential arm assembly across a record and back to the rest position.

I wasn't too surprised when I discovered the bearing had a broken tab on the side that pushes the arm assembly back to stop. That seems to be a pretty common state in these Beogram 8000 units I am seeing.


In the last Beogram 8000 project I ran into this exact same issue where the round, plastic arm drive bearing (I called it a bushing in that post) had a broken tab where the mounting bracket attaches. I was able to re-attach the bracket and the Beogram was able to function. After returning the turntable to its owner the Beogram had problems with its arm lowering. I had the Beogram shipped back to me to discover that problem was due to a piece of FOD interfering with the arm lowering mechanism. That FOD piece was the broken tab off the plastic drive bearing!

I immediately looked at the arm lowering mechanism of this new Beogram 8000 turntable and sure enough, there was the broken plastic piece sitting in the compartment where the arm lowering mechanism is. This is indeed the same problem as the last Beogram 8000. Now that is a surprise.


Here is a closer look at the broken arm bearing pieces.


As I said earlier, this appears to be a common issue with these older Beogram 8000 turntables. Extra force must be being exerted on that part of the bearing when the tangential arm assembly is moving. Perhaps it starts failing as the Beogram electronics begin to fail and the arm drive system malfunctions.


Also as I mentioned, the Beogram can still function with the broken drive bearing tab. However, the drive shaft will likely make a noticeably louder sound when traveling the direction that is pushing on the broken tab. The real solution is to replace the bearing with a fully intact one. I do have some spare Beogram 8000 units but all of them except one also had arm bearings with same broken tab. I used that intact bearing on the previous Beogram 8000 project.

Now I will have to look for a new solution.


I might be able to fabricate something I can epoxy on the side of the bearing with the broken tab but a better solution would be to come up with a 3D printed replacement part.

I am going to start looking at these arm drive bearings on all of my Beogram 8002 turntables to see if any of them have this problem.


Wednesday, July 19, 2017

Beogram 4004 Type 5526: Tangential Drive Work

The last post left off with the fixed arm sensor lamp being replaced with the custom Beolover lamp assembly. To go along with that (reversible) modification a change on the main board is also required.
Per Beolover's explanation here and his repair technique here I temporarily installed a 2M ohm trimmer resistor on the trace side of the main board so I can easily make the initial adjustment. I will do that adjustment later when I get ready to test these current changes.

This picture shows the original 1M ohm resistor (R26) that will get replaced.


Here is the replacement 2M ohm trimmer installed in its temporary location until the adjustment procedure can be made.


As I moved on to install the Beolover replacement module for the tangential tracking I noticed something wrong with the arm lowering solenoid. I didn't notice the problem when I was busy working on the damper but here in this picture you can clearly see that the solenoid is missing its plunger.

I found the plunger and re-attached it to the lever using a dab of lock-tight.


To fix the solenoid I removed all of the arm damping components again and will leave them out while I work on the rest of the tangential arm assembly. Having the chassis clear of those components will make working in there a little easier.

Here is the removal of the original tracking sensor assembly. The Beolover replacement part will fit right in place of the original light source housing and the original parts will be saved in case someone wants to revert back to them in the future.


That looks great. Now on to the drive screw cleaning and lubricating.
The drive screw bearing nut and housing always gets dirty over time. This one is no exception. There are even some specs of debris from the disintegrated chassis lock down bushings. Those pieces continue to show up.


I completely remove the drive screw and parts for cleaning and re-lubricating.


I am satisfied the drive screw parts are clean and ready for re-assembly.
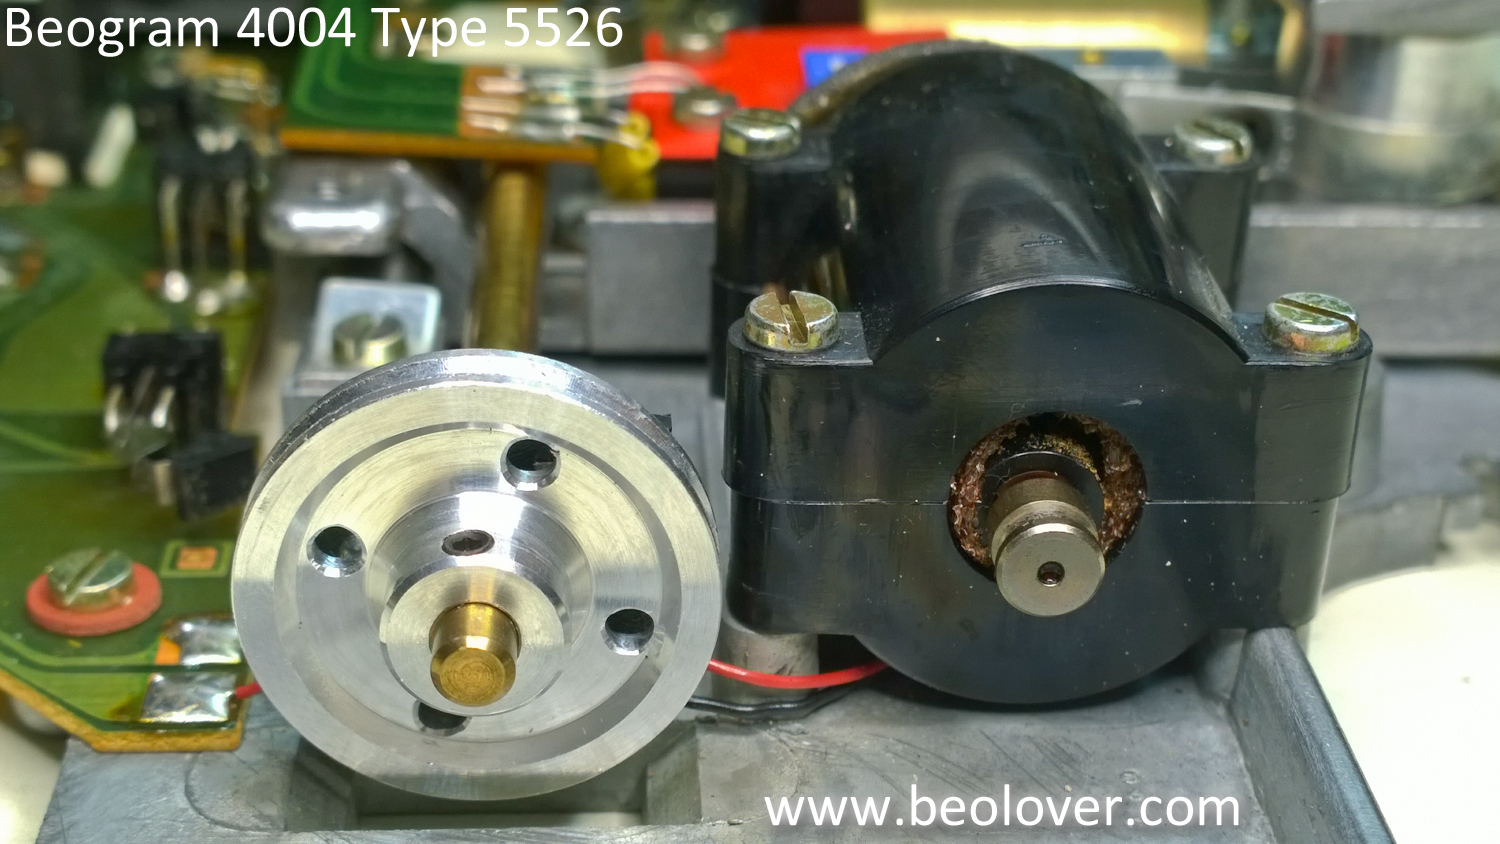
This is the point in the restoration where I also replace the tangential drive pulley. This picture shows the pulley options.  I like to replace these Beogram 400x drive pulleys with aluminum replacements from Nick (contact us if you want to get in touch with him).

The aluminum pulley on the left is Nick's original replacement (version 1). The black plastic pulley on the right is the original Beogram 4004 pulley. The pulley I am currently going with is Nick's Version 2 aluminum pulley (the one in the center of the picture). It is a nicer reproduction of the original pulley and is lighter weight than the Version 1 pulley. The indention of the middle area of the pulley also prevents accidental contact with the drive screw mounting bracket screws. A really super nice upgrade.


Here is the drive screw re-assembled with the new pulley.


I will go ahead and note it here that the tangential drive motor on this unit seems a little loose in its housing. I will look at that more closely when I get the Beogram put back together for testing. If I have to I will change out that motor.

Next I put the arm lowering parts back in place. The solenoid plunger is where it should be now.


I made one more electrical change on this Beogram tangential drive assembly while I had it out of the box. Like the recent Beogram 4002 restoration I changed out the old light source for the arm position sensor. The new LED light source will insure there won't be any problems with the old light source failing later. I also took the opportunity to clean the contacts of the tangential arm position switches (shown by the red arrows).


That pretty much does it for the tangential drive electrical restorations. All that I need to do before re-assembling these parts for testing is to align and balance the tonearm.