On my previous Beogram 8000 project I packed the turntable using an original Bang & Olufsen Beogram 8000 shipping box plus an outer box. Here are some pictures of that shipment.
In an amazing feat, the shipping company managed to damage the Beogram during shipment. There was no real visible damage to the shipping box so it was assumed that the box was dropped straight down and flat. The impact caused the transform upward so that it knocked the metal door above it off its hinge. On the downward stroke it broke the main Beogram PCB.
Fortunately I had a spare Beogram 8000 main board so I was able to repair the damage. The door hinge was not broken so I reset that. The shipping company insurance paid for all of the damage and shipping costs.
For the return shipment I did some rethinking about the packing. The monster packing box had failed to protect the Beogram in this case and that was with the B&O original Beogram inner box. So how do I improve the odds?
One thing I decided was the double boxing in this case made for an extra large shipping box and was probably difficult to handle. That isn't really an excuse but if I can improve that it should lessen the chance of a drop.
I decided to go to a custom, single box rather than the original B&O box inside an outer box. The new box however is double-wall. Twice the thickness of a normal cardboard shipping box.
The other issue was with the super dense, three inch thick foam. It is very strong but doesn't provide enough cushion. The new box would have dense, polyethylene foam glued to the inside walls and floor of the double-thick cardboard box.
I also decided to custom cut the polyethylene foam to fill the cavities under the dust cover and tonearm compartment lids.
To protect against any impact force driving the transformer anywhere I wrapped the tonearm compartment door completely before wrapping the whole Beogram with firm eggcrate foam.
I used a nice strong vinyl record shipping box to pack up the Beogram platter and put that on top of the foam wrapped Beogram.
Here are some pictures of the new shipping box packing. Of course it begins with locking down the floating chassis for shipment. Here is one of the three lock down screws in the lock position.
Next is making the foam insert to hold down the sub-platter. Note that there is a part of the foam insert that goes into the back of the case where the tangential arm moves. That foam piece prevents any arm movement during transport.
The next picture shows the packing stretch wrap around the Beogram (under the lids and over the lids). That lid is not able to move at all now.
Now the Beogram is wrapped with a clear plastic bag then wrapped twice with firm eggshell packing foam.
The securely wrapped Beogram is placed in the double-thick box that has the polyethylene padding. Extra polyethylene foam blocks make the fit tight and create storage compartments for anything else included in the shipment (i.e. phono cables).
The platter box is placed on top then covered with another firm foam pad.
The top polyethylene protective foam sheet is placed on top of all of that and the shipping box can be closed up.
This packing method worked out very nice. The overall smaller box dimensions made for an easier box to handle and reduced the shipping cost by $10. I am happy to say this time the Beogram made it safely back to its owner.
For this latest Beogram 8000 project I am using the new shipping box method as well. Another double-thick shipping box with the same foam padding. I changed my wrapping a little bit on this one. With the previous shipment I used packing tape around the eggshell packing foam. This time I used stretch wrap. That made for a little tighter wrap of the Beogram so I had to add another polyethylene foam wall. That resulted in some nicer mini compartments.
The platter box still goes on top of that followed by another eggshell foam piece and the top polyethylene sheet.
This Beogram is safely packed for the journey back home.
Featured Post
Beolover SyncDrive: DC Platter Motor Replacement for Beogram 4002 and 4004 (Type 551x and 552x)
Late Beogram 4002 and the 4004 (Types 551x and 552x), which have DC platter motors instead of the earlier synchronous AC motors usually suff...
Showing posts with label 2017LCBG8000. Show all posts
Wednesday, October 18, 2017
Monday, October 9, 2017
Beogram 8000: Finishing Up The Project
Now it is time to finish the reassembly and do the final check out.
Just like the aluminum deck trim, there were a couple of other pieces that required cleaning off old, original, double-sided tape and reattaching pieces with new, 3M double-sided tape.
One of those assemblies was the tonearm compartment floor cover. I use Goo Gone to soften up the old tape residue then clean it off with paper towels and elbow grease (fingers actually).
I also prepared the tonearm compartment lid hinge lever so I could reattach the dust cover assembly.
This Beogram had no damping grease in the hinge lever compartment at all so I had to add some. As always I use Nygel 767A damping grease. It has the necessary properties to handle the job.
Once the hinge lever components for the dust cover and tonearm compartment lid are prepared I attached the cover assembly.
For the tonearm compartment lid attachment I used the same 3M double-sided tape that I used on the aluminum deck. I also attached new rubber stops to the corners of the dust cover that contact the aluminum deck. There is also a new rubber stop for the tonearm compartment lid.
Saturday, September 30, 2017
Beogram 8000: Feel Like Listening to a Record?
The light at the end of the tunnel for a vintage Beogram restoration project is the red glow of light at the end of the fixed arm while the tonearm tracks a favorite vinyl track.
Today is the day for that event with this latest Beogram 8000 from Detroit.
To get to this point I had to reassemble the Beogram parts into the cabinet. I did a little touch up of the inside of the Beogram cabinet with flat black paint. There were some spots where original paint was scraped off and I didn't want any rust to form.
I also had to reinstall the aluminum deck panel on this Beogram as is always the case with these units. I have reverted to using 3M double-sided tape for this as it is the most reliable.
Before suspending the floating chassis with the turntable components to the cabinet I still had to fix the speed sensor bracket mount. I had a spare locking ring to replace the worn, original ring.
Before heading towards the listening room with the Beogram I did a quick check of the platter to arm height. The service manual calls for 23mm and that is what this Beogram measures.
The last thing I did was change out the phono muting relay from the original National relay to a sealed Omron miniature relay. I used the Beolover adapter board for the National HB2 type relays that he created for the Beogram 4002/4004 turntables. The Omron G6K relay for the Beogram 4002/4004 turntables is a 24 VDC relay. This one on the Beogram 8000 is a 12 VDC relay.
I mounted the replacement relay board assembly where the original relay was installed.
The relay didn't work. It turns out the polarity of the relay coil voltage is different on the Beogram 8000 circuit than the 4002/4004 turntables. So I needed to flip the relay. That turned out to be no problem and solved the relay problem.
I rechecked the phono muting functionality with this new Omron relay and it works great. There is audio with the tonearm is lowered on the record grooves and both channels mute the same when the tonearm lifts.
The Beogram is now to the point I can do some serious record listening. I haven't re-attached the cabinet dust cover or any of the compartment lids. I usually do that as the very last step before shipping the turntable home. That way I can easily open the Beogram back into service position should I find anything that needs adjustment during record play.
Now there is that red glow of the Beogram playing some Marvin Gaye. A nice assist from an MMC-20CL cartridge produces a wonderful listening experience.
Today is the day for that event with this latest Beogram 8000 from Detroit.
To get to this point I had to reassemble the Beogram parts into the cabinet. I did a little touch up of the inside of the Beogram cabinet with flat black paint. There were some spots where original paint was scraped off and I didn't want any rust to form.
I also had to reinstall the aluminum deck panel on this Beogram as is always the case with these units. I have reverted to using 3M double-sided tape for this as it is the most reliable.
Before suspending the floating chassis with the turntable components to the cabinet I still had to fix the speed sensor bracket mount. I had a spare locking ring to replace the worn, original ring.
Before heading towards the listening room with the Beogram I did a quick check of the platter to arm height. The service manual calls for 23mm and that is what this Beogram measures.
The last thing I did was change out the phono muting relay from the original National relay to a sealed Omron miniature relay. I used the Beolover adapter board for the National HB2 type relays that he created for the Beogram 4002/4004 turntables. The Omron G6K relay for the Beogram 4002/4004 turntables is a 24 VDC relay. This one on the Beogram 8000 is a 12 VDC relay.
I mounted the replacement relay board assembly where the original relay was installed.
The relay didn't work. It turns out the polarity of the relay coil voltage is different on the Beogram 8000 circuit than the 4002/4004 turntables. So I needed to flip the relay. That turned out to be no problem and solved the relay problem.
I rechecked the phono muting functionality with this new Omron relay and it works great. There is audio with the tonearm is lowered on the record grooves and both channels mute the same when the tonearm lifts.
The Beogram is now to the point I can do some serious record listening. I haven't re-attached the cabinet dust cover or any of the compartment lids. I usually do that as the very last step before shipping the turntable home. That way I can easily open the Beogram back into service position should I find anything that needs adjustment during record play.
Now there is that red glow of the Beogram playing some Marvin Gaye. A nice assist from an MMC-20CL cartridge produces a wonderful listening experience.
Sunday, September 24, 2017
Beogram 8000: Preparing for Record Play (UPDATED)
This Beogram 8000 is almost ready for the record listening phase of the testing. There are still a few test milestones to check.
The normal voltage level for the forward LDR and reverse LDR devices should be between 0.6 and 0.7 VDC. Adjustments to that voltage are made by adjusting separate screws for the forward and reverse LDR light apertures.
So did the forward scanning adjustment.
One is to calibrate the tonearm/cartridge tracking force. I like to set the tonearm tracking force to 1 gram and calibrate the arm counter-weight for that force with a typical B&O cartridge attached. This picture shows the components involved with calibrating the tracking force.
I started out with the B&O tracking force scale but I end up finalizing the adjustment with a digital scale.
The tracking force is set so it is on to the Beogram forward and reverse scanning voltage checks. The controls for the left (forward) and right (reverse) tonearm scanning operate an aperture that passes light onto an LDR device. The amount of light changes the voltage on the device which affects the motor control circuitry responsible for moving the tonearm.
The normal voltage level for the forward LDR and reverse LDR devices should be between 0.6 and 0.7 VDC. Adjustments to that voltage are made by adjusting separate screws for the forward and reverse LDR light apertures.
I like the option to check these LDR voltages after the Beogram is re-assembled in its cabinet. It is easy to pop open the control panel but probing the LDR devices to measure them is difficult at that point. For that reason I attach a small test connector that I can use later for re-adjusting the scanning voltages.
Here is the control panel with the test connector installed. Note that the color coding I use on the test connector matches the corresponding signals on the panel's small ribbon cable. The test connector is a female connector so it can't short out when not being used for testing. Just insert a three-prong test jack and the measurements can be made with a DMM.
Now for some initial measurements.
CORRECTION: The following scanning LDR measurement results have been corrected from the original post.
The reverse direction scanning LDR adjusted nicely within the 0.6 to 0.7 VDC range.
CORRECTION: The following scanning LDR measurement results have been corrected from the original post.
The reverse direction scanning LDR adjusted nicely within the 0.6 to 0.7 VDC range.
No problems with the forward and reverse scanning functions.
The third thing I checked was the Beogram phono muting relay. I have started to see more signs of the original muting relays starting to wear. Sometimes these relays fail completely so it is easy to diagnose. Typically though the relay just starts acting up slowly. It may occasionally fail to switch in and out of muting or it could start exhibiting some noise after closing.
On this Beogram I noticed that the muting relay isn't always completely closing when the phono signals are supposed to be muted.
Here are some pictures that show the problem.
The first picture shows the muting relay open where both channels are playing a music source.
This result looks good and shows the relay is working.
When the tonearm lifts the muting relay closes and the phono signals get shorted. The result should be both left and right channels muted. This picture shows that the right channel isn't completely muted.
I tapped on the relay a few times and the muting relay started working again.
The phono muting relay issue will have to be fixed but swapping out the relay is something I can easily do later. It doesn't need to hold up testing the Beogram record play functions.
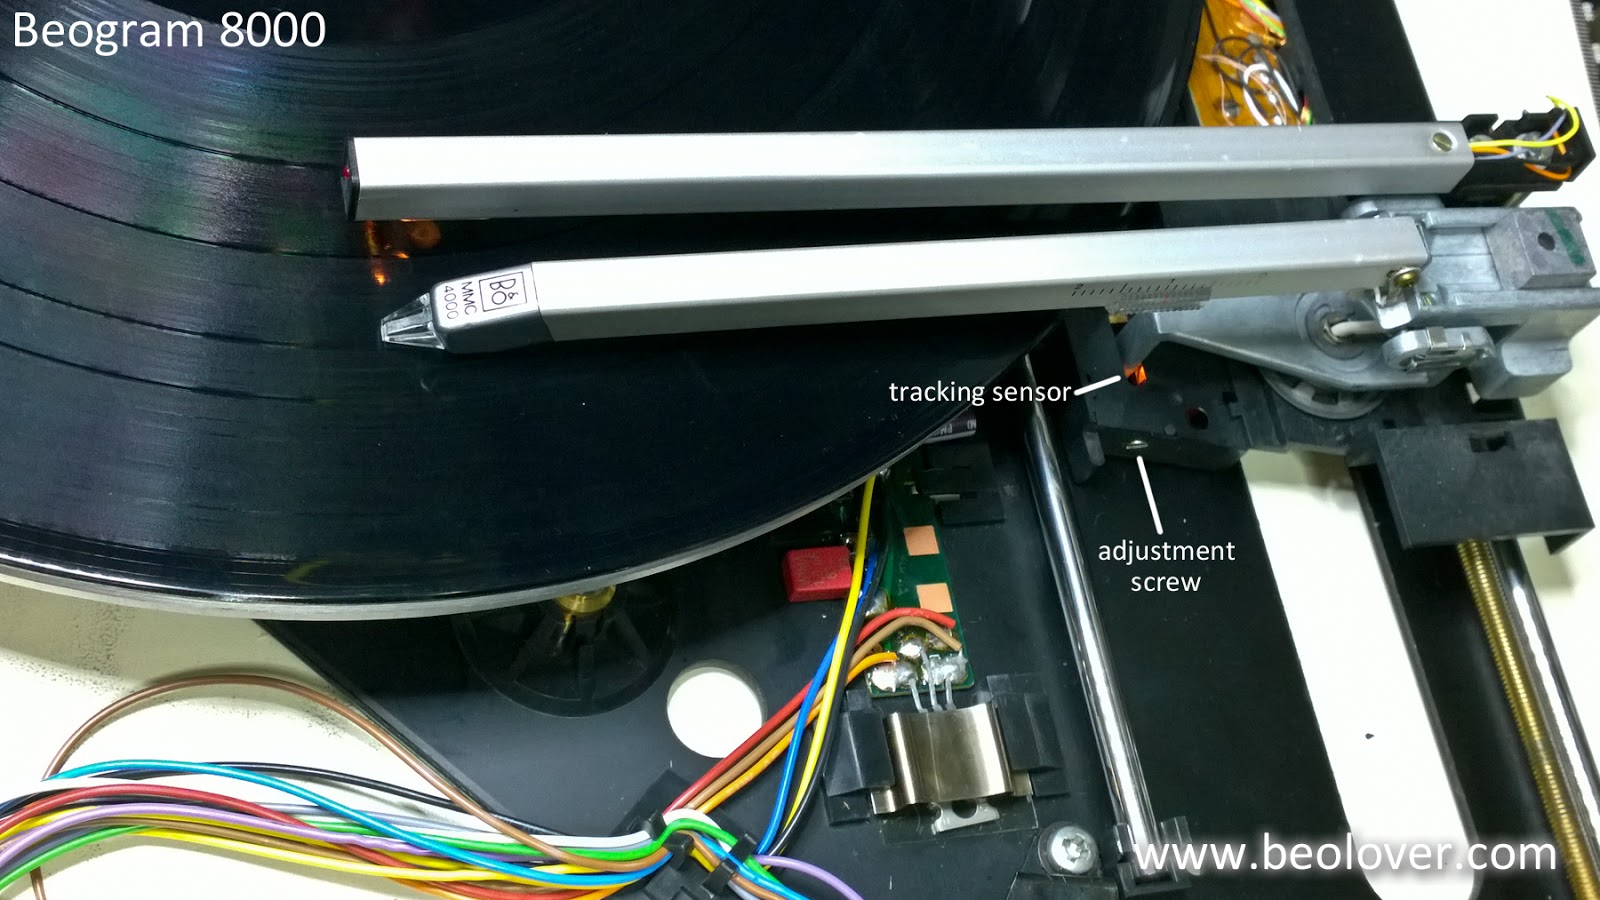
The last check before record play is to check the tangential arm tracking. To perform this check power is removed from the platter so that it can only rotate manually by hand. The P4 connector is disconnected from the main board to do this.
Note: Unplug the Beogram before unplugging and plugging in any board connections.
The linear tangential arm tracking test calls for setting the Beogram arm onto a Bang & Olufsen Test Record 3621001 track 5. The platter is manually rotated and the rotations counted while observing the tracking motor for movement. When the stylus sets down the tracking motor should begin first moving the arm transport after 2 ± 1 rotations. After that the tracking motor should move on every platter rotation.
I have never been able to find a B&O Test Record 3621001 so I use a couple of records I have found worked well for this adjustment.
Surprisingly, this Beogram 8000 did not require any adjustment to the tracking sensor. It tracked my test records perfectly.
Tomorrow I will re-assemble the Beogram and test play a record.
The last check before record play is to check the tangential arm tracking. To perform this check power is removed from the platter so that it can only rotate manually by hand. The P4 connector is disconnected from the main board to do this.
Note: Unplug the Beogram before unplugging and plugging in any board connections.
The linear tangential arm tracking test calls for setting the Beogram arm onto a Bang & Olufsen Test Record 3621001 track 5. The platter is manually rotated and the rotations counted while observing the tracking motor for movement. When the stylus sets down the tracking motor should begin first moving the arm transport after 2 ± 1 rotations. After that the tracking motor should move on every platter rotation.
I have never been able to find a B&O Test Record 3621001 so I use a couple of records I have found worked well for this adjustment.
Surprisingly, this Beogram 8000 did not require any adjustment to the tracking sensor. It tracked my test records perfectly.
Tomorrow I will re-assemble the Beogram and test play a record.
Subscribe to:
Posts (Atom)