I recently received the DC motor, the main PCB and the RPM panel from a Beogram 4002 (5513) in Arizona for restoration. The unit exhibited the usual RPM fluctuations. I opened up the motor first since it tcan take up to three days to infuse dry bearings with oil. This shows the motor as received:
I took it apart to get to the bearings:
The bearings are the two small donuts on the black pad. I immersed them in motor oil and pulled a vacuum. Immediately vigorous bubbling started, indicative of air being drawn from the porous bearing material. This makes room for oil to interdiffuse into the bearing.
After about three days the bubbling stopped and I extracted the bearings from the oil:
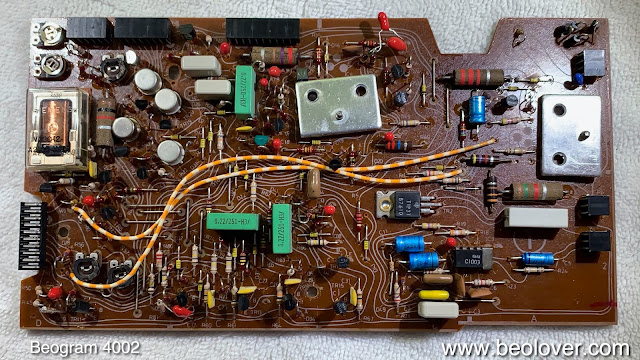
I put the motor back together and set it aside. The next step was rebuilding the main PCB. This shows the original condition:
This is a detail shot of the 'RPM section' with the 33/45 relay and the trimmers for adjusting the speed:
This are the replacement parts: A modern encapsulated relay with an adapter board that has the footprint of the original Siemens relay, and two multi-turn trimmers to replace the often oxidized single turn original RPM trimmers
This shows the parts installed:
I also replaced TR3 that amplifies the record sensor signal. It often goes out of spec with the consequence that the deck cannot distinguish anymore between no record on the platter and the presence of a record. This can get dangerous for the stylus. This shows the original BC183C transistor with fixed 1M Ohm biasing resistor in place:
And after replacement with modern 2N5089 high gain type and a multi-turn trimmer enabling exact biasing of the transistor to obtain the specified 4 V at the collector:
I also replaced all the electrolytic capacitors since they often go out of spec at this point in time:
The next step was to restore the RPM panel. It came with some strange 'custom wiring' (oh, that human ingenuity!!..;-):
I decided to replace this mess with a complete trimmer unit from a scratched up panel that I had on the shelf. I removed the unit from the rewired panel, which revealed a completely wavy white background label. This is what happens when the original light bulbs are replaced with modern bulbs that have a higher output power. This makes them run hotter, and that damages the label.
Anyway, I put the replacement in place and installed my LED replacement boards. This is a good idea since LEDs run much cooler than bulbs, and that keeps the RPM trimmers in this panel from changing their temperature, which sometimes can also result in RPM fluctuations while playing a record:
After installing the LED panels I put the original covers back on. Since the LEDs do not cover the small slots in the covers (for the bulb holders), I put a bit of black tape over them to prevent light from seeping out. This can sometimes be seen though the crack between RPM panel and small aluminum plate of the Beogram.
Then it was time to test the setup. This shows the RPM panel in action: The nice incandescent looking color (while correctly showing the indicator in red) is a consequence of using red-green LEDs tuned to yield a warm incandescent glow:
The next step was adjusting the bias of TR3 to get 4V at the collector:
Then I measured the sensor response with the oscilloscope:
This signal looks good, and the deck correctly recognized 7" and 12" records, and also their absence. The final step was testing the RPM stability of the entire setup. For this I installed my BeoloverRPM device and measured the RPM in 10sec intervals for about 24 hrs:
This is the curve I measured:
This is an excellent result. It is probably one of the best DC motors that I encountered since I started Beoloving. This setup is ready for duty again. Time to send it back to Arizona!


No comments:
Post a Comment
Comments and suggestions are welcome!