Featured Post

Beolover SyncDrive: DC Platter Motor Replacement for Beogram 4002 and 4004 (Type 551x and 552x)

Late Beogram 4002 and the 4004 (Types 551x and 552x), which have DC platter motors instead of the earlier synchronous AC motors usually suff...

Showing posts with label microcomputer board. Show all posts

Sunday, January 6, 2019

Beogram 8000 Type 5613: Recapping the main board and microcomputer board

The capacitor replacement on the main board and microcomputer board is complete. The microcomputer board also got a new socket for the microcomputer IC and the solder joints were reflowed on all of the board connector pins.

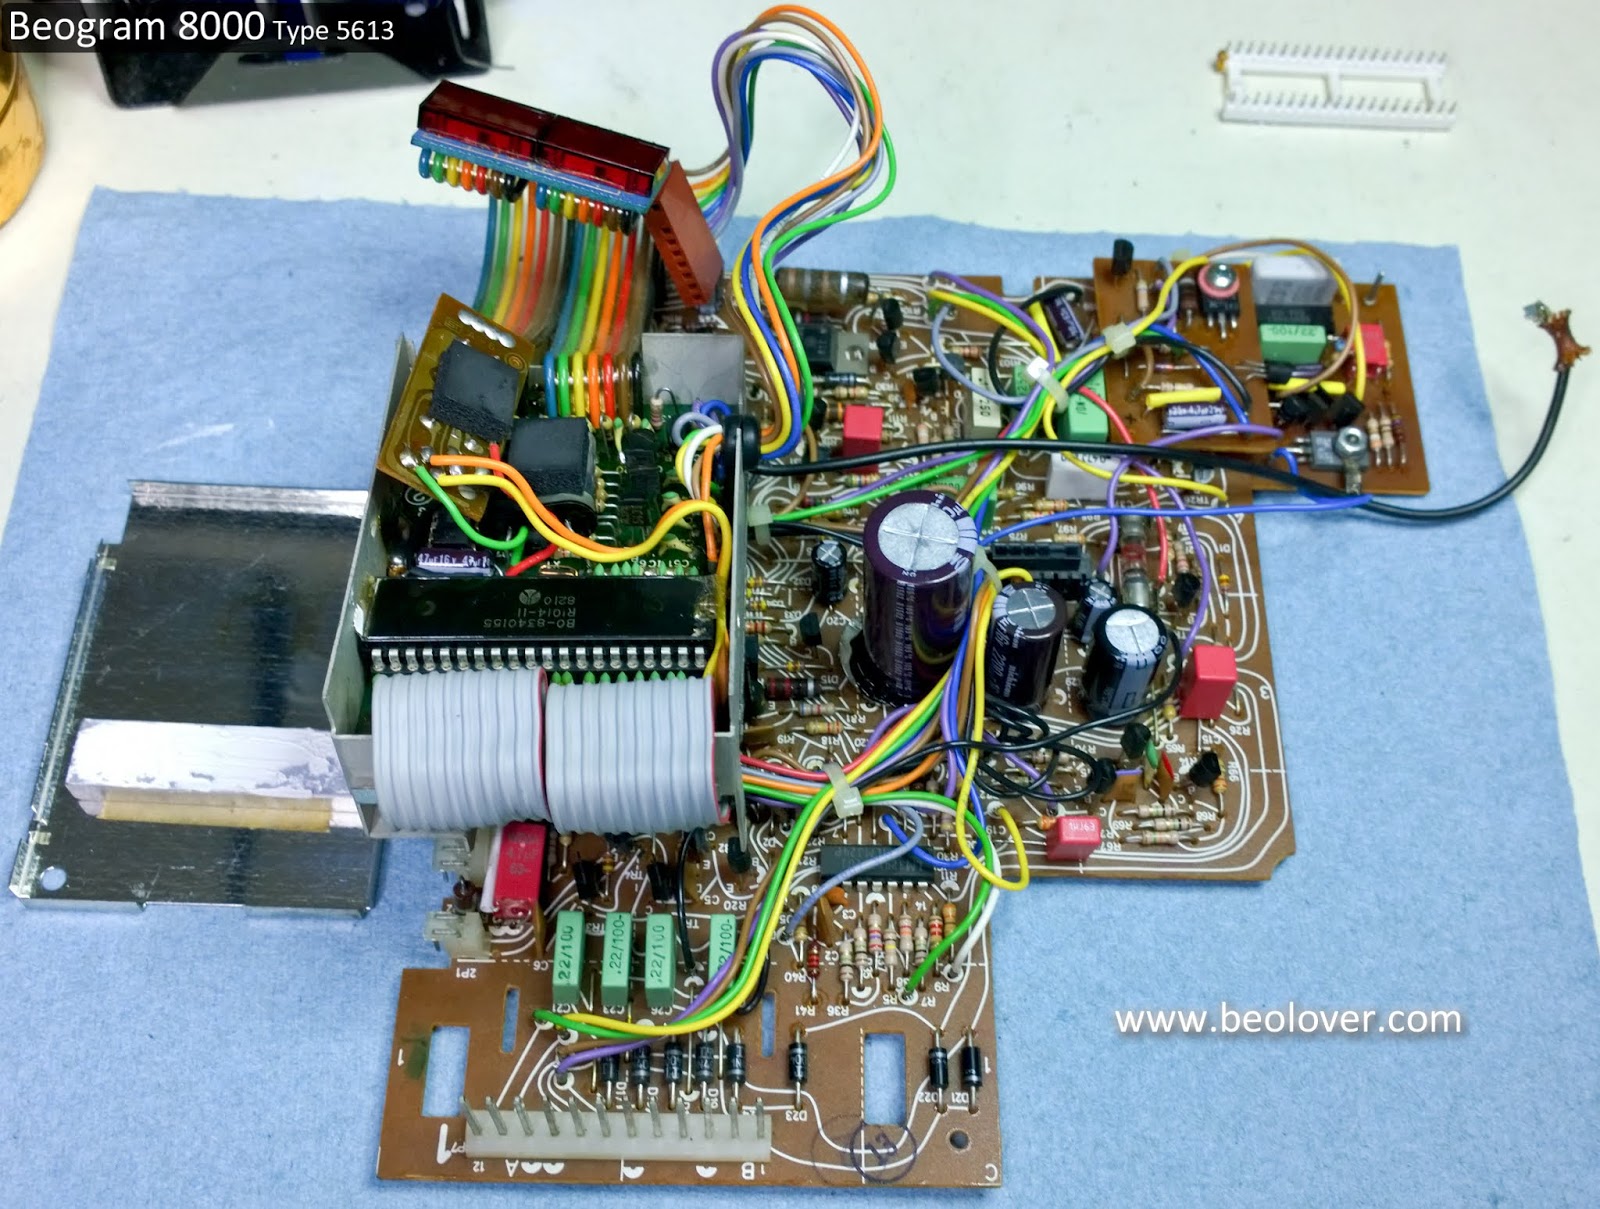
Here is the start of the main board recapping.


A nice small board plus three smaller boards. It should be pretty easy.

That's what I always think but it turns out this board takes me longer than any other Bang & Olufsen board from the period. You have to disassemble the two add on boards and the microcomputer board is difficult because there is so little space to get to the single capacitor on it.

There are two small 1uF capacitors on the trace side of the main board so I will do those first.


One got nicked but is okay.


The main board recapping goes pretty quick until I get to the largest capacitor, C27.


The original C27 is attached securely to the main board by three mounting pins which are connected to the negative side of the capacitor plus the single positive lead...four mounting points. New, replacement electrolytic capacitors don't come with the same mounting options (or at least I haven't found any) and I don't like the way the two lead replacement capacitor is wobbly using just the two mounting points.

My solution is to pop off the original C27 base (with the three prongs) and use it on the new capacitor. I solder the negative lead to the base then put a bead of black hot glue around the edge.


That makes for a good solid fit.


That takes care of the main board (and the two, small add-on boards).
On to the microcomputer board.


The microcomputer board only has one capacitor...C28. Only one but it is difficult.
Its positive lead is soldered to the trace side of the board while the negative lead is soldered to component side of the board. The proximity to the microcomputer IC makes it a little risky so to be safe I don my anti-static strap, ground the metal box containing the microcomputer board and remove the microcomputer IC.


On this particular unit the small add-on board inside the box gets its power from the C28 capacitor directly across the C28 leads. That adds to the removal difficulty.

Since I removed the microcomputer IC for safety I always go ahead and replace the 40-pin IC socket. Removing the socket also gives me more working room. The new replacement socket is a heavier duty socket.


With the microcomputer IC and socket removed I am able to get my soldering iron on C28 to remove it.


For the replacement C28 I will run both its positive lead and the positive power wire (red wire) from the add-on board together to the trace side.  The C28 negative lead also goes through the PCB but does not have a solder point on the trace side.


The add-on board negative power wire (black wire, ground) solders to the C28 negative lead and the ground solder pad on the component side. You can see how having the microcomputer IC and socket make that a much easier task.


Now the new microcomputer socket can be installed.


Here is the completed microcomputer board along with the main board. I won't attach the lid to the microcomputer board box until I make sure the Beogram powers on and works.


Once I verify the recapped boards are good I will be able to start in on the service manual checks.

Tuesday, October 23, 2018

Texas Beomaster 8000: Microcomputer board fixed

Taking a little break before revisiting the Beomaster 8000 microcomputer board problem resulted in success. I believe this board is functioning properly again.

Two things I wanted to try at the end of my last post were to confirm the two processor devices were good and to try and do away with the extra jumper wire.

I moved the two processor devices (IC3 and IC4) out of this Beomaster's microcomputer board and into one of my good spare boards. Reinserting that board into the Beomaster confirmed the board functioned correctly so the IC3 and IC4 devices are good.  I don't think I have come across a Beomaster 8000 yet that has had any bad processor ICs.

For the extra jumper wire on the trace side, I removed it and resoldered all of the related solder joints. When I was done I confirmed that the grounds on IC5 and IC6 were the same. No need for the jumper wire.

The next step was to try the updated microcomputer board in the Beomaster again. The result was the same.


I wasn't really expecting the board to be working but I had to try.  IC5 and IC6 didn't make sense as being the cause of the problem above.

Studying the result I realized that everything worked except for the program display segments and the first seven-segment display of the volume indicator.  I started looking for what area of the microcomputer board only affects those specific things. The schematic showed me exactly what I was looking for.


As you can see per the dotted red line, the IC3 processor enables those specific display segments using IC3 pin 17 (PHASE1). Since known good boards work I knew the problem had to be from the microcomputer board P74 connector pin 4 back to IC3 pin 17.

Checking that path and the components (C31, R30) revealed nothing. Continuity was there. There were no shorts to other paths. C31 and R30 both measured correct values.

The only thing left to do was to desolder that path (including P74) and resolder it. That turned out to solve the problem. When I reinstalled the microcomputer board (for the tenth time) the Beomaster display came to life the way it did with the known good microcomputer boards.


Here is what the (hopefully) final version of the restored microcomputer board looks like. It looks like a typical Beomaster 8000 microcomputer board.


What a relief. I haven't had a Beomaster 8000 microcomputer board with this type of problem before.
Now I can proceed to the functional testing with this unit.

Texas Beomaster 8000: Sorting out problems with the microcomputer board

In the blog post where I checked out the Beomaster 8000 power supply I used a spare microcomputer board to run the Beomaster. The reason for that was because the original microcomputer board was not in good shape. During the recapping of that board I could see there were problems with it.

In this post I dig into the original microcomputer board with the goal of cleaning up bad solder joints, investigating some unusual board wiring and making sure the two processor devices are working.

The starting point of this task is with the recapped microcomputer board.


On the trace side the picture below shows this microcomputer board compared with a typical Beomaster 8000 board...in this case the microcomputer board from the Canada Beomaster 8000 unit.


The orange and green connection wires are what I expect to see on these boards. The other wires on the Texas Beomaster 8000 microcomputer board are unusual.

Checking them against a known good board I found that they do connect points that are supposed to be connected. The question is why and if they are necessary.  I started by removing one end of each jumper wire and testing if the connection was still good. In some cases it was so the wire really wasn't necessary. In several wires however the jumper wire was the only thing making the connection.

My suspicion is that board vias (connections between the top and bottom board layers) are not making contact.

Some of the jumper wires appear to have been made as a change to the normal wiring between vias on the component side.

One task on this board restoration is to replace the two crystal oscillators as I did on the Beomaster 8000 from Canada. Starting with that task will give me better access to board vias I want to resolder.

The following pictures show the removal of the two processor devices and the replacement of the crystal oscillator devices. The same care was taken regarding static discharge and the shorting of the oscillator leads while handling the processor devices.


When removing the processor chips I felt the sockets were showing their age so I removed the original sockets and plan to replaced them with modern, tulip style sockets. The pins are sturdier. This picture shows the old sockets (in the rear) and new sockets in the foreground.


While the processor devices and sockets were removed I installed the new crystal oscillators and added three jumper wires (blue, green, orange) between board vias as shown below. That is the normal way the Beomaster 8000 microcomputer board makes those connections. That eliminated three wires that were on the trace side of the board.


I also resoldered the vias involved in all of those connections.

After this first round of work I was left with the following...The green and orange jumpers that should be on the trace side plus three additional jumpers that I found I could not remove yet.
Note that the green and blue jumper wires were white wires earlier. I changed them when I started cleaning up bad solder connections. I did the same thing with the original yellow jumper wire.
I changed it to the white in the photo below.


Testing this state of the board resulted in a partially working Beomaster.

The standby LED dot illuminated and the keypad selection switch put the Beomaster in the power on mode. However the source selection did not appear to function and some displays were not working.
I swapped the two processor devices with some spares I had to make sure the processor chips were not the problem. It doesn't appear to be an issue with those two devices but I need to make some additional checks.


My prime suspect at this point is still connections between board layers. I want to see why those remaining three jumper wires have to be on the trace side.

For the green and blue wires (from two vias next to one of the oscillators) ... to IC7 I discovered that the board vias were the problem.


I removed IC7 to get to the component side of those vias and resoldered them there. I also resoldered the vias on the trace side. That resulted in those connections being good without the jumper wires.

Here is the original state of the microcomputer board trace side compared to the current state.
Note again that I changed the yellow jumper wire to a new, white wire when I cleaned up the ugly solder joints for that.


I am left with just the white wire jumper. That jumper is connecting the board ground between two devices (IC5 and IC6). With the wire removed those two points are not making a good connection.  The wire shouldn't be necessary so there is another via or two I need to check.

In this current state the microcomputer board still isn't functioning correctly. I can control quite a bit of the functions. The volume and tuning dials operate. The channel balance control works as do filter and tone control switches (for the three illuminated lamps below).


There are a couple of things I need to do next.

I want to put the original processor devices in one of my good spare boards to be 100% sure those devices are good.

I want to try and eliminate that grounding layer connection the white jumper wire is trying to do.

If finding and fixing the problem (that requires the white jumper wire) doesn't result in a fully functional microcomputer board then I will have to move forward on this project with one of my spare microcomputer boards and return to this problem board at a later date.

This microcomputer board is the only component in this Beomaster 8000 that is keeping it from moving to functional testing.


Thursday, October 18, 2018

Canada Beomaster 8000: Microcomputer Board Completed

I completed the electrolytic capacitor replacement on the Beomaster 8000 a few posts back. When I changed the two capacitors on the microcomputer and display boards I said I would return to the two boards later to finish their restoration tasks. I did that because I wanted to test the Beomaster power supply voltages first. Now that the power supply tests are out of the way I returned to the microcomputer board and completed the last task there.

The final microcomputer board task was to replace the two 2 MHz crystal oscillators with new ones. We like to replace the two oscillator devices because the Beomaster 8000 is such a heavy and expensive component to ship. Beolover first ran into a problem with the Beomaster 8000 2 MHz oscillator devices in a 2016 restoration. Since then we decided to make that replacement on all of our Beomaster 8000 restorations that involve shipping. Think of it as insurance.

The replacement is not terribly difficult but care must be taken to not damage the two microcomputer board processor devices.

Here is the board as I left it after the recap. The crystal oscillators and their related capacitors are highlighted.


This is a closer look at the 2 MHz oscillator devices and their 12pF ceramic capacitors.


Before de-soldering and removing the existing 2 MHz oscillator devices the leads are shorted and the two processor devices (9IC3 & 9IC4) are removed. The red alligator clip connects the board ground to my shop power ground and my electrostatic discharge wristband. It is important to protect against static discharge when working with integrated circuits. Especially when some of these integrated circuits are not available anymore.


This picture shows the oscillators removed.


The new crystal oscillator devices are 2 MHz oscillators but their spec sheet specifies that they require 18pF capacitors instead of the 12pF capacitors the old oscillator devices required.


The metal lids are then reattached to the microcomputer board shield box and I tested that the Beomaster microcomputer board still works.


The control panel still functions so the microcomputer board looks like it is ready to go.

The display has some failed segments. To verify that I will remove the four segmented display modules and see how they do on the test jig.

Monday, October 8, 2018

Texas Beomaster 8000: Final four capacitors replaced

Like the Beomaster 8000 from Canada I replaced the last four capacitors on the Texas Beomaster.  My original plan was to run some power supply checks with the recapped Beomasters. Unfortunately this Beomaster 8000 from Texas has a few additional problems with the last two boards. The problems aren't anything that can't be fixed but rather some things that must be reworked. This Beomaster from Texas was worked on before. Whoever put a soldering iron to this receiver did a poor job. I already have had to fix some bad solder joints on other boards in this unit. The microcomputer and display boards also have some ugly solder joints.

I started with the microcomputer board.


Removing the top and bottom covers of the metal shield box reveal the microcomputer components.
This Beomaster is missing a paper insulator piece that fits on the inside of the bottom cover. I will make a replacement for that.


There are quite a few jumper wires on this board compared to the pristine board from the Canada Beomaster unit.  That doesn't mean the wiring is incorrect.  I have seen several other Beomaster 8000 units where updates to circuit boards were made in service centers after the units had left the factory.

The problem with this wiring though is that it looks pretty sloppy.  Here is a closer look at some of the soldering on the wiring.


There is no way that was done by a professional B&O technician.

I will go ahead and get the two capacitors on this board replaced but will have to do a bunch of rework on the sloppy solder joints before I begin using this board.

Here are the two capacitors being replaced.


Here are the replacements installed.


The display board is next. It is in decent shape.


This board had a bad soldering pad for one of the capacitors being recapped and I found a diode lead that was barely attached to its pad.  I fixed both problems.


I still need to reflow all of the solder joints on this board before using it.