This post describes the functional restoration of a Beogram 4004 (5526) whose original condition was assessed in here. This shows the Beogram as received with the aluminum plates removed:
As usual I started with the DC platter motor. These motors all have dry bearings at this point in time and these bearings need to be recharged with oil to ensure RPM stability of the platter.
The bearings are the two small donuts on the black pad. I immersed them in motor oil and pulled a vacuum:
The strong bubbling shows air being drawn from the bearing due to the vacuum. These air bubbles are essentially replaced by oil that diffuses into the bearing after the air is out. This process usually takes 2-3 days (it is over when the bubbling stops) so I focused on the other parts of the restoration process.
The next 'station' was the arm lowering/carriage mechanism. This shows the arm lowering mechanism consisting of solenoid and damper (which slows down the drop of the arm):
I removed the damper and the linkages for cleaning and re-lubricating.
After I re-installed these parts, I took out the sensor arm to get to the linkage that connects damper and arm:
Its pivot point is often stuck due to hardened lubricants. I removed the linkage,
and while I did that the small copper plate that serves to enable smooth lateral motion of the arm while in up position came off. It is held by (usually) deteriorated double sided tape. I cleaned the tape residues off and epoxied it back into position:
Then I re-installed the linkage onto its freshly lubricated shaft and placed the sensor arm back onto the carriage. The next step was to replace the original tracking sensor bulb (black box in the center of the picture)
with a LED replacement:
This LED light source features a trimmer that allows tuning the light intensity. This is a resurrection of a feature found in some earlier Beogram 4000s, which had been discontinued in later versions. It is very helpful for a precise adjustment of the tracking feedback.
After cleaning the carriage rods I also replaced the original cracked plastic pulley and worn belt
with a machined aluminum replica and a new belt:
My next focus was the restoration of the electronic components of the deck. This shows the main PCB as extracted:
This is a detail photo of the 'RPM section' composed of RPM trimmers and RPM relay:
I replaced all electrolytic capacitors and the RPM components:
This shows the rejuvenated RPM section:
It now features 25 turn trimmers and a modern encapsulated relay for enhanced durability and adjustment precision.
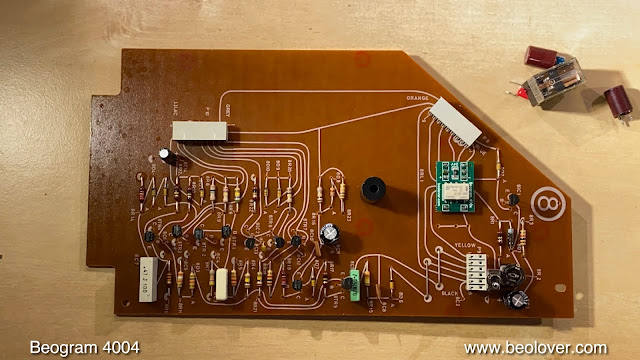
The other PCB in these Beograms is the output PCB. In the Beogram 4004 it contains two circuits:
The remote control circuit on the left side and the output/mute relay circuit on the right.
This shows the mute/output section:
I replaced all electrolytic capacitors and the muting relay, and I installed a switch that allows connecting system and signal grounds in case there is a hum issue when connecting to an amplifier with RCA inputs:
A detail view of the mute circuit with the red switch:
At this point I also replaced the reservoir capacitor of the unit. These capacitors are often out of spec and/or start leaking:
This shows the modern replacement which is housed in a 3D printed shell to fit into the original mounting clamp:
The next step was to replace the remaining incandescent bulbs with LED circuits. This shows the RPM panel with the bulb covers removed:
I took out the bulbs and soldered LED boards in their place.
While I had everything apart it was a good moment to address the end-of-life transport lock bushings. I later Beogram 400xs like this one they were made from a plastic that degraded over time and became brittle:
It is important to vacuum the entire enclosure bottom to get rid of any fragments of these bushings to ensure that the floating chassis is not blocked from floating by errant pieces lodged between chassis and enclosure:
This shows the 3D printed replacement bushings:
They consist of two pieces that insert from the top and the bottom onto the holes that held the original bushings. This makes it a snap to install them:
This shows one of them inside a reassembled lock:
After I plugged everything back together I focused on replacing the final bulb, which is located inside a small compartment at the end of the sensor arm. This shows the compartment pulled out from the sensor arm and the flex-PCB based LED replacement:
I removed the bulb and installed the LED component:
Whenever the sensor arm bulb is being serviced, it is a great idea to also replace TR4 which amplifies the sensor signal. These transistors have a tendency to loose gain over the years, which impairs the record detection function. A potentially expensive issue when an expensive cantilever is accidentally dropped onto the platter without a record present! This shows the original transistor in place:
I usually also replace the 1MOhm biasing resistor that connects between base and collector of this transistor (red resistor behind the transistor in the above picture) with a 5MOhm 25 turn trimmer which allows a precise adjustment of the DC collector voltage of TR4. In order to adjust the trimmer it needs to be first placed on the solder side of the PCB that one can adjust it with the deck powered up:
After adjusting the collector to 4V I installed the set trimmer on the compoent side into the position of the original resistor:
Then it was time to check the sensor response. For this one needs to solder a jumper to the collector of TR4 since it is located underneath the platter. This enables measuring the signal at the collector with the platter installed. Then I spun the platter by hand and I measured this signal:
This is as good as it gets. Typically 5V amplitude or better is passable.
In the meantime the vacuum did its job and the bearings were fully re-infused with oil. I broke the vacuum and extracted them from the oil:
I reassembled the motor and after installing it I measured the RPM of the deck for ~24hrs with the BeoloverRPM device, which can log the RPM in 10s intervals for extended periods of time. This is the curve I measured:
A quite nice result for a DC motor restoration! This is as good as it gets! This meant I was getting close to a test spin of this Beogram!
On to some final tasks to get this baby ready! First I replaced the flimsy circlip of the counter weight screw in the back of the tonearm assembly. This shows the original setup:
I installed a square M3 nut with a washer instead. This allows bolting the counterweight in place after calibration, which makes this setup stable during transport:
Then I adjusted the tracking weight with a digital gauge:
The next step was adjusting the arm lowering limit as the final protection of the tip should the arm ever be lowered on an empty platter. The limit needs to be adjusted in a way that the tip is able to go below the record surface, but not far enough to hit the platter ribs:
Then I adjusted the tracking feedback:
And finally I installed a DIN5 plug with gold plated pins to replace the grimy original convertible DIN7 plug (As is the case in most Beogram 4004s the two pins that convert the plug from 5 to 7 pins have been lost). Since this deck will not be used with a Beomaster 2400, which uses the two additional pins for a simple remote control function of the Beogram, my customer decided to go with a DIN5 plug. This shows the original plug
and here after installation of the new plug:
Then I spent some time adjusting the arm height, arm parallelism, platter height and center position of the floating chassis. This is a pretty involved process since so many interconnected parameters need to be adjusted in a way that they all meet specs. After this was done I tested the deck to make sure everything worked properly, and then it was time to install the Beolover Commander remote control module, which allows controlling the deck with an Apple remote. A great way to protect the fragile keypad coating, which deteriorates from exposure to the acids and fats in the skin.
The installation is a 'plug-and-play' installation which makes use of the keypad socket on the main PCB, i.e. there is no need for soldering. The Commander is available to other B&O enthusiasts. See
here for more information.
This shows the installed module:
This shows the pristine looking Beogram together with this great record:
A perfect combination!
Beolovely.!!...or at least I thought it was at this moment!
Unfortunately, as I continued playing this Beogram for a few days after this initial spin I started noticing RPM fluctuations! Not a good sign. I ran another test with the BeoloverRPM device and this time I measured the blue curve:
This suggested that one or more of the spark snubbers had died, causing short circuits during the rotation of the rotor of the motor. I extracted the motor and opened it up again. This shows the motor with the original spark snubbers (yellow devices on ring on top of the coils):
I removed the original snubbers. This shows them together with the modern bidirectional TVS devices that I use as replacement:
I soldered the TVS devices in place
and installed the reassembled motor back in the Beogram for another RPM stability measurement. This time I received the nice red curve in the above graph, i.e. it was indeed the spark snubbers that gave out.
I will now play this deck for a bit longer, and if nothing else comes up it will be time for this Beogram to be picked up by its owner!


