Featured Post

Beolover SyncDrive: DC Platter Motor Replacement for Beogram 4002 and 4004 (Type 551x and 552x)

Late Beogram 4002 and the 4004 (Types 551x and 552x), which have DC platter motors instead of the earlier synchronous AC motors usually suff...

Showing posts with label playing records. Show all posts

Saturday, August 21, 2021

Beogram 8002 From North Texas: Completed and Connected to a Beomaster 6000

In the last post I showed that the Beogram 8002 was only missing a few bumper pads (2 for the dustcover and 1 for the metal accessory compartment lid).  

I made some new pads and installed them. They fit tight enough to just press into place. That way they can be removed without too much trouble in the future.


Here is the completed Beomaster 8002 after a bit of final polishing.


I decided to use a Beomaster 6000 and Beovox MC120.2 system to do the listening tests with the Beogram.


For the first record to play I selected a new copy of Kenny Burrell's "Midnight Blue" album. It is a re-issue of his 1963 release on Blue Note records.

I don't listen to my Beomaster 6000 and MC120.2 speakers as much as I should. They are in the same room as some Yamaha NS-10M, Yamaha NS-1000M, Beovox MS150.2 and Beovox M100.2 speakers so they get overlooked.

They sound great though so I will enjoy the next couple of weeks testing out this restored Beogram 8002. I installed a nice MMC-2 cartridge that plays beautifully.


Coming up...Another Beogram 8002 restoration.

Friday, May 28, 2021

Beogram 8002 From North Carolina: Finishing the Reassembly and Playing Records

I really wanted to start listening to this Beogram 8002 today so I continued on from the previous post and finished the reassembly of the turntable.

The remaining reassembly tasks were to attach the dust cover, tonearm compartment lid, hinge bar and a couple of trim pieces.

I started with the dust cover and the tonearm compartment lid mount. Both of those attach to the back of cabinet with the long metal bar hinge. I lined things up, applied a little dry lubricant on the bar and slid it through the hinge mounts to secure the lids.


Notice how flat the back of the dust cover lid looks now that the hinge back part has been changed (from the original cracked one). 


With the dust cover in its closed position I checked how two new dust cover lid spacers I printed up fit.
They work really nice as replacements for the original pads that had deteriorated.


Before I install the leaf spring damper to the dust cover lid I changed focus over to the tonearm compartment lid. It needs to be reattached to its hinged mounting piece with some of the same 3M VHB tape I used on the deck panel. 

While the tonearm compartment lid has been off I refilled the damping mechanism for its lowering lever with new damping grease (Nyogel 767A).

Here is the reassembly of the tonearm compartment lid.


Now I can finally install and setup the dust cover damping spring assembly. It seems kind of funny finishing up with the thing that started out all of the cabinet problems.

The installation was non-eventful (as it should be). The leaf spring fat end fit under the set screw while the narrow end fit into the bracket that presses the rotating hinge against the stationary hinge (mounted to the dust cover).  The adjustment of the leaf spring tension was easy and the task was soon done.


The hinge bar remains straight now and the dust cover damping works properly.

The last two pieces were the trim piece to hide the dust cover damping mechanism and the small, metal lid that fits under the tonearm assembly.


This now looks like a proper Beogram 8002.

I grabbed an MMC-2 cartridge, a Beogram 8002 phono cable and moved the Beogram to my office stereo. The first record I grabbed was a new pressing of Band of Gypsies by Jimi Hendrix. It is a live recording I have always liked and should sound great on the Beogram 8002.


I gave it a listen as I created this post.  It doesn't get much better than this.  

Monday, December 31, 2018

Beogram 4004 Type 5526: Second Beogram 4004 from Texas service manual checks to playing records

I reached the home stretch of this Beogram 4004 turntable. It was almost as pristine as the first one but did require a few adjustments per the service manual.

Running through the service manual checks I started with checking the sensor signals from the carriage position sensor and from the fixed arm. Because the LED lamp was changed for the carriage position sensor I needed to make sure the voltage on the sensor, 4IC1, is 5V when the sensor is on a clear part of the moving position scale.


That sensor and new LED lamp are now adjusted where they should be.

For the new Beolover lamp assembly in the fixed arm for the record detection the voltage on the collector side of 1TR3 should be a steady 4V when a record is present or the platter is off.


That measurement was initially low so I had to raise the collector voltage using the new 2MΩ multi-turn trimmer I installed in place of the original, fixed 1MΩ resistor 1R26.  The reason for that is described in this Beolover post.

Now that the voltage level at the collector of 1TR3 is set I checked what the actual pulse signal looked like when the platter is installed and turning.


A nice healthy detector arm signal from an empty platter. I think it is safe to press the fixed arm's sensor assembly back into the arm.


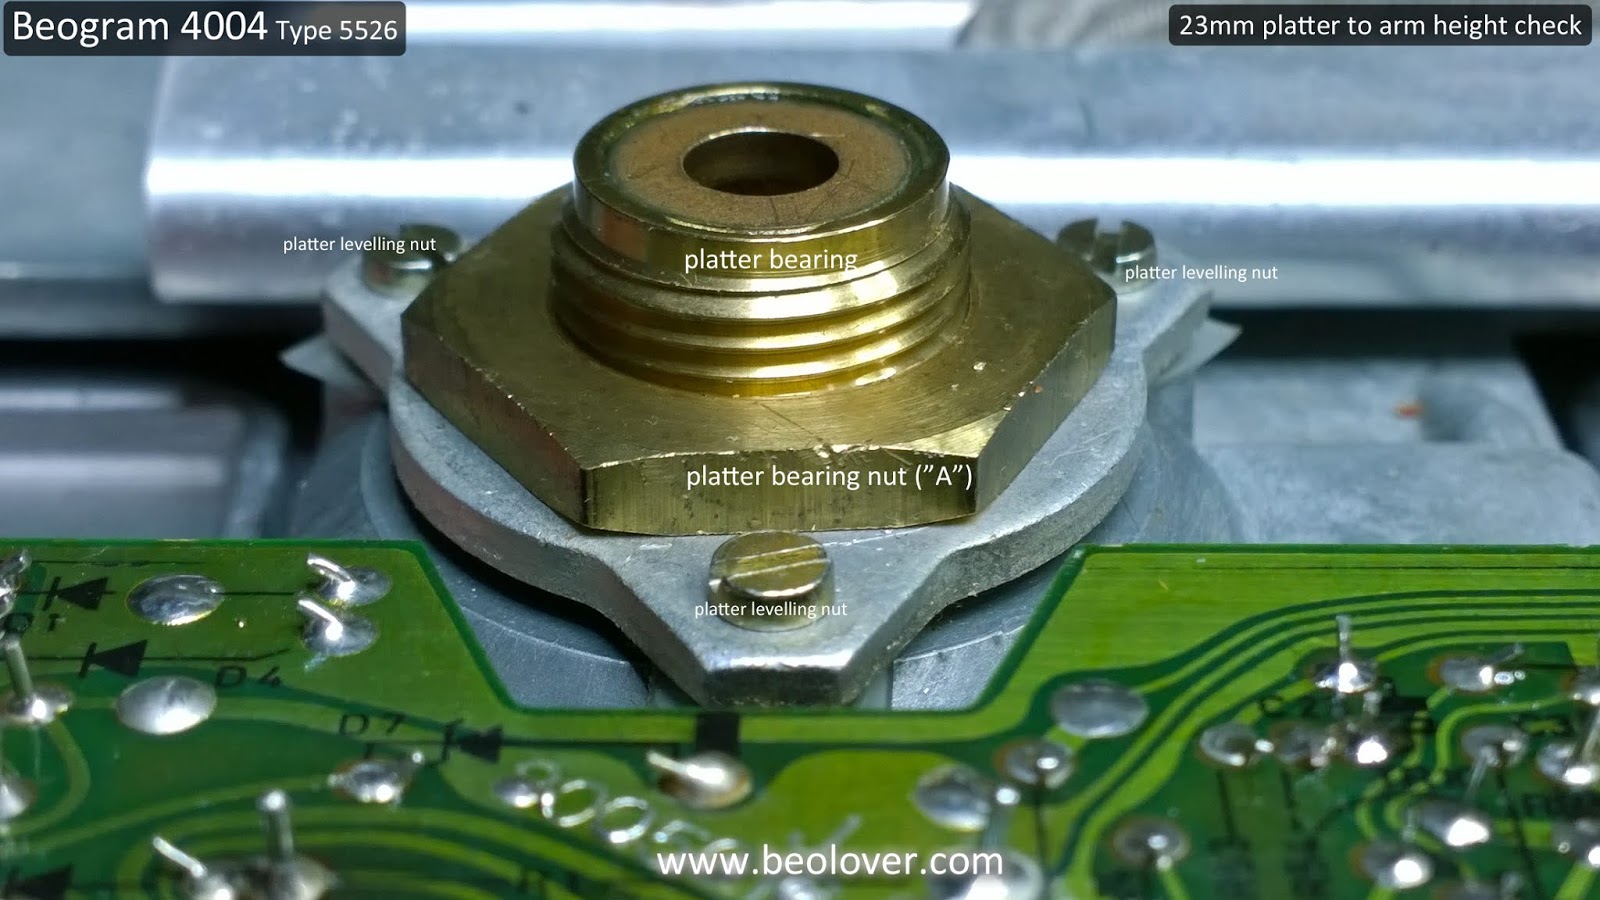
On to the platter to tonearm mechanical height adjustment. The platter was a little low on this Beogram. It should be 23mm from the deck of the platter to the top of the fixed arm.


The platter height (and levelling) is done with the platter main bearing assembly. The large nut is loosened so the threaded bearing can be rotated up or down as needed for the adjustment.


In this case I needed the platter to be lowered a little bit.

I check the height at the edge of the platter and at the center.


That is right on the money.

During the platter height check I determined that the platter needed a little levelling so I adjusted those screws as well.

The next mechanical type check is for the arm lowering limit. For this check the stylus should be about 0.5mm above the low rib of the platter. That provides a little bit of cushion should the arm try to drive towards the center of the platter without a record. The stylus hitting the high rib of a rotating platter could easily shear off the stylus.


The stylus/tonearm distance check is done with a string from the center spindle of the platter to the edge of the turntable. I can use the string to make sure the travel of the stylus remains on the center line.


The cartridge tracking force check showed it needed some recalibration so I adjusted the tracking force gear position to bring it into line. I calibrate it for 1 gram.


This Beogram 4004 restoration installed a new tangential tracking sensor lamp assembly (a Beolover custom part) so I figured I would have to go through that whole adjustment procedure and I did.

The platter belt is removed and the adjustment calls for manually rotating a test record with the platter engaged and observing when the tangential drive motor advances the arm assembly. On initial lowering of the tonearm on a record the platter should go through two rotations before the arm assembly is advanced. After that it should advance on every rotation.


The following pictures show the adjustment screws.


It always takes a few iterations but eventually it was set per the service manual.

I attached the platter belt again and performed the platter motor speed adjustments.


It is very nice to have the Beolover RPM measurement tool and both speeds adjusted easily with the new multi-turn trimmers I installed on the controller board.

The final adjustment steps were strictly cosmetic, mechanical adjustments. I made sure the cabinet deck and platter were level and the floating suspension worked.


The Beogram 4004 turntables still look amazing!

The first real record play was next and I fully expected it to play great as all of the tests passed. No problems. I moved the Beogram to my office and put on an MMC-20CL cartridge followed by some seventies big band music.


The dust cover on this Beogram 4004 could use a little polishing so I will have to do that as the last step...but first I am going to reward myself with a nice, long listening break.

Thursday, July 5, 2018

Beogram 4002 (5513): First Record Play Testing

Finally....time to see how this restored Beogram 4002 (5513) turntable does playing a record for listening pleasure.

First though, a couple of pictures showing some tidying up of some loose ends. In the last post I neglected to post the pictures of installing new cabinet guides and the rework of the phono cable.
So before showing the first record play photos here are a couple of pictures showing the Beolover Beogram 4002 3D cabinet guide parts.


There are five total cabinet guides. The last photo shows the lone black one that is used for the front center of the cabinet so it isn't noticeable. Note that these are not washers. The cabinet guides hold the plinth in place but allow it to slide forward and backwards for opening up the Beogram cabinet. The early Beogram 400x turntable guides were made out of a brittle plastic that almost always broke. In the later model Beogram 400x turntables B&O switched to a metal guide to fix the problem. The Type 5513 Beogram 4002 was before the metal guide came out. Even though they are just a small part they make a big difference. A lot of people will just substitute flat washers but they don't provide the function needed.

Now the phono cable. The original DIN plug cable had already been replaced and while the replacement was a nice cable I didn't like the way the wires terminated in the P9 plug to the Beogram phono output board.


I removed each P9 pin and reworked the wire connections. The wires connected to pins 2 and 4 are not used so I removed them.


Here is the reworked cable plugged into the Beogram phono output board. I reused the blue wire and its P9 connector for the left and right channel shield wires. The small switch we install allows the option to short the shield wires to the chassis ground wire or leave it open.


That is a lot cleaner looking. I can live with that.

Time for some lively Jazz from Buddy Rich.


I have used those for Beogram play tests before and keep using them for some reason :-).

Next the Beogram will go through a day of testing like this while I make sure the set down positions are good, the phono muting delay is satisfactory and there are no tracking problems. Once those things are satisfied I will install the remaining cabinet pieces and go through a week of listening tests before this Beogram's owner picks it up.

Thanks to Beolover by the way for another excellent job on parts and the platter motor restoration.