Featured Post

Beolover SyncDrive: DC Platter Motor Replacement for Beogram 4002 and 4004 (Type 551x and 552x)

Late Beogram 4002 and the 4004 (Types 551x and 552x), which have DC platter motors instead of the earlier synchronous AC motors usually suff...

Thursday, October 26, 2017

Beogram 4002 (5521): A Stuck Tonearm and Polishing the Hood

A Beogram 4002 (5521) that I restored a while ago came back with a tonearm that would not track anymore properly. It turned out that the tracking sensor aperture had shifted down and was now touching the sensor housing. This impeded the lateral movement of the arm. The repair was simple: Loosen the screw that holds the aperture to the base of the arm assembly and move it up a bit until the arm moved freely again. To prevent this from happening again I installed a better screw. This shows the original screw:
I never liked these simple sheet metal screws since they are difficult to tighten properly with the Philips head etc...A much superior solution is a flat socket head M2 12 mm screw :
Since it is countered by a nut, it can be tightened well. So I am hopeful that this will be a durable fix. After this modification I calibrated the tracking sensor feedback to spec, and that concluded the repair.

My customer took the opportunity to also get the hood polished while I had the unit on my bench. We did not do that during the first visit of this Beogram. The hood had the usual 'ice skating' swirls on it plus a few more damages:
I gave it the usual treatment, starting out with 320 grit sand paper to get rid of the damages and even out the surface. After that was done, I polished it back through a number of ever finer grits until it was nicely translucent again:
Time to send this Beogram back to its owner.


Tuesday, October 24, 2017

Beogram 8000: Unpacking and Preparing for Use

We often get Beogram turntables sent to us for restoration where the suspension lock down screws are not engaged and the phono cartridge is left on the tonearm. In a lot of those cases it is due to the person sending us the turntable not knowing about the lock down screws and the dangers of leaving a cartridge on the tonearm. With the cartridge I think that it is sometimes left on because the person is a little gun shy about removing it from the tonearm.

When we restore a Beogram and send it back home we pack it very securely. That means removing and packing both the platter and cartridge separately. It also means locking down the suspension.

For Beogram owners that get their properly packed Beogram turntables back home the following pictures show how to prepare the Beogram for play again.

Unlocking the locked suspension just requires a medium size, flat head screw driver. There are three lock down screws that hold down three round, metal plates.


The flat head screw driver is used to back off the locking screws from the round metal plate.


Once the locking screw head is backed out high enough the metal plate is free to rotate. The plate is rotated to line up the larger hole with the locking screw. This is so the screw can be lowered down below the plate where it is out of the way for record play.


When locking down the suspension or unlocking it, make sure not to over tighten the screws. They only have to be snug.


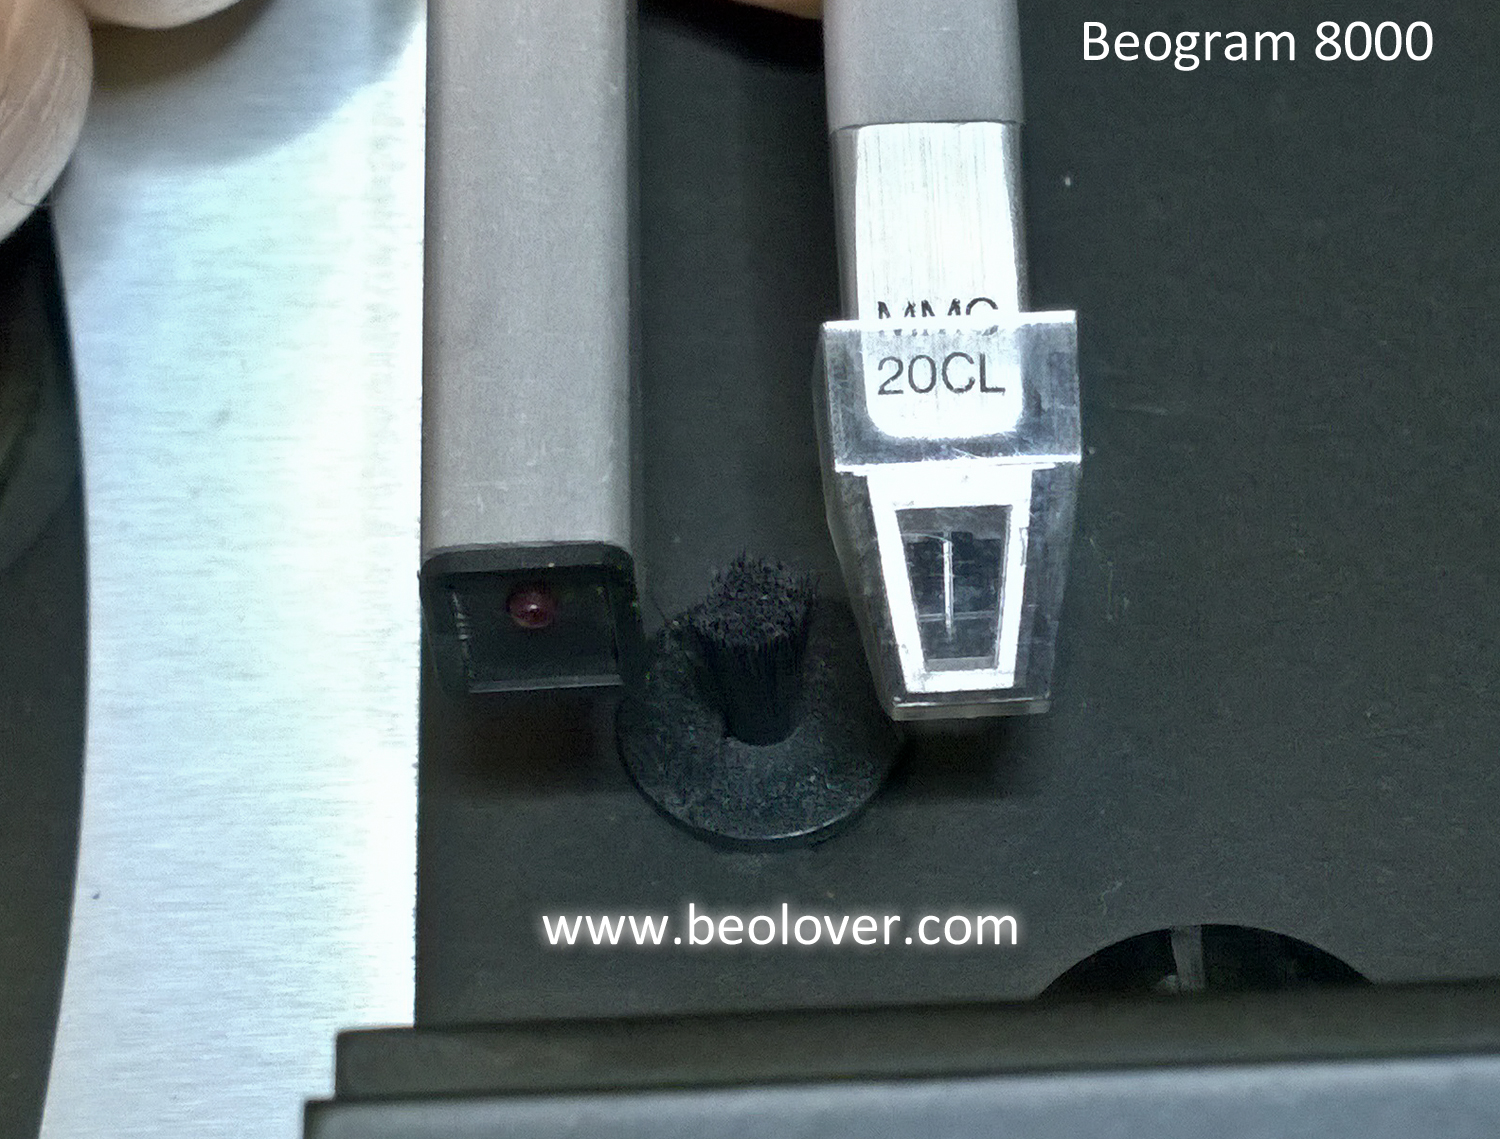
The next step before using the Beogram is to mount the MMC phono cartridge.

Check the tracking force dial and make sure it is set to the tracking force you need for your cartridge. I am using 1 gram for an MMC-20CL cartridge.


To mount the phono cartridge to the Beogram I grasp the tonearm with my thumb and index finger so it can't move.


With the other hand I push the cartridge onto the end of the tonearm. Note that the connector angles down slightly.


It usually requires firmly pressing into place so be careful. That is also why I leave the stylus guard on the cartridge when I do this. This will prevent accidental damage to the stylus and cantilever.

Once the cartridge is in position the stylus guard slides off and is stored away. Don't discard it!


The turntable platter is set in place and this Beogram is ready to play records.


Sunday, October 22, 2017

Beogram 4004 Type 5526: Keypad Contact Cleaning

My Beogram 4004 project is about ready to wrap up. The dust cover has been polished and the keypad surface was refurbished at Beolover's workshop. After reassembling everything I found that some of the keypad buttons were not responding consistently. That usually means the contacts are dirty so I removed the keypad contact board to take a look.

Sure enough there was quite a bit of oxidation.


The contacts look pretty tarnished but it isn't anything a fiberglass brush can't fix followed by some Deoxit contact treatment.

This looks much better.


The Beogram 4004 controls are now working perfectly again.

Saturday, October 21, 2017

Beogram 4004 (5526): A New Arrival and a First Look

A Beogram 4004 (5526) recently arrived at my bench for some TLC. This unit came packaged 'by the book' (or rather 'by the video...;-)...check out the video here). Double boxed and with an ample amount of padding. Nonetheless, a (probably nascent) crack in the hood developed fully, probably caused by the vibrations that occur during transport:
I carefully removed the hood from the deck to limit possible damage to the other side of the hinge. Then I lifted the aluminum strips up on the sides to unscrew the hinge from the hood.
This is the usual location where cracks develop in Beogram 400x hoods since the bolt holes represent the structurally weakest point, while the highest forces act on this part of the hood when it is opened and closed. The only good news here is that this can be fixed in a way that it is almost invisible. On the occasion of a cracked hood on a Beogram 4000 I recently developed laser cut plexiglass patches that match the bolt holes and the shape of the area under the aluminum strip. See here for a discussion.

After packing the hood away for attention at a later point in the restoration process, I assessed the Beogram. It is in fairly decent condition with only little damage to the aluminum surfaces and the wood plinth:
The keypad has the usual finger smudges, but they did not cut through the coating yet. I removed the aluminum panels and the platter:
It seems it is original as far as I can tell with no obvious signs of 'human creativity'. This is always a good starting point for a restoration. I put the platter on and plugged it in. It started up normally, but I was not able to switch it to 45 RPM. So there is an issue somewhere in the electronics. Maybe it just needs a new RPM relay. We will see...In summary, this unit is a pretty good starting point for a restoration and it will be close to new condition once I am done.


Beogram 4004: Restoration of DC Motor, Main PCB and RPM Adjustment Panel

I recently received a package from Denmark containing the DC motor, the main PCB and the RPM adjustment panel for restoration. Restoration of these three components of a DC motor Beogram can cure RPM stability issues reliably. So I set out to rebuild the PCB with new 105C electrolytic capacitors of Japanese origin. I also installed new RPM trimmers and a new RPM relay. This shows the board in its original condition:
Here an impression after the restoration:
And a detail shot from the RPM control circuit:
This shows the RPM relay in comparison with the original National relay:
Like all Beolover parts featured on this blog, these replacement relays are available to other enthusiasts. Just send an email or use the contact form on the right.

On to rebuilding the RPM adjustment panel. This shows it in its original condition with the bulb covers on:
With the covers removed:
Bulbs taken out:
And LED boards installed:
This shows the LED boards:
They are drop-in replacements based on red/green LEDs that are run in a ratio to yield an approximation of an incandescent bulb emission spectrum. This two-LED approach ensures that there are red photons to illuminate the red RPM scale hands. If amber LEDs were used, the hands would  appear grey if there is no additional incandescent room light present.

This shows the covers back in place:

The final step was to rebuild the DC motor. This shows the motor:
Extracting the oil-hungry bearings requires to taking it apart completely:
Inserting the bearings into oil and pulling a vacuum resulted in the usual bubbling, indicating that the oil infusion process started:
After about 24 hrs the process stopped and I retrieved the bearings from the oil. After soaking up excess oil on the outside
it was time to put the motor back together and do a 24 hrs RPM stability test with the Beolover RPM device to ensure that this restoration was successful. 
Aside from precisely adjusting the RPM, Beolover RPM also allows logging the RPM performance in 10s intervals for extended periods of time. It is available to other enthusiasts who want piece of mind that their Beograms are on top of their RPM game.

This is the 24 hrs RPM stability curve that I measured for this motor as it was controlled by the restored main PCB and RPM adjustment panel:
The RPM fluctuations are well below the discernible level, i.e. the control system of this Beogram is in good shape again.

Friday, October 20, 2017

Beogram 4002 (5523): Final Adjustments, Repair of a Damaged Pinth Corner and Test Drive with Bobby Hutcherson

The restoration of the Beogram 4002 (5523) that I have on the bench right now is coming to a close. After implementing new gold coated RCA plugs I adjusted the sub-chassis and the plater height and cleaned the aluminum surfaces thoroughly. The next step was to adjust the arm lowering limit to ensure the needle misses the ribs on the platter should the record detection mechanism ever fail:
Next was the calibration of the tracking weight scale. As usual, I upgraded the counter weight adjustment mechanism with a M3 nut replacing the flimsy circlip that is installed originally. This shows the original setup:
And with the tightened nut and washer installed after balancing the arm:
This makes the weight calibration much more resilient against the 'rigors of transport'.
Now it was time to adjust the tracking weight:
Before I connected the deck to my Beomaster 6000 for a test spin, I fixed a small chipped off area in the plinth:
It is always the corners that are damaged...I cut a small piece of veneer to size and glued it into place. After letting the wood glue harden, I cut off the overhang with a razor blade:
I think this looks much better. Adding some wood polishing compound later on will further improve the look. I think in a '20/20 setting' this plinth looks quite passable now.

Time for the test drive! I selected a recent acquisition to the Beolover's vigorously expanding vinyl collection: Bobby Hutcherson's Solo / Quartet album from 1982. This album is very underrated in my opinion. Especially the Solo part on side 1 is a very unique composition that shows an entirely different side of Bobby Hutcherson's talent. Incredibly smooth and lush it is ideal for a quiet evening working away on Beograms! According to the liner notes, he composed it while recovering from an injury of his index finger caused by a 'power lawn mower mishap'. I guess another demonstration that misfortune can result in unexpected outcomes and benefits. Here is an impression of the Beogram playing this lovely album:
Of course this album was ultrasonically cleaned with a CleanerVinyl set-up.

All that is left is to do is to polish the hood...time for a 3 hrs workout with the polishing block!!!..;-)


Thursday, October 19, 2017

Beogram 4002 (5523): Replacement of Corroded RCA Plugs

The Beogram 4002 (5523) that I am restoring right now was outfitted with RCA plugs and a grounding wire instead of the standard DIN 5 connector. As usual the plugs and the grounding terminal were grimy and corroded:
I replaced the RCA with all-metal gold plated plugs and I installed a new grounding terminal:
For some reason these nice compact RCA plugs do not come with a color coding, so a while back when I started using them in my restorations I designed 3D printed inserts that close off the back of the plugs and give them a distinguishing mark for the left and right channels:
On to the final adjustments and a test drive of this lovely Beogram!