Oh well! I recently received a Beogram 4002 (Type 5503) from a customer in Arizona with the indication that 'it does not lower the arm anymore'. I had restored the unit only in Dec. 2022, so this was a bit early for my taste to see it again!
After I removed the aluminum panels it became immediately clear why the arm would not lower again!:

The solenoid had completely melted down! I measured its resistance and it was about 1.2 Ohms. Normally it should have about 9 Ohms. Why this happened also became clear quickly. My solenoid arm extension part did not hold up. It cracked in a very similar way like the original arm extensions:

Because of this weakened arm link the solenoid switch did not get activated anymore and so the solenoid ran at full power even after the arm had been lowered. At some point the insulation of the coil wiring burned off, short circuiting the coil and that was the end of the arm lowering function.
I extracted the solenoid

and took it apart:

Then I made a new coil. Luckily I recently learned how to do that:

This shows the new solenoid installed in the original bracket:

After I implanted the solenoid I had to realize that it would not activate at full power. This turned my attention to the solenoid switch. I found it to have a too high resistance when closed. And that caused the solenoid to be underpowered. Maybe the switch-terminals also suffered during the solenoid burnout. But it also did not click properly when activating it manually, so there was something wrong with its mechanics, too.
Since these switches are not made anymore, I had to figure out a 'modern replacement'. Immediately, I thought about the end switches used in 3D printers. They have a suitably small form factor, but they usually are only rated for switching DC currents up to an amp or so. Not enough for handling the typical 3-4 Amp current in the Beogram solenoid when it is activating.
After a bit of thought I decided to try using a power transistor for the 'heavy lifting', and the switch only for activating the transistor. This approach promised reducing the mechanically switched current by about 2 magnitudes since the current gain of such transistors is typically in the 100x range. In other words the switched current promised to only be in the sub-100mA range.
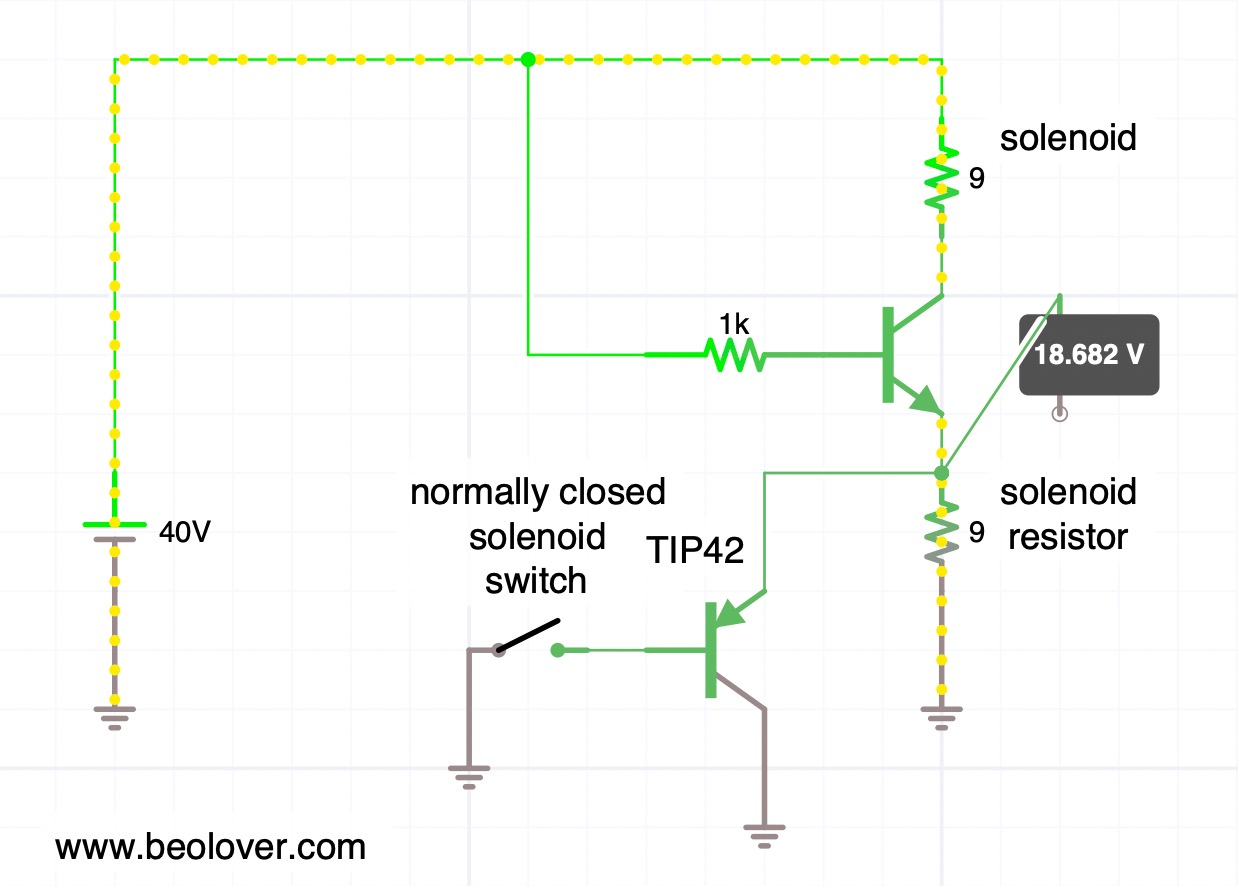
This is the simple circuit that I implemented using a end switch connected as a normally closed switch, so the TIP42 pnp transistor would be on when the solenoid is initially fired up to sink the solenoid directly into ground. This is the situation shown here (yellow beads show the main current flow):

You see that the simulation shows a voltage of about 0.7V at the emitter of the solenoid transistor. This means that the solenoid sees almost 40V driving it with about 4.3 amps based on its approximate 9 Ohms resistance.
After the solenoid activates and pushes its plunger out the solenoid switch gets hit and the TIP42 turns off, sending the current solely though the solenoid resistor. This causes the voltage across the solenoid to be dramatically lowered and with that the current gets reduced:
This situation is maintained during the play of a record when the arm is down.
This shows this concept put into practice on the solenoid switch PCB that I extracted to be able to work on it:

I found the best switch position by trial and error, and then drilled a hole into the circuit board so I could anchor it with a 2mm bolt in place. The TIP42C is bolted in via one of the two mounting screws of the PCB. The way it is connected still allows the board to be be shifted up and down to fine tune the switch position. This is important to make sure the arm hits the switch in a way that it really switches.
The last task was the re-design of my solenoid arm extension. I got rid of the nut and instead used a self-tapping 2mm screw that would put only minimal stress on the plastic. I added a liberal amount of epoxy in the bolt hole and the compartment that receives the end of the metal arm to keep things from separating. This shows the result:


Let's hope this holds up better!
Here you can see the arm in concert with the switch. First with the solenoid off:

And now with the solenoid activated:

Once the solenoid demonstrated to actuate properly, I measured the voltage across it during the activation process. In this measurement the trace corresponds to the signal measured at the collector of the solenoid transistor (0TR4).
But first I measured a reference signal that I was able to obtain conveniently from another 5503 that I have on the bench currently:

Before activation of the solenoid, the voltage at the collector is essentially the same as the power rail, i.e. ~40V. This means the solenoid has 0V across it. Once the solenoid transistor activates, the voltage across the solenoid increases to about 40V and then, after about 10ms, the solenoid arm hits the switch, and the solenoid gets disconnected from ground, and the current flows through the solenoid resistor instead. This results in a strong voltage reduction across the solenoid and it has now only about 8-10V applied to it. This real-life voltage is less compared to the simulation above. I think it comes from the fact that in the simulation I drive the solenoid transistor with an arbitrary 1k resistor connected to 40V, while in the real circuit a series of transistors (TR14/15/16) drives it with a different current.
What really counts is: Does the TIP42 replacement result in a similar behavior as with the original switch? Happily it does as is evident from this trace that I measured on the implemented circuit:

This trace is hardly distinguishable from the standard circuit behavior and so we can conclude that this may be a good fix for broken solenoid switches!
All good again in the arm lowering department of this Beogram 4002! Beolove is sometimes a bit painful, but only steady improvement leads to perfection. And that is what the Beolover aims to achieve!
No comments:
Post a Comment
Comments and suggestions are welcome!